
Whether you’re looking to add a calendar, a list of events, or a grid, this guide walks you through how to do just that with EventKoi, the modern events calendar built for flexibility and performance.
In this post, you’ll learn:
- Events calendar plugins comparisons – only those with a robust Elementor integration,
- How to create an event (so you have something to display),
- How to create a custom events template in Elementor, and
- How to display a calendar, list or grid of events in Elementor using both free and pro plugins – in 3 different ways
Before you start (what you need)
Here are the pre-requisites you’ll need before you can begin building:
- A WordPress site
- Elementor
- Events calendar plugin (See options below)
Step 1. Deciding on an events calendar plugin
There are many WordPress events calendar plugins out there. We looked at popular options and picked the top three with the most robust Elementor integrations:
- EventKoi
- The Events Calendar
- Eventin
All 3 options have customisable event templates, calendar and events widgets, and shortcodes across their free and pro versions.
Here’s a table for a high level comparison across all three plugins (with more details of each integration below):
| Features | EventKoi Lite + Elementor | EventKoi Pro + Elementor Pro | The Events Calendar (free) + Elementor | The Events Calendar Pro + Elementor Pro | Eventin + Elementor | Eventin Pro + Elementor Pro |
|---|---|---|---|---|---|---|
| Dynamic templates | ❌ | ✅ | ❌ | ✅ | ✅ | ✅ |
| Calendar widget | ✅ | ✅ | ✅ | ✅ | ✅ | ✅ |
| Event widget | ✅ | ✅ | ✅ | ✅ | ✅ | ✅ |
| Dynamic tags | ❌ | ✅ | ❌ | ❌ | ❌ | ❌ |
| Loop grid widget compatibility | ❌ | ✅ | ❌ | ❌ | ❌ | ❌ |
| Calendar shortcode | ✅ | ✅ | ❌ | ✅ | ✅ | ✅ |
Option 1. EventKoi (recommended)
EventKoi is a modern and easy-to-use events calendar plugin. It is a clean and simple plugin with powerful and flexible features, without the bloat.
EventKoi Pro is the only integration that integrates with Elementor’s dynamic tags, which enables you to create fully customisable events lists and templates.
Note: we’ll be using EventKoi for this guide.
EventKoi Lite is free and available on WordPress.org. EventKoi Pro starts from $99/year.
Learn more about EventKoi’s Elementor integration here.
Option 2. The Events Calendar
The Events Calendar is one of the most established events calendar plugins available. It has a large add-on ecosystem by both the plugin company itself and third parties giving you all the features you could possibly need.
The Events Calendar is free and available on WordPress.org. The Events Calendar Pro starts from $149/year.
Learn more about The Events Calendar’s Elementor integration here.
Option 3. Eventin
Eventin is an all-in-one WordPress event manager to let you organize events, manage calendars, and track attendees in one place.
Across all 3 plugins reviewed, Eventin has the most total number of widgets in their free and pro plans.
Eventin is free and available on WordPress.org. Eventin Pro starts from $99/year.
Learn more about Eventin’s Elementor integration here.
Step 2. Create your first event (so Elementor has something to display)
After selecting your events calendar plugin, you can now create your first event.
We’ll use EventKoi for this demo.
Once you’ve installed and activated EventKoi, you can follow the onboarding wizard to get set up.

To test things out, you can choose to use the demo event already created for you.

Or create a new event for yourself by heading to Events, then selecting Create event.

You will then see various event options for you to fill up, including event name, date and time, location, and more.
Once you’ve successfully created your event, you’re now ready to design your event template in Elementor.
Step 3. Customise your event template in Elementor
Begin by creating a single post/page template in Elementor
In the lefthand admin panel, underneath Elementor, click on Templates. Then click on Add New in the submenu, or Add New template at the top menu bar.

Design your events template and customise it with dynamic tags
Inside the Elementor template builder, I’ve add a Heading widget and two Text Editor widgets. Using dynamic tags, I’ve linked the Heading to Event Title, and the first Text Editor to Event datetime and the second to Event details.

This means that every time an event is created, this template will automatically display the event title, date and time, and event details. EventKoi comes with 14 different dynamic tags, so you can add as much or as little event data as you want.
Select display conditions
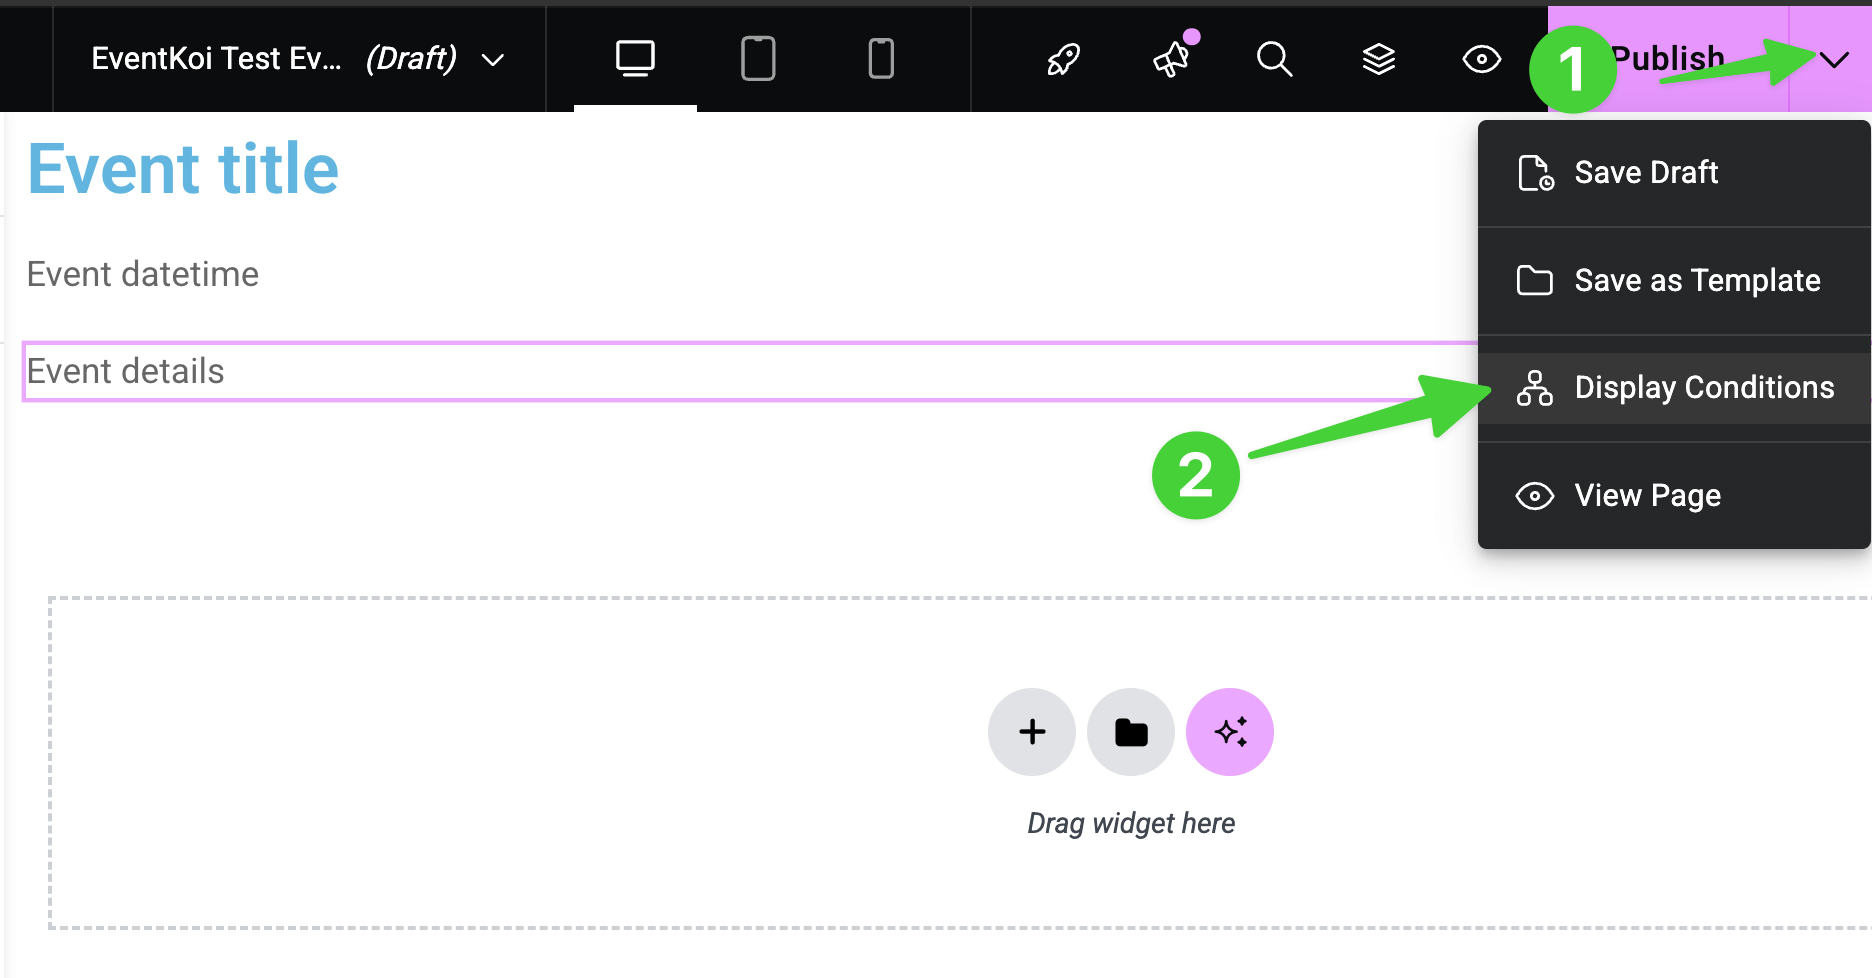
When you are done building your event template, it’s time to use it.
- Click on the dropdown next to the Publish button on the top right hand corner
- Then click on Display conditions
In the Publish settings modal that appears, click on Add condition.

Select Events as the condition, then click on Save & Close.

Assign your new template in EventKoi
Go back to EventKoi, find the event that will use your Elementor template and click to edit it.
Inside the Event Settings, scroll all the way down to the bottom until you see the Event template settings.
Here, you should see a section labeled Elementor. And. beneath it, you should see the Elementor template you created.
Select it and save or publish your event. And that’s it! Your event will now use your Elementor event template!

For a more detailed step-by-step guide, on creating an events template in Elementor, check out our documentation:
Step 4. Display an events calendar, list or grid in Elementor
Now that you’ve created your event and events template, the next step is to display a calendar or list of events so that site visitors can see all the events you have going on.
There are multiple ways you can display an events calendar or list in Elementor. Here, we’ll use EventKoi to cover 3 options – the first 2 are free.
Option 1. Calendar widget (best for communities and schools with many events throughout the year)
Free option: This requires Elementor and EventKoi Lite. Both available for free on WordPress.org.
Start by adding the EventKoi Calendar widget to your Elementor post
- Search “EventKoi” or “Calendar” to find the EventKoi Calendar widget
- Select widget from the left-hand panel
- Drag and drop widget into the main canvas.

Then you can select from several calendar options:

For more information on using the EventKoi Calendar widget, check out this in depth guide:
Option 2. Calendar or List shortcode (best for established websites that are used to using shortcodes)
Free option: This requires Elementor and EventKoi Lite. Both available for free on WordPress.org.
For users that are familiar with shortcodes, this is an easy and straightforward way to add a calendar or events list to your Elementor site.
Here are the shortcodes to use:
[eventkoi_calendar id=insert_calendar_id_here display=calendar]
[eventkoi_calendar id=insert_calendar_id_here display=list]
The downside of this approach is that you cannot change the styling of the calendar like you can with the EventKoi Calendar widget mentioned in option 1.
To learn more about EventKoi’s shortcodes, check out:
Option 3. Dynamic tags and Loop grid widget (best for showing upcoming events and for websites wanting full design control)
Paid option: This requires Elementor Pro and EventKoi Pro.
This option gives users the most flexibility in terms of designing an events list or grid and how they want their event data to be displayed.
You can create a completely customisable events list or grid using two Pro features from Elementor: Dynamic tags and the Loop Grid widget.
Dynamic tags
Dynamic tags display data from elsewhere on your site automatically.
For example, instead of typing the author’s name, you use an Author Name dynamic tag. If the author name changes in the WordPress admin, the name updates everywhere automatically.
How to add EventKoi event data using dynamic tags
To add a dynamic tag in Elementor Pro, first add a heading or text widget (or any other widget that supports dynamic tags)
Then click on the dynamic tag icon.

From here, scroll down until you see the available EventKoi dynamic tags, and insert the one you want.
Loop Grid widget
Many websites show lists of posts, such as events, news articles, or blog posts. The Loop Grid widget lets you design how these lists look, so you can customize them to match your needs.
How to create a Loop Grid for your events
First, add a Loop Grid widget to your Elementor page. You’ll be prompted to create a template for your Loop Grid. This is necessary to create your list or grid design.

You’ll be prompted to drag and drop widgets into your Loop Grid template. You can add whatever you like, but for the purposes of this demo, we’ll just add Heading and Text Editor widgets.

After adding those two widgets, we will connect the event data using dynamic tags (like what we did in the dynamic tags section above).

When you’re ready, click “Save & Back”

Next, finetune your event loop in the Loop Grid widget.
- Locate the Query section and expand it.
- Click on the Source dropdown and select Events
- Then in the Include By area, select Term
- Finally, search which calendars you would like to include

Your events Loop Grid is ready! As the Loop Grid template is completely flexible, you can further style it however you want.

Summary
You’ve now seen how easy it is to take your WordPress events and display them beautifully inside Elementor, with a built-in calendar widget, a simple shortcode, or a fully custom Loop Grid design.
Here’s a quick recap of this post:
- Looked at top 3 event calendar plugins with robust Elementor integrations
- Set up an event
- Customised an events template in Elementor
- Looked at 3 options for displaying a calendar, list or grid of events in Elementor
- Calendar Widget: Best for visual schedules and community event pages (free).
- Shortcodes: Quick embed option for established sites already using shortcodes. (free).
- Dynamic Tags + Loop Grid: Full design control for custom events lists and grids (requires Elementor Pro + EventKoi Pro).
EventKoi gives you a flexible foundation that works with Elementor’s visual editor so you can build event pages that look great and keep your audience engaged.