
EventKoi Lite lets you sell paid or free tickets directly from your event pages using any WooCommerce payment gateway (Stripe, PayPal, Bank Transfer, Cash on Delivery, and others). You can create multiple ticket types per event, set capacity limits, control when sales open and close, and manage all orders from your WordPress dashboard.
This guide covers the broad overview of setting up and selling tickets in EventKoi Lite.
💡 Want native Stripe checkout (no WooCommerce required)? EventKoi Pro includes a built-in Stripe integration so buyers can pay by credit card, Apple Pay, or Google Pay directly on your site. Upgrade to EventKoi Pro →
💡 Want native Stripe checkout (no WooCommerce required)? EventKoi Pro includes a built-in Stripe integration so buyers can pay by credit card, Apple Pay, or Google Pay directly on your site. Upgrade to EventKoi Pro →
Attendee experience
1. Purchasing tickets
When visiting the event page, attendees will see a tickets box with the price range and a button to Get tickets.
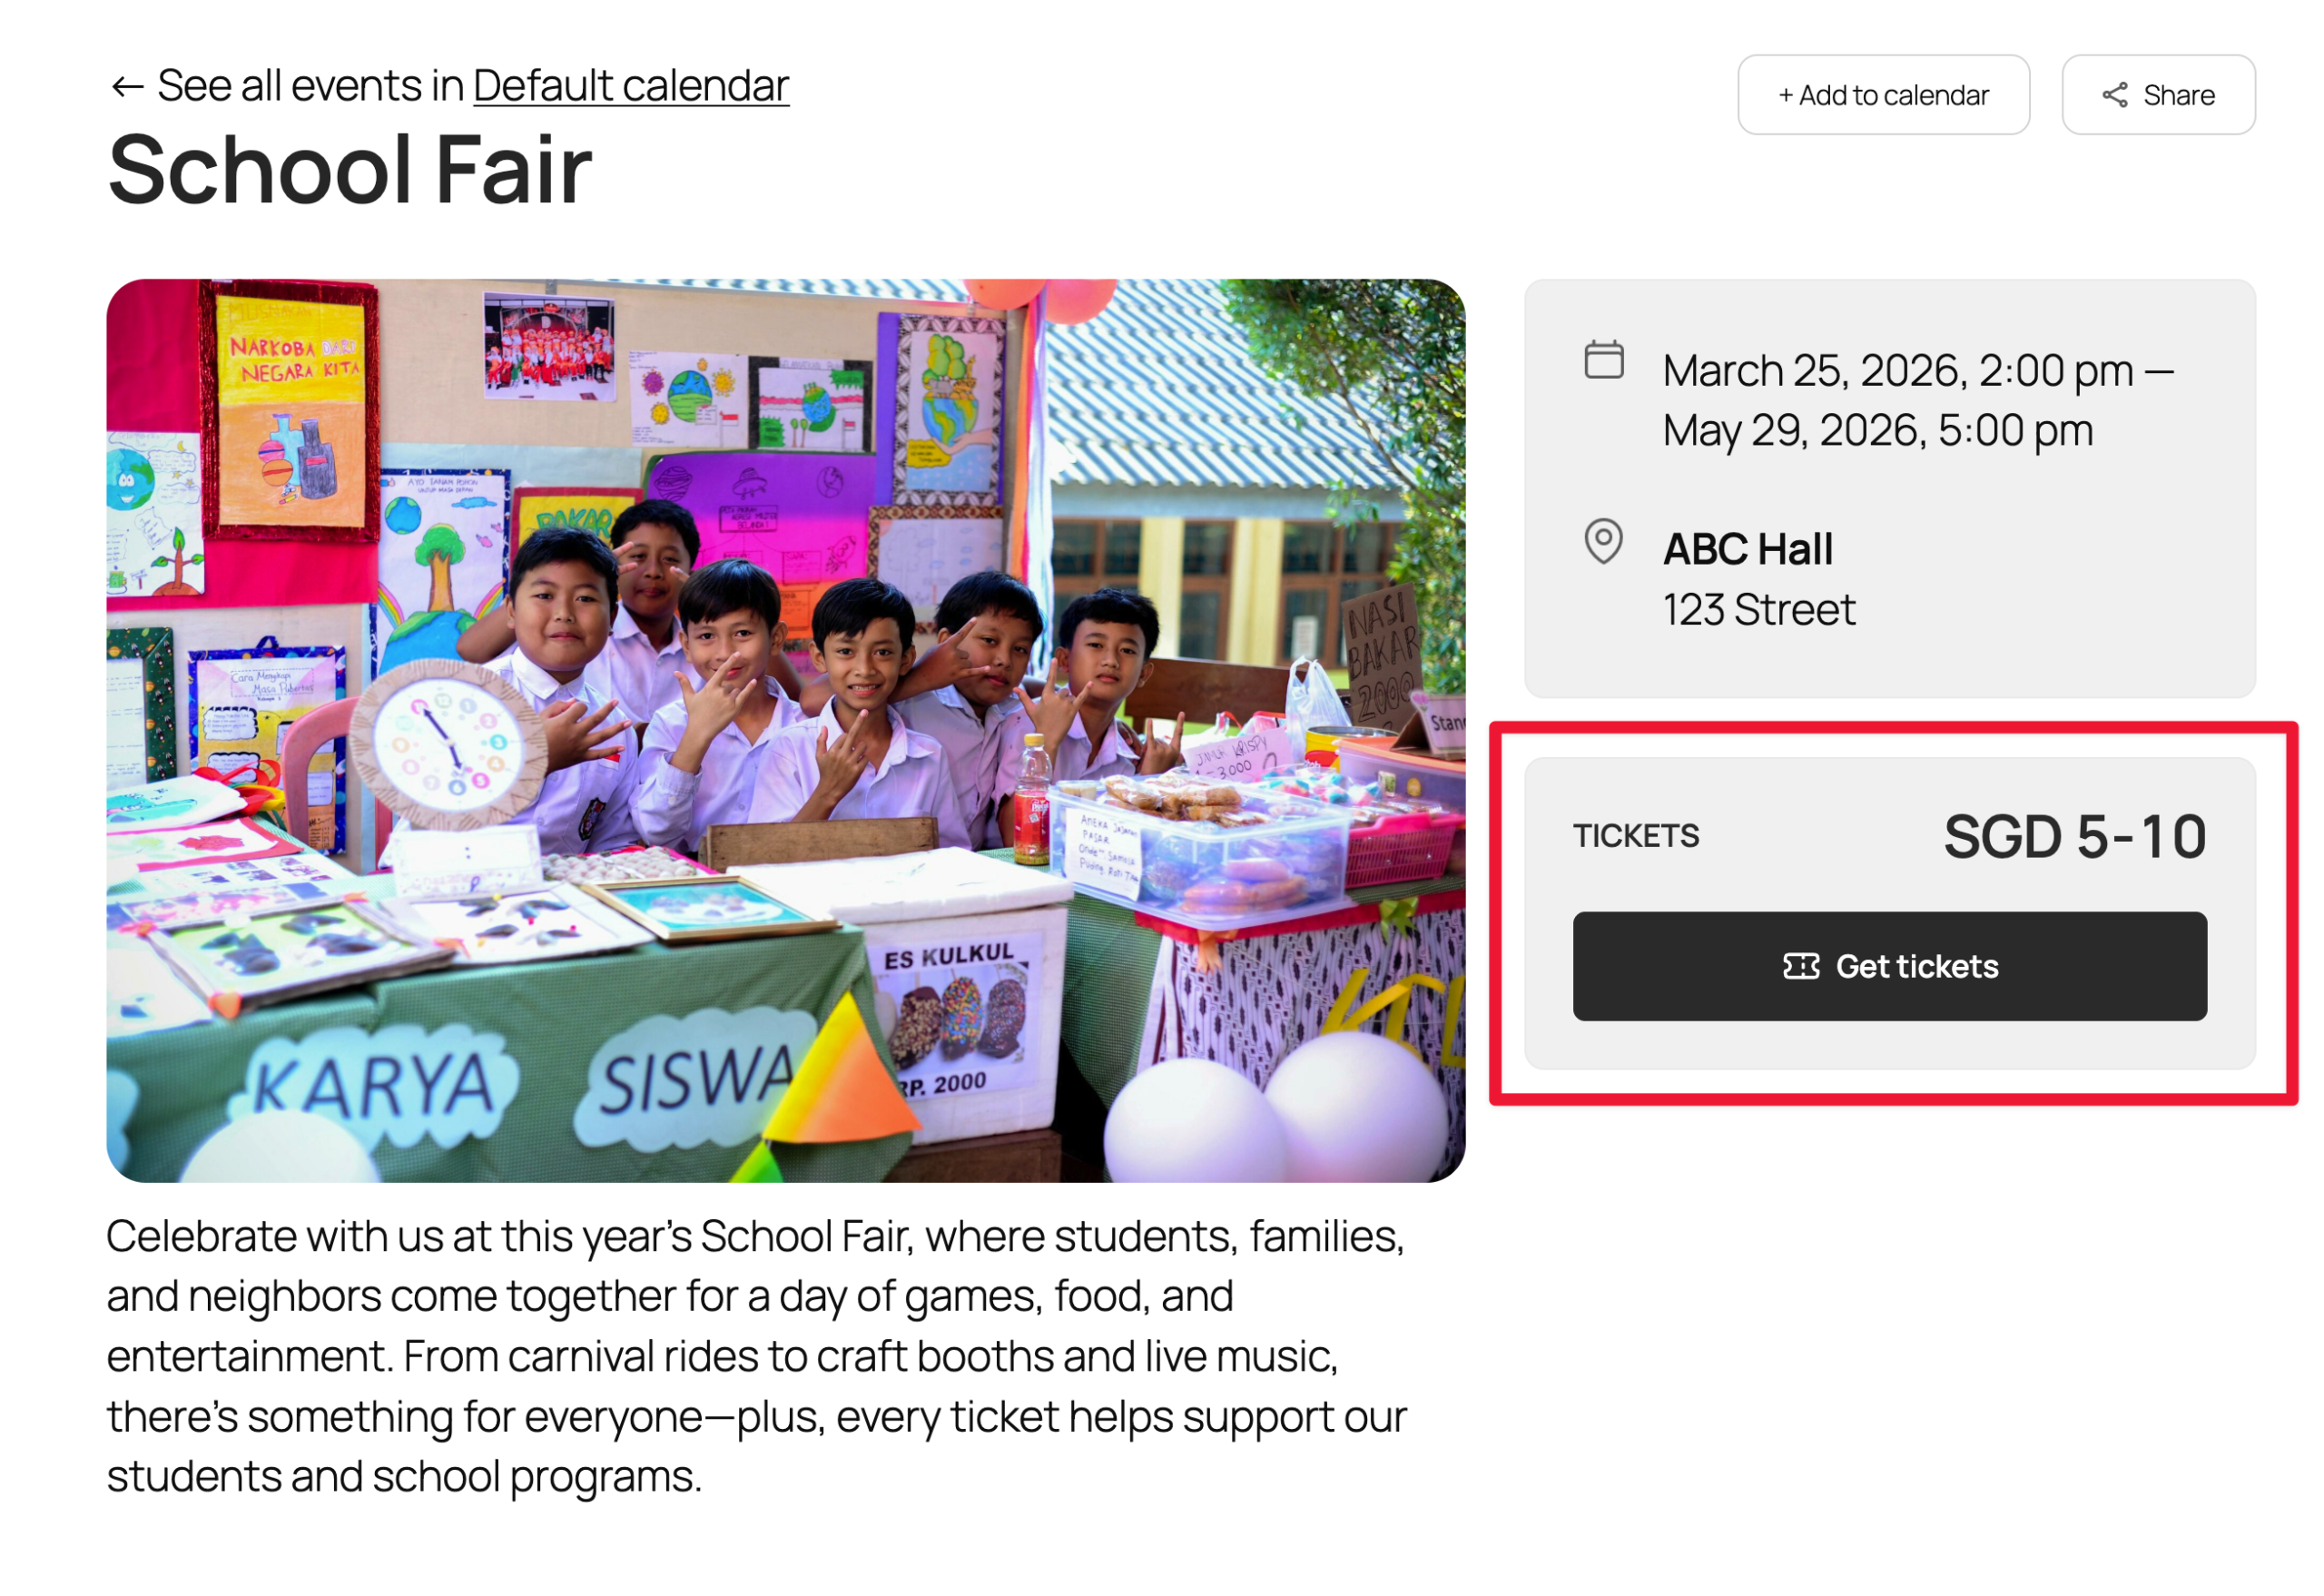
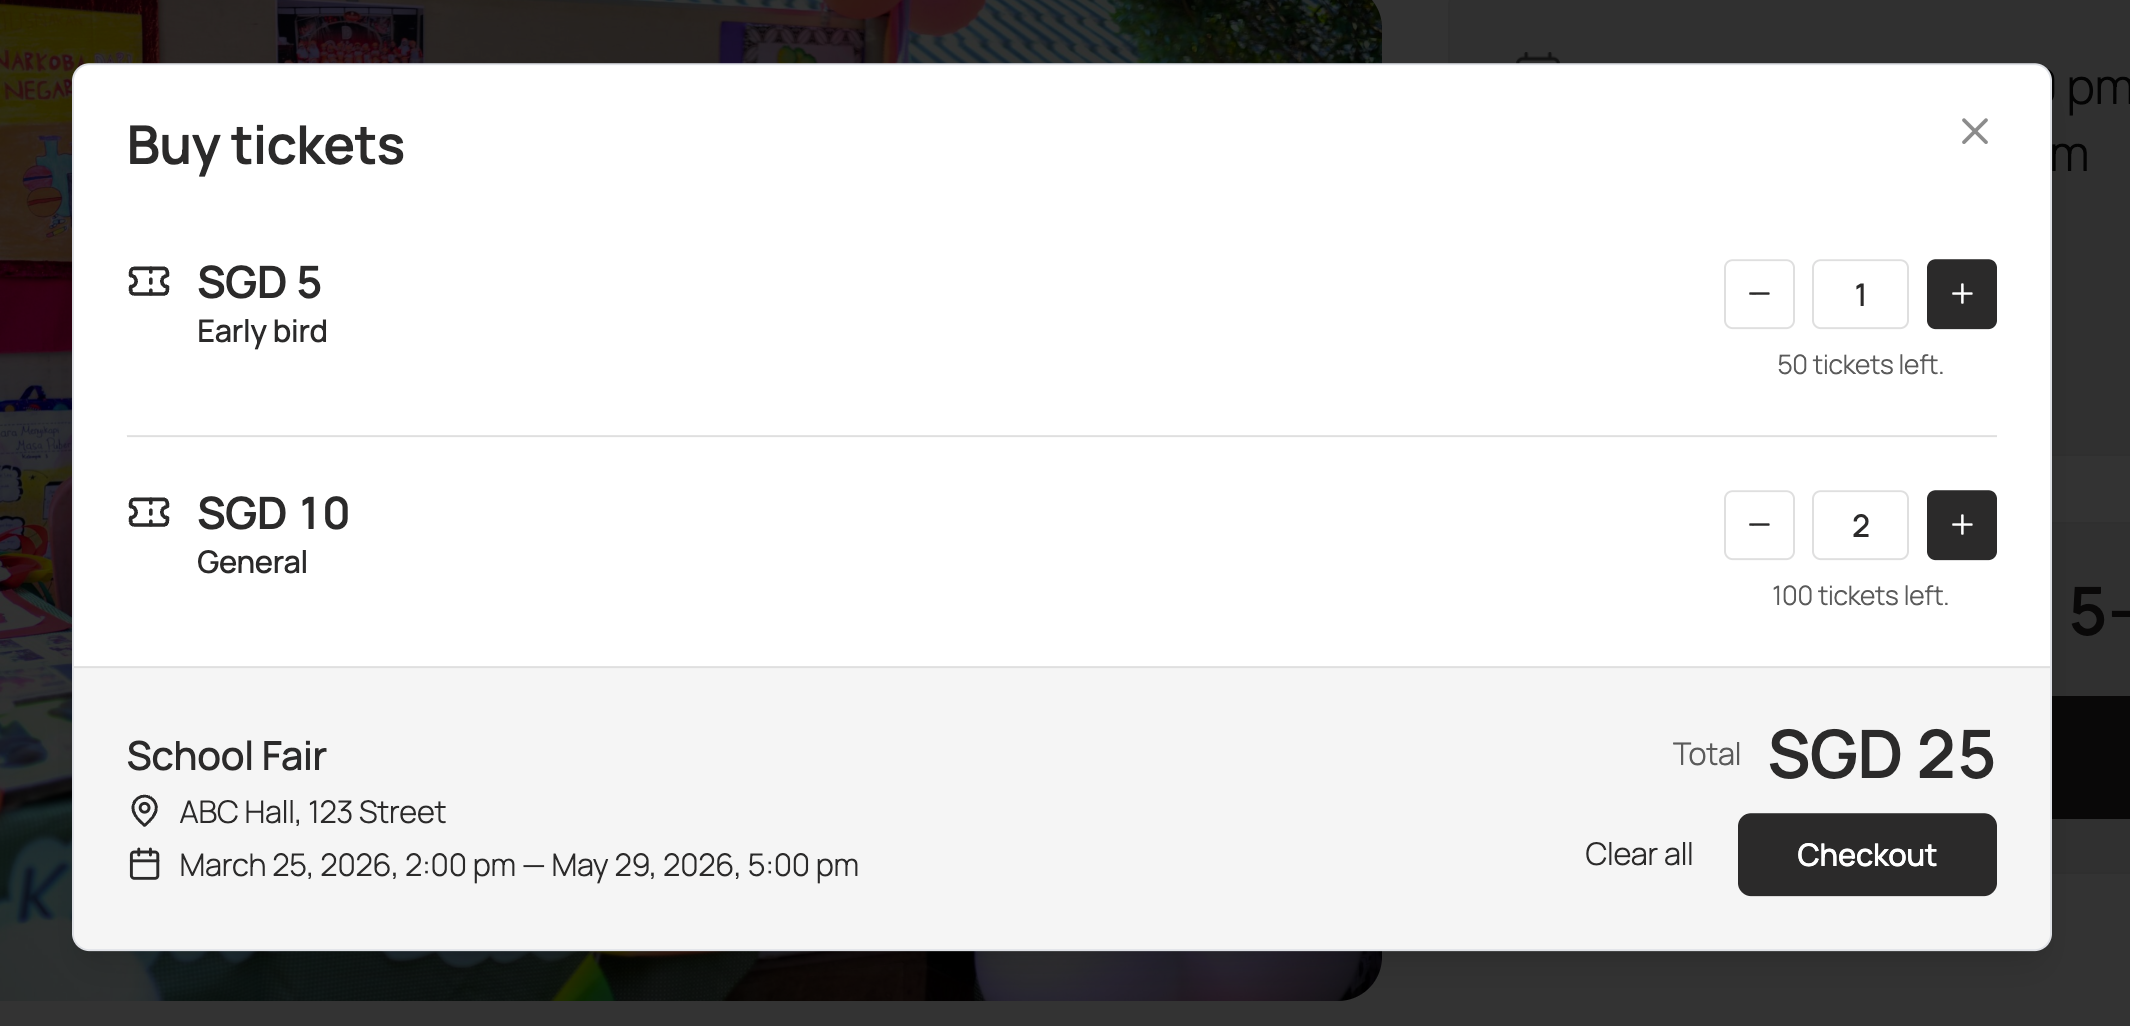
After clicking on Get tickets, they will see the ticket options available, and can select how many tickets they would like to purchase.
From there, they can Checkout.
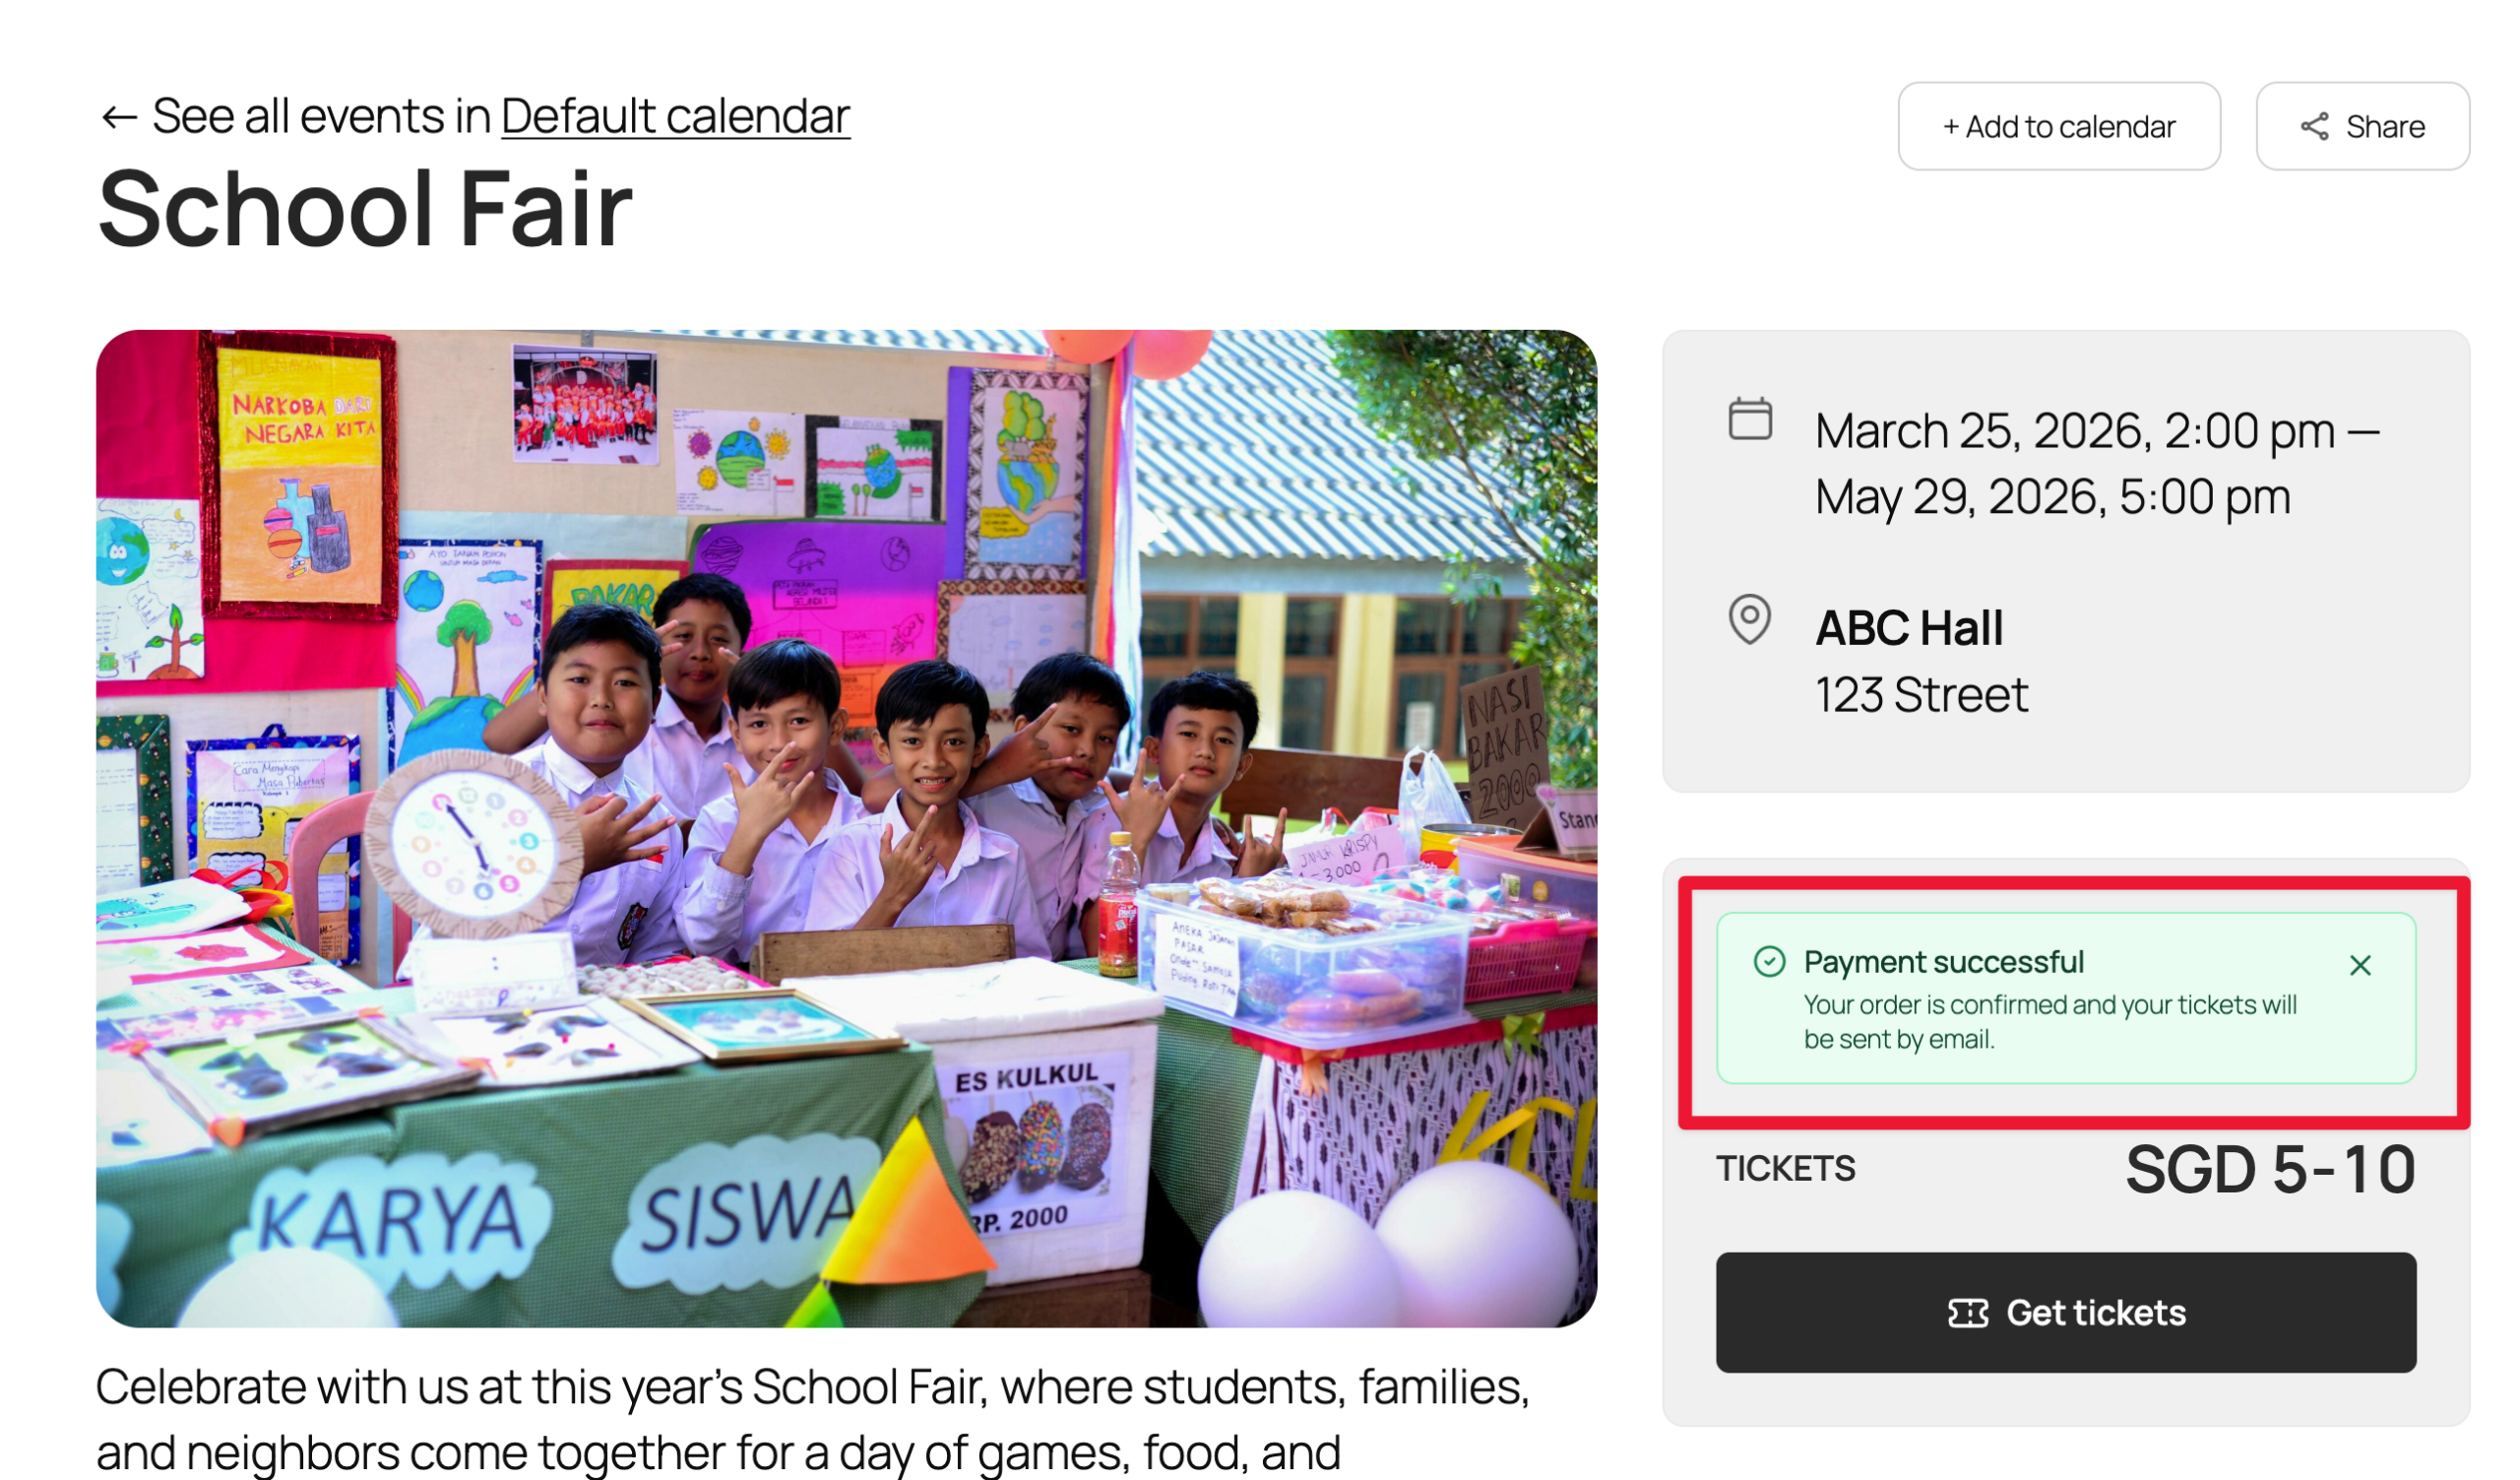
Because EventKoi Lite uses WooCommerce for checkout, attendees are taken to your standard WooCommerce checkout page, where they fill in their billing information and complete payment using whichever WooCommerce payment gateway you have configured (Stripe, PayPal, Bank Transfer, Cash on Delivery, etc.).

Their tickets will be sent to the email address entered at checkout.
Once payment has been processed, the attendee is returned to the event page with a confirmation that their payment was successful and that their tickets have been emailed to them.
2. Receiving tickets via email
This is the email they will receive, which includes their order ID, ticket details, and a check-in code:

3. Check-in at event
On the day of the event, the attendee shares their check-in code with the admin (either by showing the email or reading out the code), and the admin marks them as checked in from the Attendees tab in WordPress.
Admin experience
1. Setting up ticket payments
EventKoi Lite uses WooCommerce as the checkout method. This lets you use any payment gateway already configured in WooCommerce — Stripe, PayPal, bank transfer, cash on delivery, and others.
To check or update your checkout method:
- Go to EventKoi > Settings > Payments.
- Under Checkout method, the WooCommerce option will be selected. The label will read Any WooCommerce gateway if WooCommerce is active, or prompt you to Install and activate WooCommerce if it isn’t.
Currency, tax, and other commerce options are inherited from your WooCommerce store settings.

💡 Don’t want to use WooCommerce? EventKoi Pro includes a native Stripe integration as the default checkout method — no WooCommerce required. Upgrade to EventKoi Pro →
2. Setting up tickets on an event
Tickets are created inside an event. You cannot create a ticket independently from an event. Each event can have one or more ticket types — for example, “Early bird” and “General admission”.
Adding ticket types
In your WordPress admin, go to Events, then click on Add event.

Add in your event details (name, date and time, etc.). Then scroll to Attendance and select Tickets.

When you select Tickets, a new Tickets tab appears on the left side menu. Click on it to create a ticket.

Ticket settings available:
- Option to auto-create an attendee account in WordPress when someone purchases a ticket.
- Option to show remaining tickets on the event page.
- Add terms & conditions for all tickets, or for individual tickets.
- Ticket name, price and quantity.
- Maximum number of tickets per order.
- Ticket sales start and end date. If left blank, sales will start when the event starts, and sales end when the event ends.
- Ticket description.
- You can make a ticket active or inactive, delete the ticket, and create multiple tickets per event.
Free tickets
Free tickets follow the same checkout flow, but no payment details are collected. The order is processed at $0 and the buyer receives a confirmation email with their check-in code.
When attendees click on Get tickets, they see a pop-up that allows them to select how many tickets they want to purchase. When they’re ready, they click on Checkout.
3. Managing orders
Viewing attendees for a specific event
The Attendees tab in the event editor gives you a combined view of everyone registered for the event.

Here you can see:
- Attendee name and email
- Check-in status
- Check-in code
- Order ID
- Order status
- Ticket quantity
- Order date
- You can also resend a confirmation email or archive an order
Viewing ticket sales history for a specific event
For a full order list for a single event, view the Sales history tab, which is directly beneath Attendees.

You can also export sales history to CSV from this view.
Viewing and managing a specific order
To view and manage a specific order, click on the Order ID.

Because EventKoi Lite uses WooCommerce for checkout, you’ll be taken to the order details inside of WooCommerce, where you can:
- View order summary and customer details
- See payment method and gateway details
- Add order notes
- Resend the order confirmation
- Process refunds (refunding a WooCommerce order automatically triggers EventKoi’s refund confirmation email to the customer)

💡 Want a unified order management experience inside EventKoi? EventKoi Pro adds a native order details page directly inside the EventKoi admin when using Stripe — including an in-app refund flow with a refund note, ticket totals update, and customer email confirmation, all without leaving EventKoi. Upgrade to EventKoi Pro →
Viewing all orders across all events
To see ticket sales across all events, head to Events > Ticket sales.

From this page, you can filter, search, archive/unarchive orders, and export the full list to CSV.
4. Checking in attendees
Check-in is managed from the Attendees tab on each event.
Manual check-in
To manually check in an attendee, click the Check-in button on their row. You can select the number of people to check in. This is useful if an order has multiple tickets but not everyone has arrived yet.
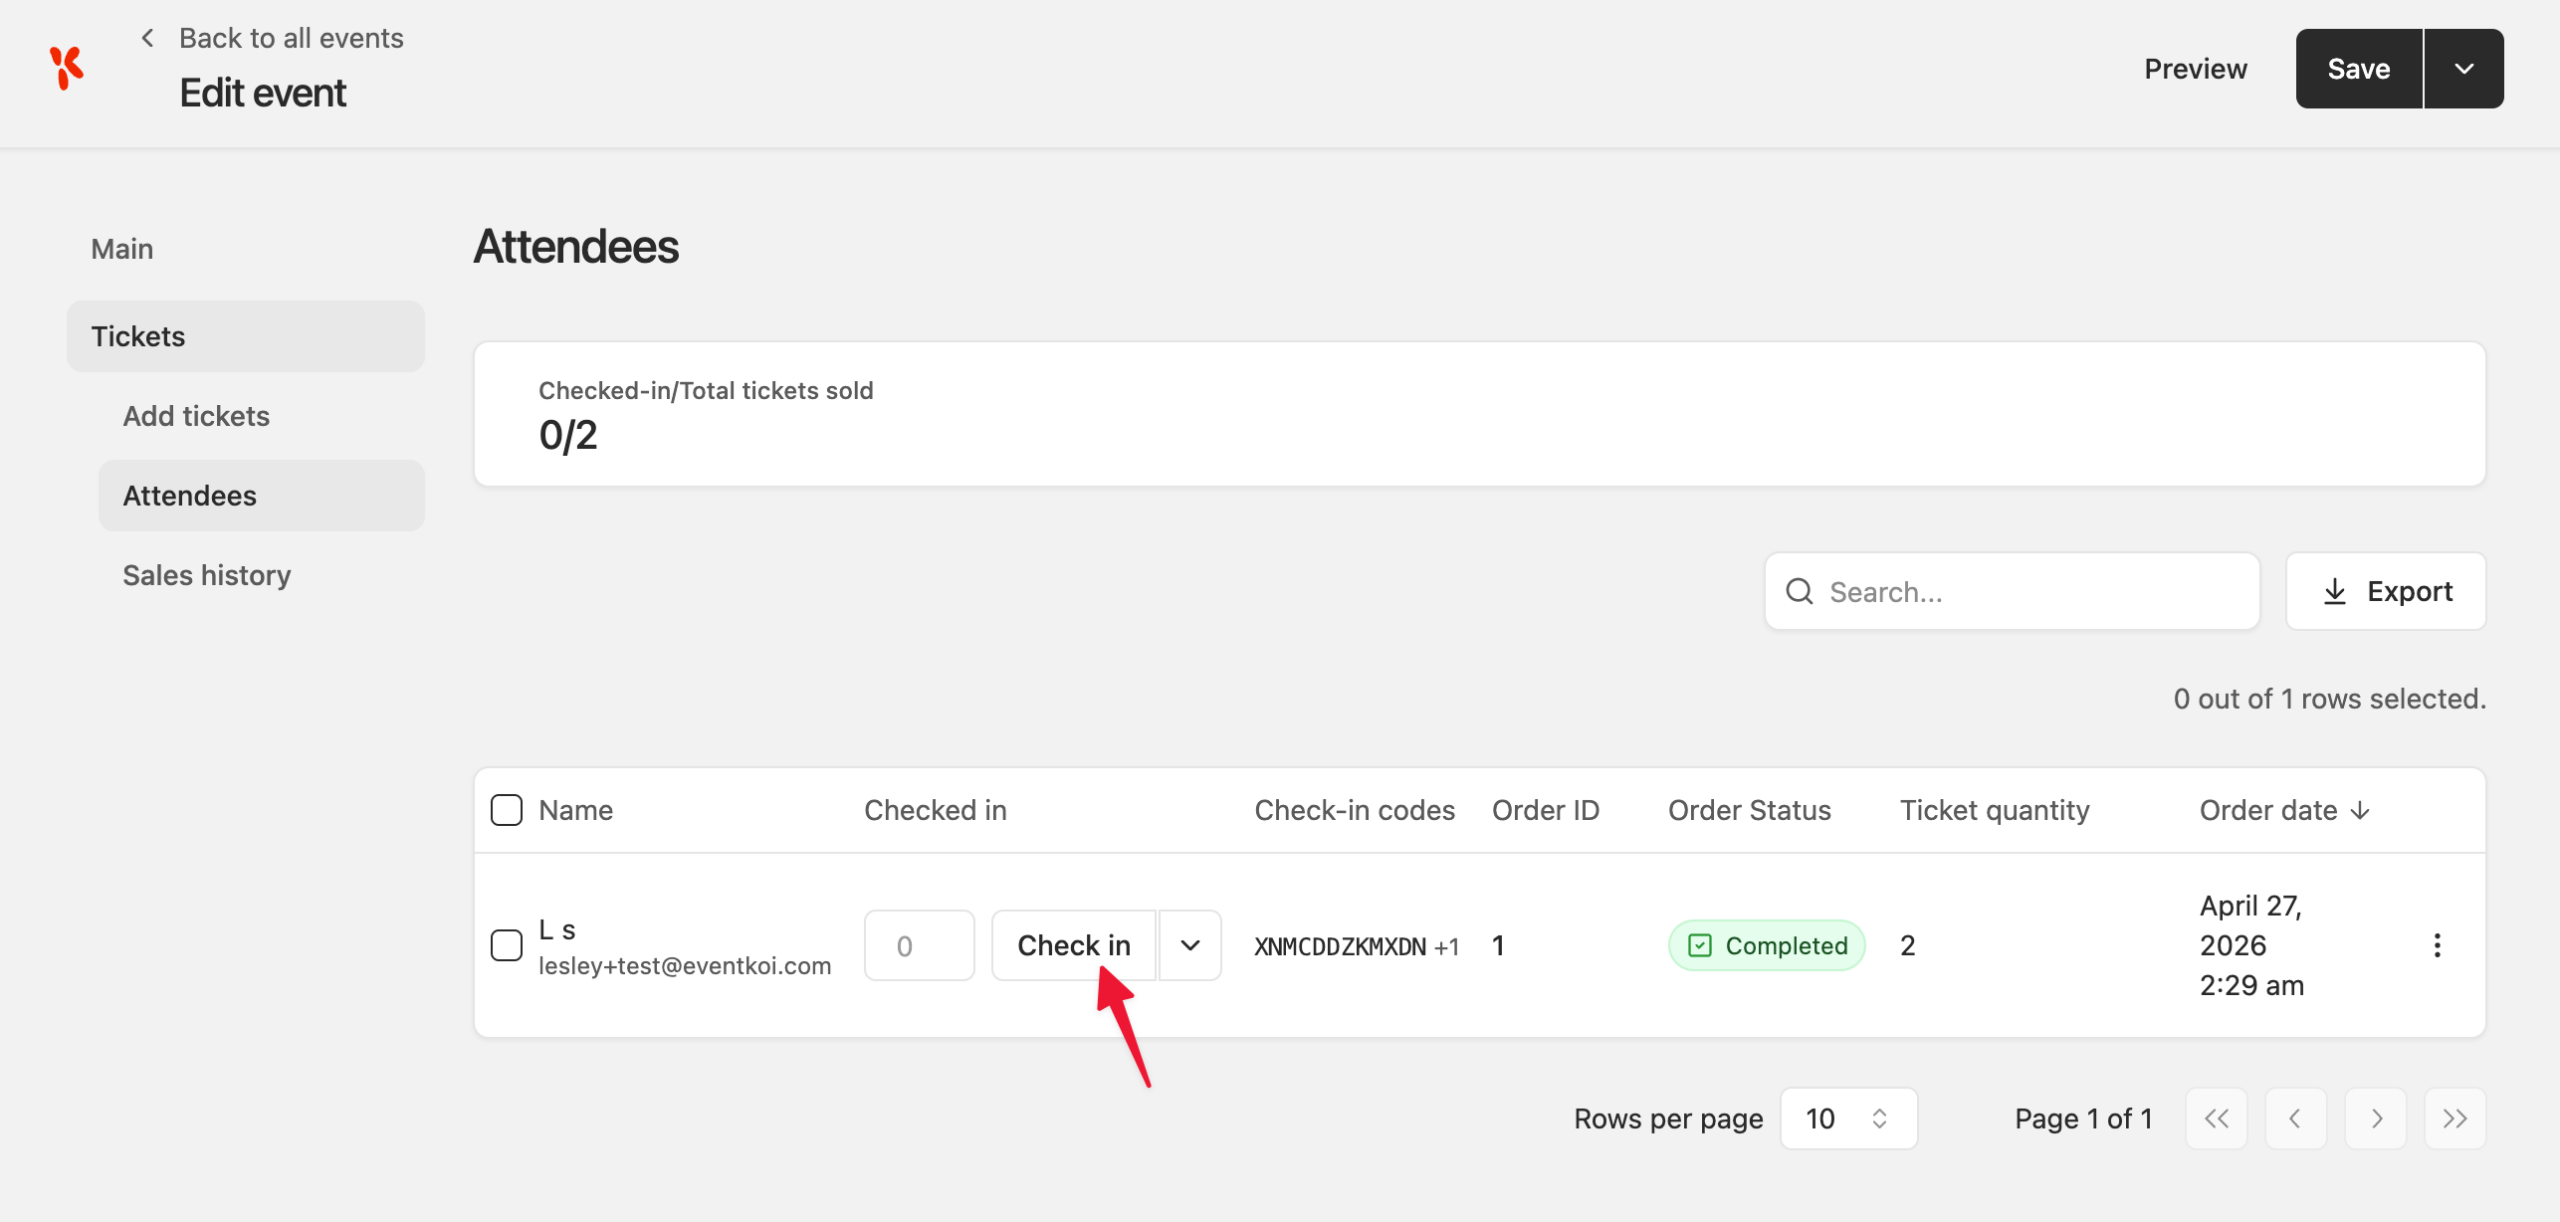
You can also bulk check-in attendees from the Attendees tab using row selection and the bulk actions menu.
5. Email notifications
EventKoi Lite sends automated emails for key activities. To manage email settings, go to EventKoi > Settings > Emails.
💡 Need to Customize your Email Templates? EventKoi Pro has a full email editor with dynamic tags allowing you to customize every detail of your event emails. Upgrade to EventKoi Pro →

There are two types of emails sent: User emails (sent to event attendees) and Admin notifications (sent to you). Select a template from the dropdown to edit it.
The following emails are available:
User emails:
- RSVP confirmation email
- Ticket confirmation email
- Refund confirmation email
Admin notification emails:
- New RSVP notification
- New ticket sale notification
For each template you can set:
- Enabled — toggle the email on or off.
- Sender name — the name the email is sent from.
- Sender email address — the address the email is sent from.
Upgrade to EventKoi Pro to customize:
- Subject line — the email subject.
- Email content — the full email body, edited using a rich text editor.
Frequently asked questions
Do I need WooCommerce to sell tickets in EventKoi Lite? Yes. EventKoi Lite uses WooCommerce as the checkout method, which lets you accept payments through any WooCommerce-supported gateway (Stripe, PayPal, Bank Transfer, Cash on Delivery, and others).
If you’d prefer to sell tickets without installing WooCommerce, EventKoi Pro includes a native Stripe integration that processes payments directly on your event pages — no WooCommerce required.
Can I test my ticket setup without charging real cards? Yes. Use WooCommerce’s built-in payment gateway test modes — for example, Stripe for WooCommerce supports test mode with test card numbers, and most other gateways have a sandbox mode. Refer to your gateway’s documentation for details.
What happens to ticket availability when an event is updated? Updating event details (title, date, description, etc.) does not affect ticket availability or existing orders. To stop selling tickets, deactivate individual ticket types or mark the event as completed or cancelled.
Can buyers purchase tickets if they already have a WordPress account? Yes. If a logged-in user purchases tickets, their WordPress user ID is recorded against the order and their billing information is auto-filled at checkout. If Auto-create attendee account is enabled in your ticket settings, new accounts are only created for buyers who are not already logged in.
When are tickets issued? Tickets are issued as soon as a WooCommerce order moves to Processing status, so every gateway (including Cash on Delivery and Bank Transfer) works out of the box.
How are refunds handled? Process refunds through WooCommerce as you would for any other order. When a WooCommerce order is refunded (fully or partially), EventKoi automatically:
- Updates the order status on the EventKoi sales history (e.g. “Partially refunded”).
- Sends the refund confirmation email to the customer.