Most guides on selling tickets in WordPress cover a single event on a single date.
But plenty of businesses sell something that repeats: a weekly class, or a tour that runs every Saturday. Each date needs its own capacity, its own attendee list, and often its own details, since next Tuesday’s class isn’t the same as this one.
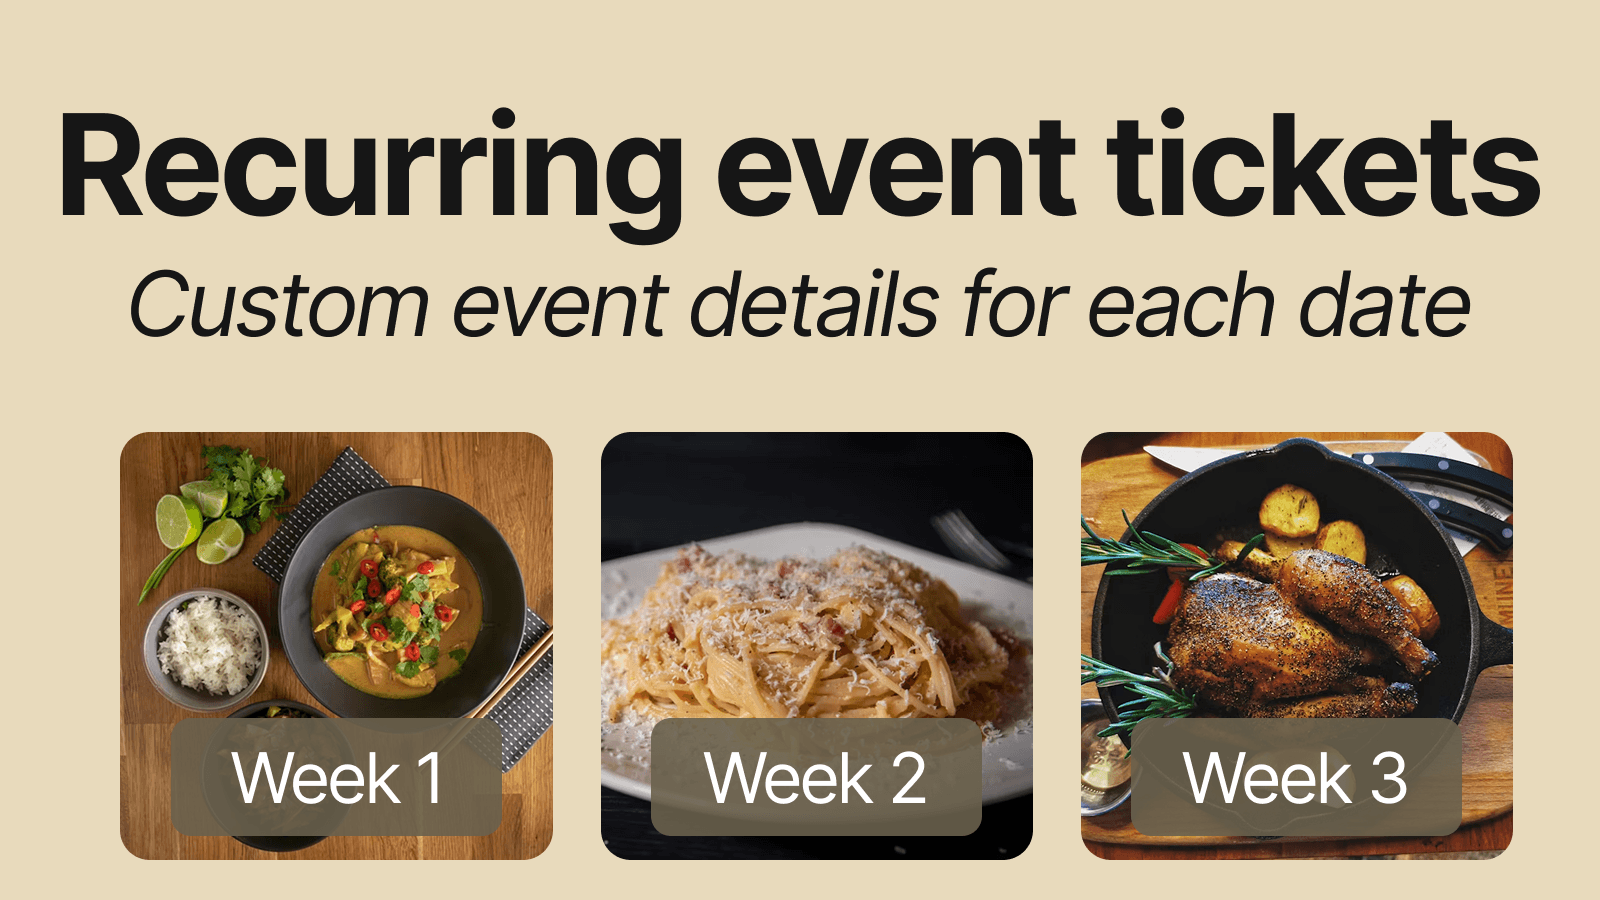
As an example, we’ll use a cooking school running a different class every Tuesday, so you can see how each week gets its own event details and ticket sales.
To do this, we’ll set up a recurring event and edit each individual instance.
In this post, you’ll learn:
- How to create a recurring event
- How to create tickets
- How to add terms and conditions
- How to customise each individual event instance
- How to manage orders, attendees and check-ins
Before you start (what you need)
Here are the pre-requisites you will need before you can begin:
- A WordPress site
- EventKoi Pro (recurring events and custom fields are Pro features)
- A Stripe account, or WooCommerce with a payment gateway connected
Tho keep this guide short and focused, we will assume you’ve already set up EventKoi and a payments gateway.
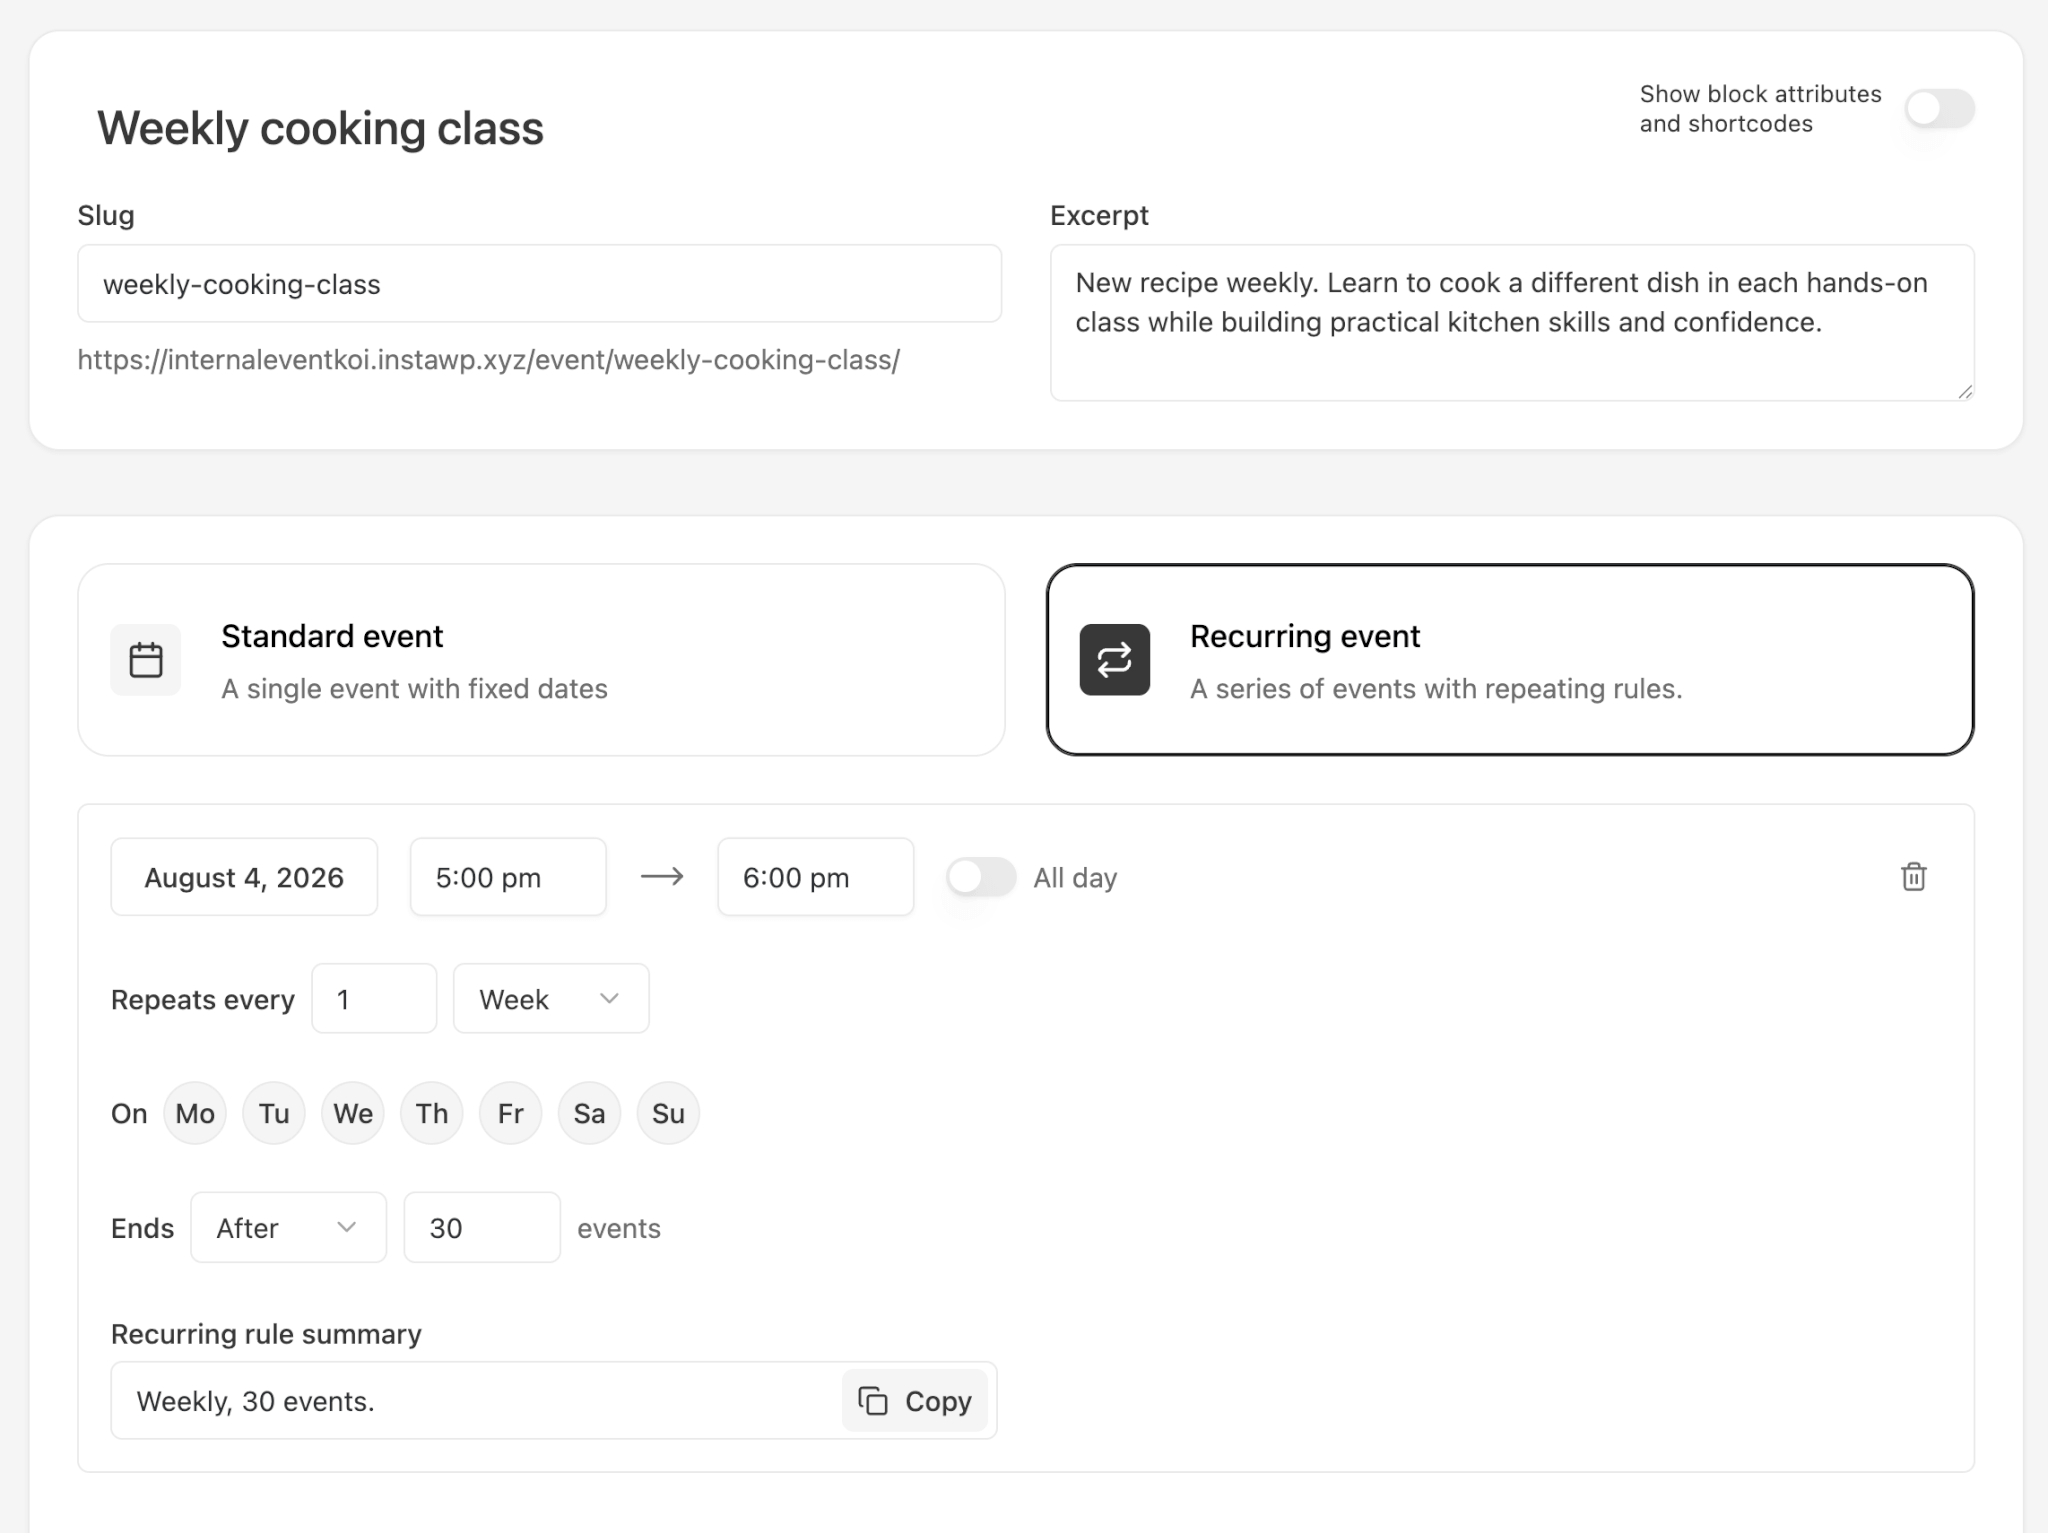
For this guide, we will use a cooking school as an example. The cooking school runs a weekly cooking class every Tuesday evening, with a different dish each week.
Step 1. Create your event
Create a recurring event that repeats weekly.
Step 2. Create tickets
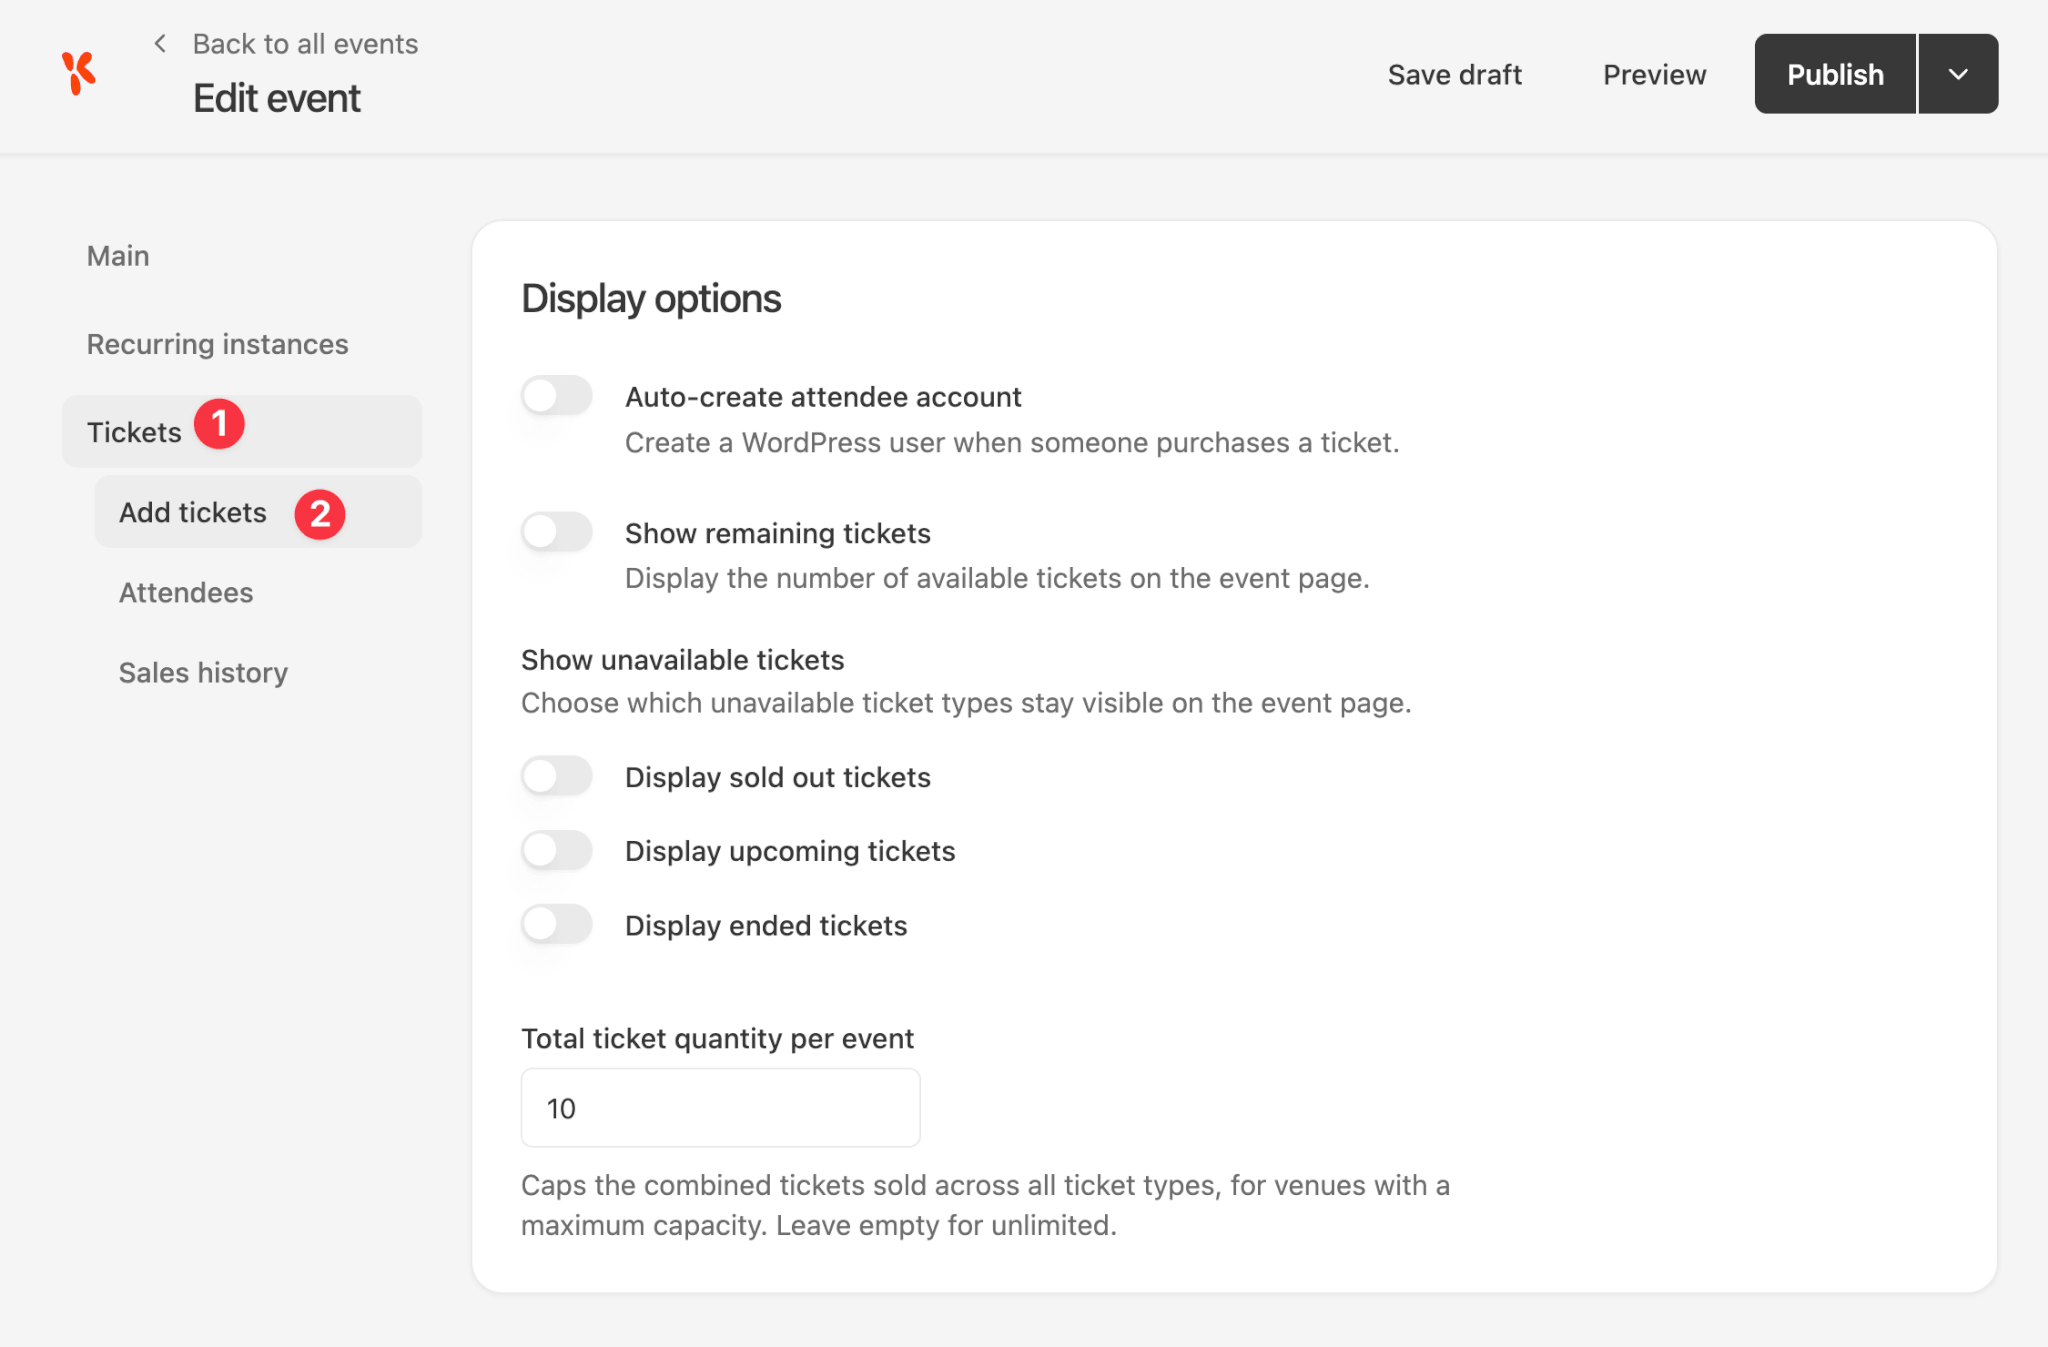
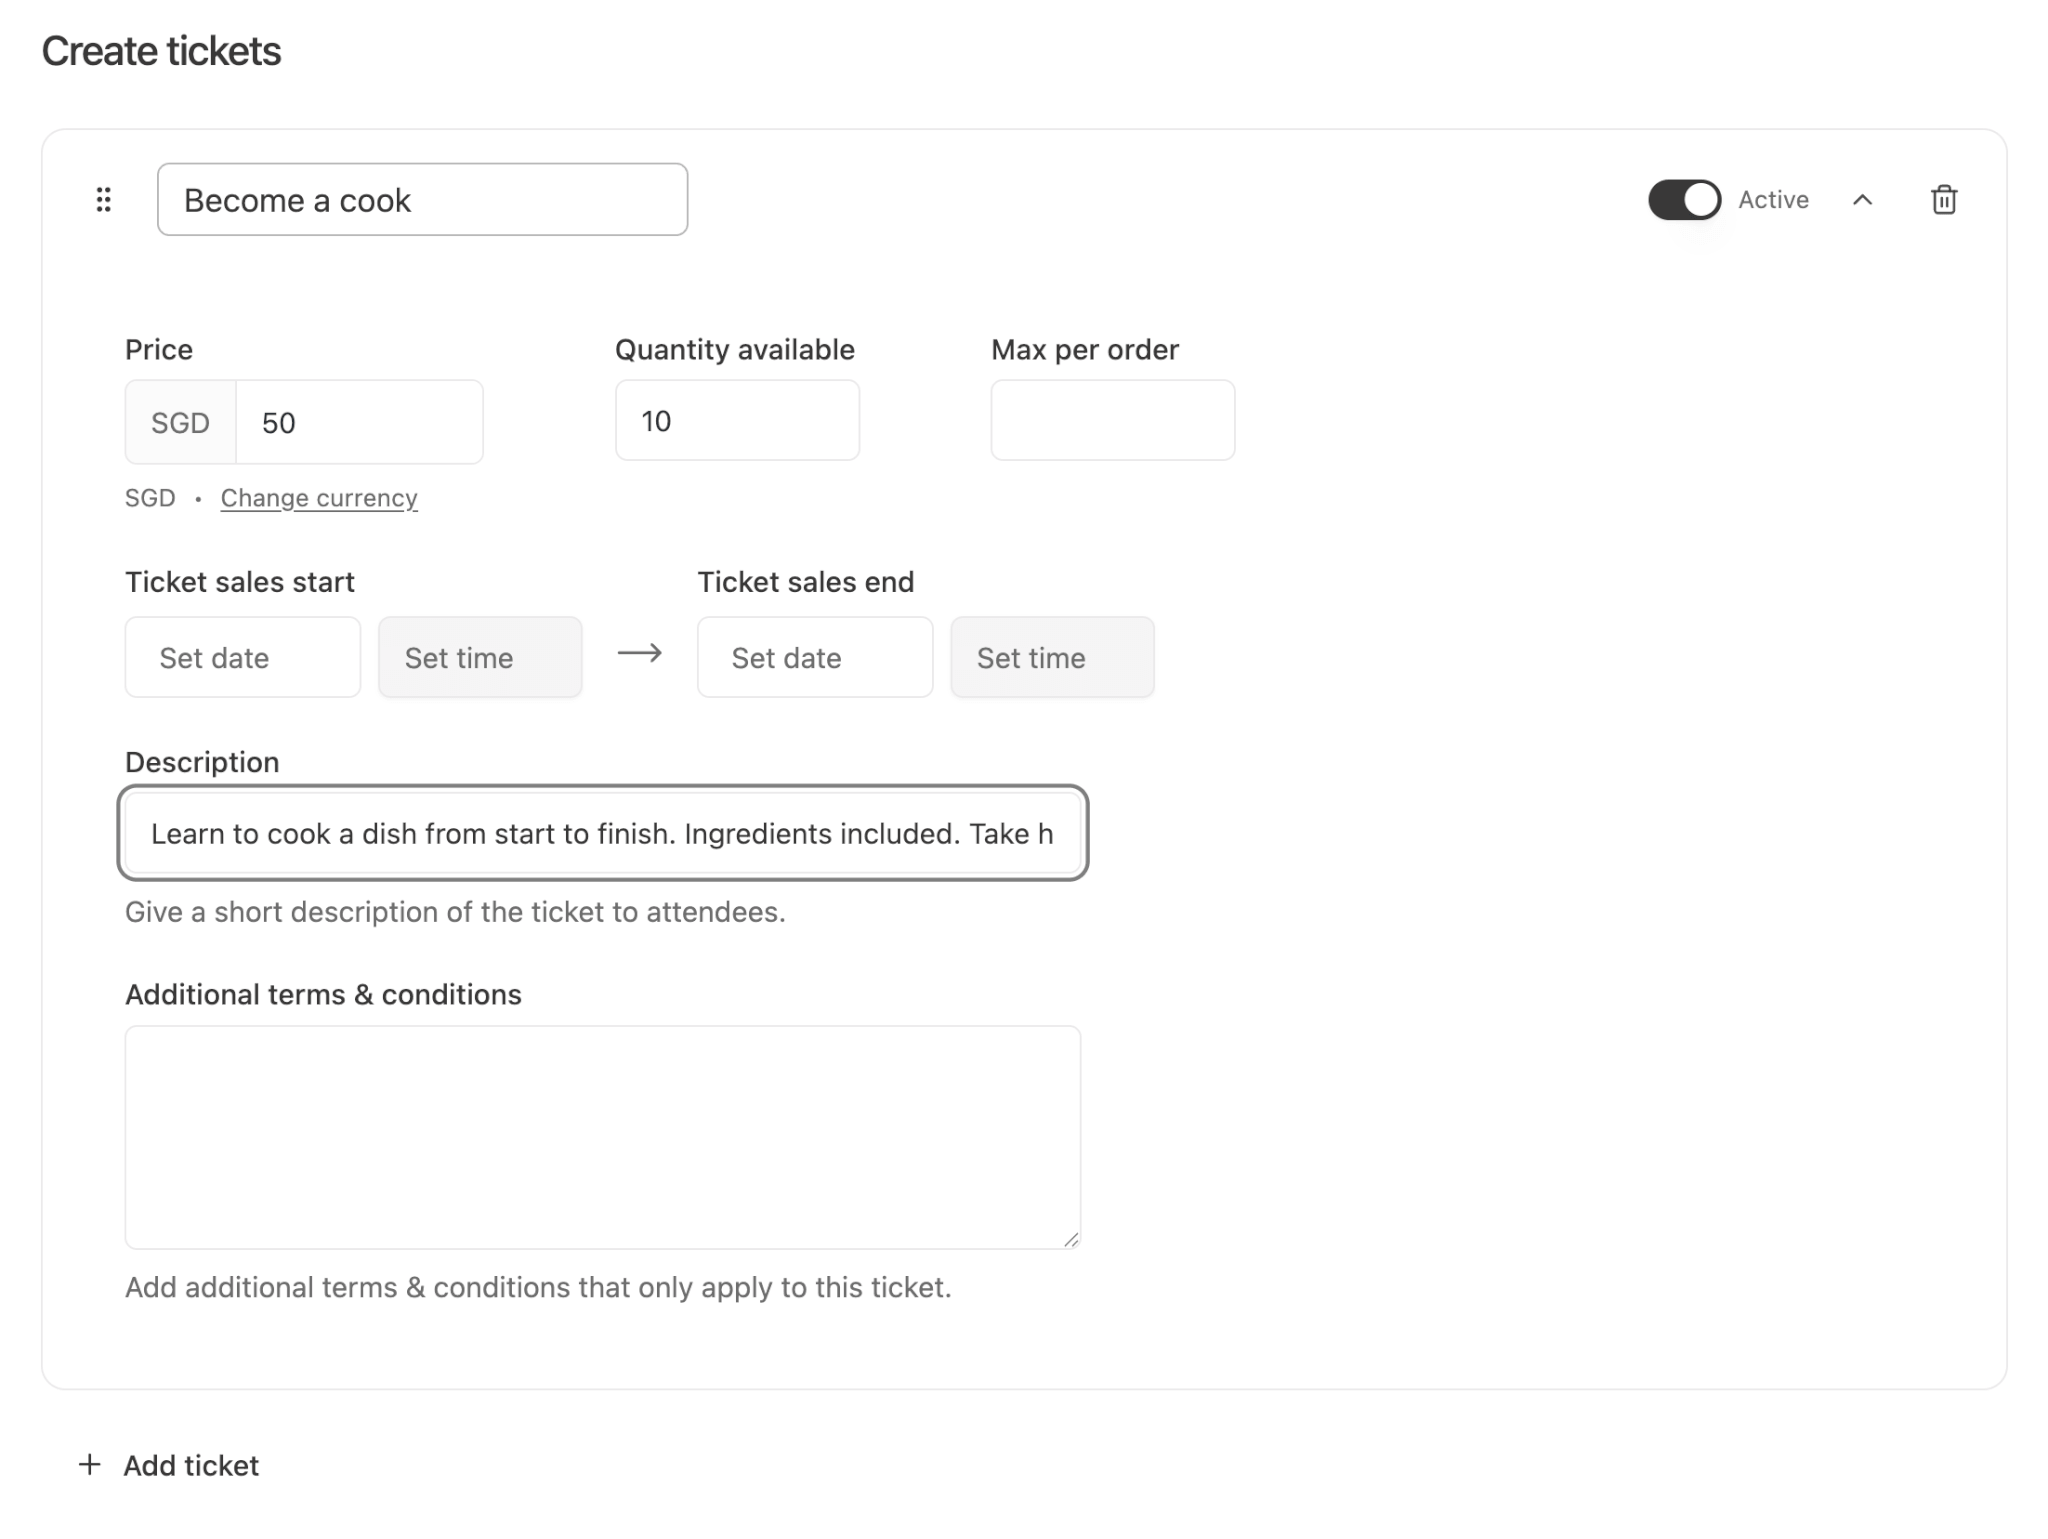
After you’ve created your event, in the left hand panel, select the Tickets tab, and go to Add tickets. There you can customise your ticket settings and create your ticket. This creates a generic ticket, in the next step, we will customise each ticket for each class.
Terms and conditions
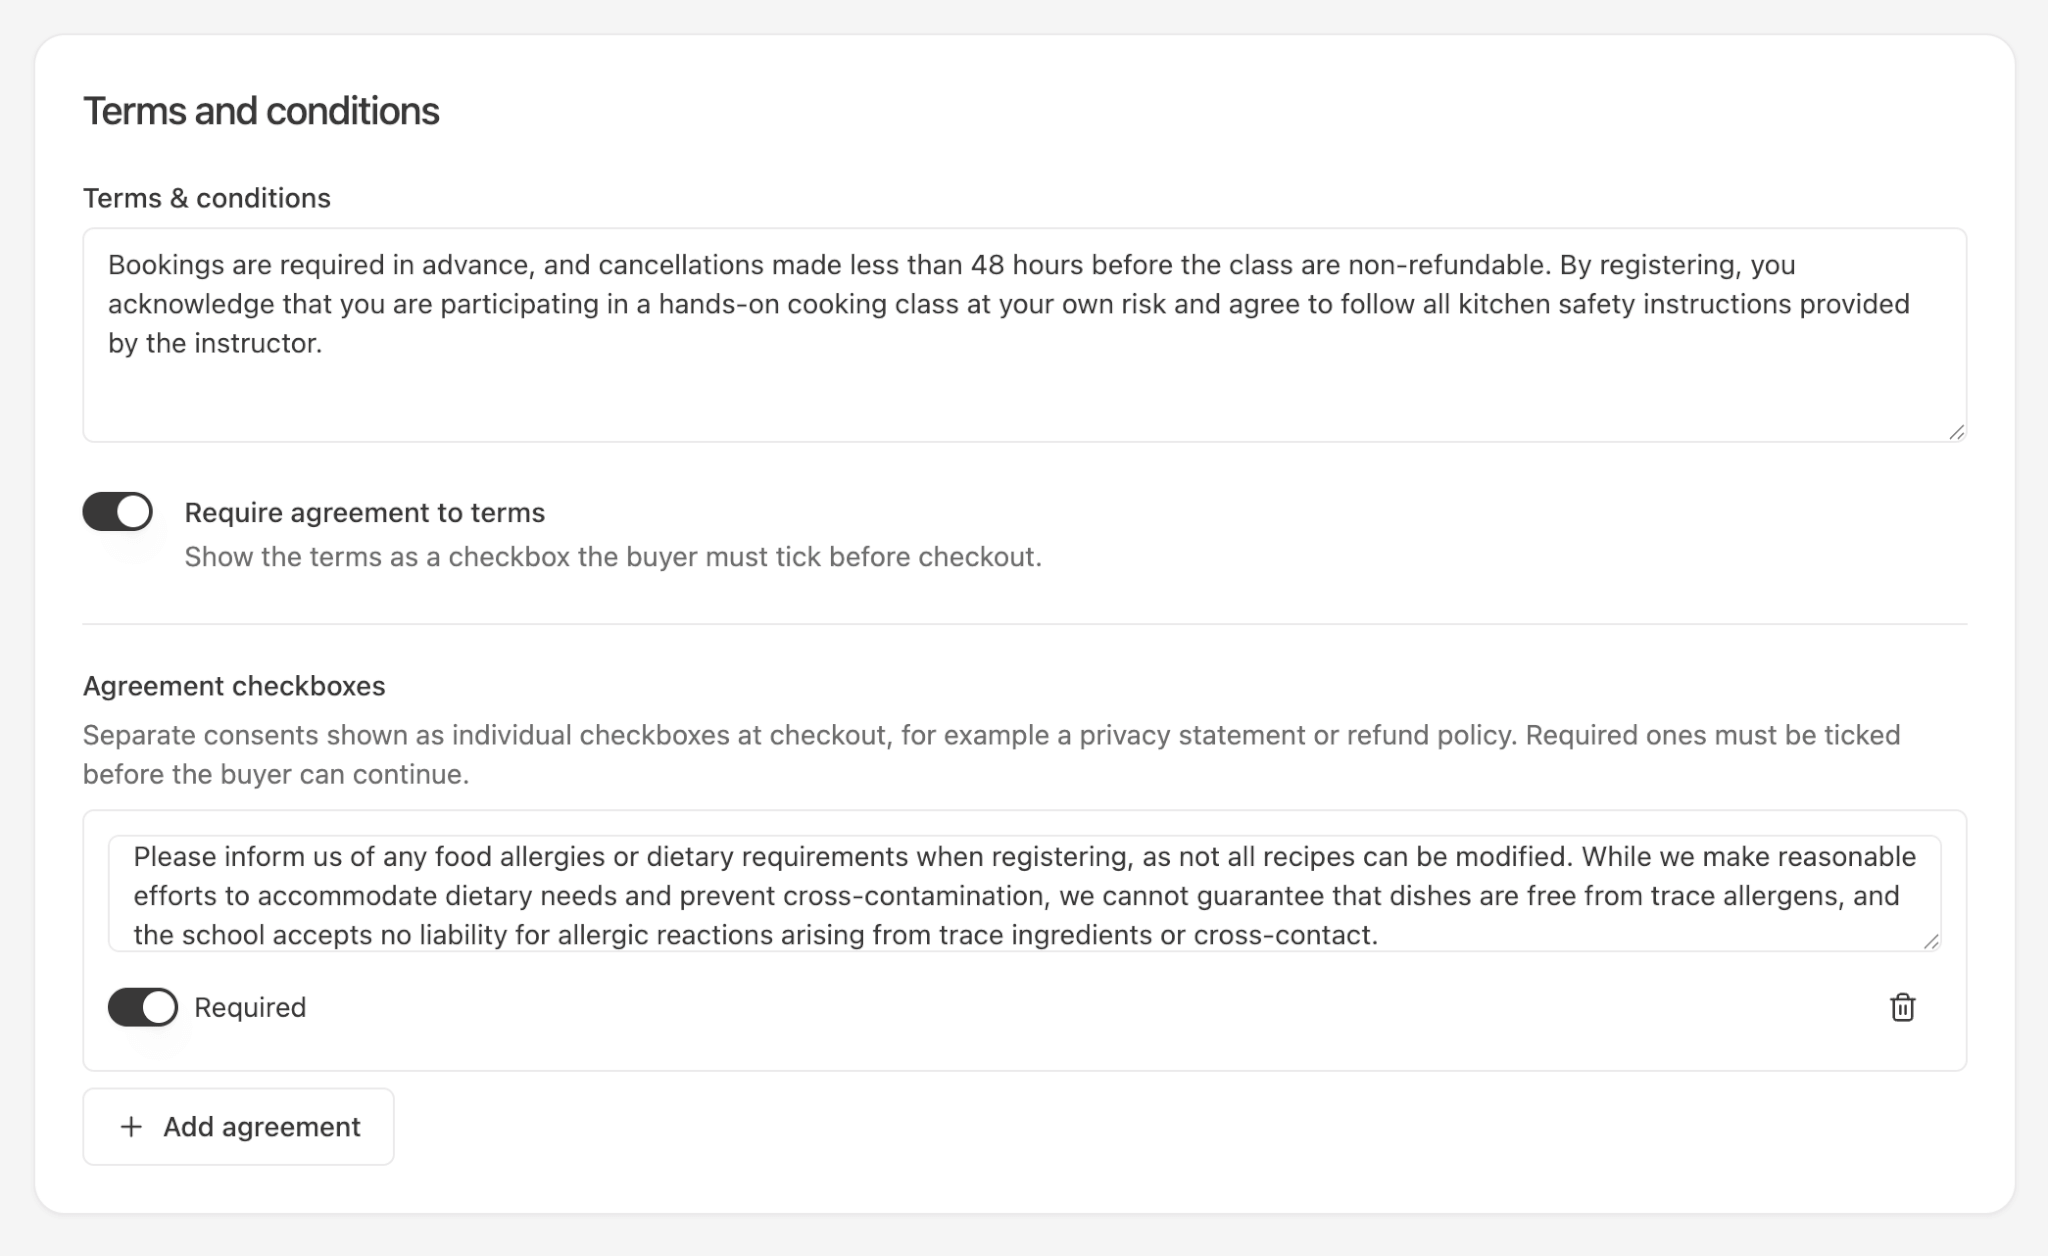
It’s common for events to have terms & conditions. With EventKoi, you can add as many terms as you want and set “Required” checkboxes for each of them. There are many scenarios where this is important. For example, if you have an “Above 18” event and need a checkbox for that.
In the case of our weekly cooking class, we want them to create two checkboxes. One is a generic checkbox about non-refundable cancellations and safety.
However, because this is a cooking class, we created a separate checkbox regarding allergies.
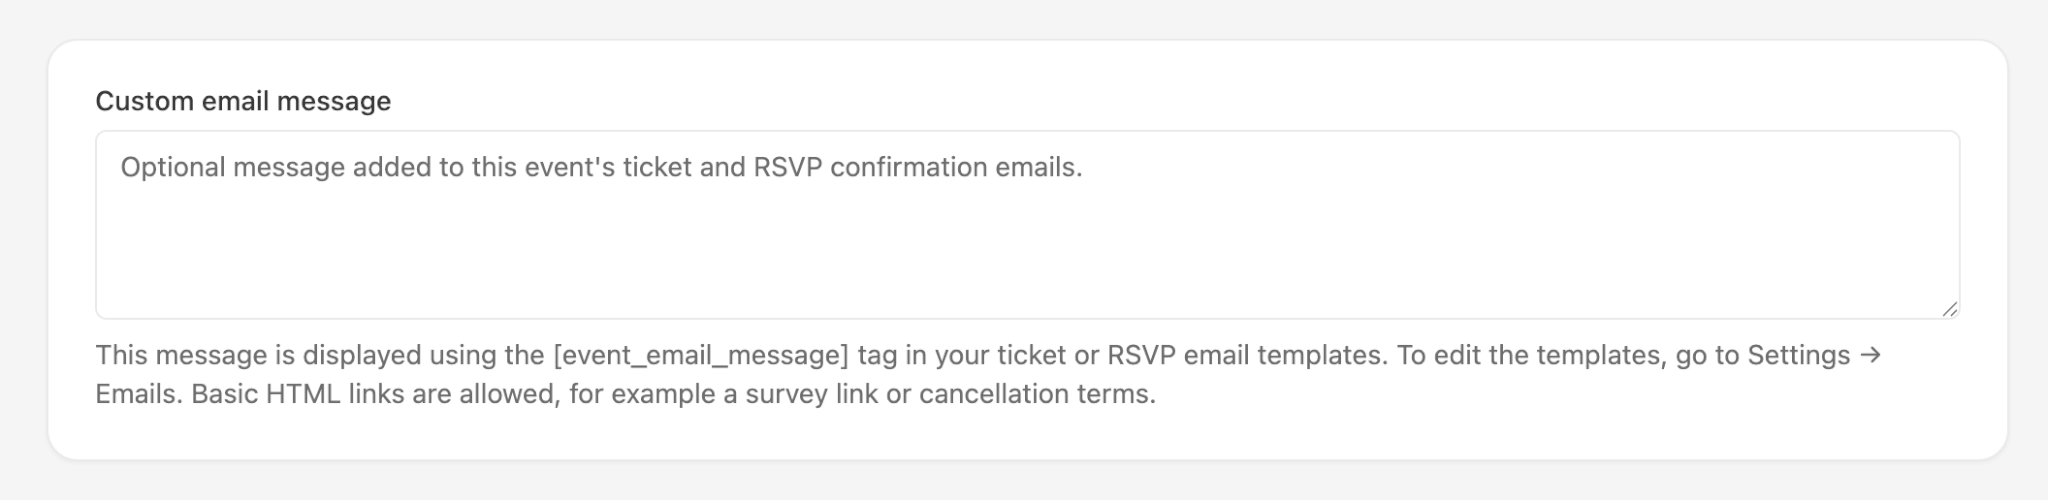
Custom email message
When someone buys a ticket to an event, they receive an email confirmation which includes ticket details and a QR code for checking in.
You can customise this email at a global level by going to Events > Settings > Emails.
However, EventKoi also allows you to customise this email at a per event level. This is useful if you want to add special instructions or a special welcome message for individual events.
Step 3. Customise individual classes and tickets
Next, in the left hand menu bar, go to the Recurring instances tab.
There you’ll see each class. Click on an individual class to customise it.
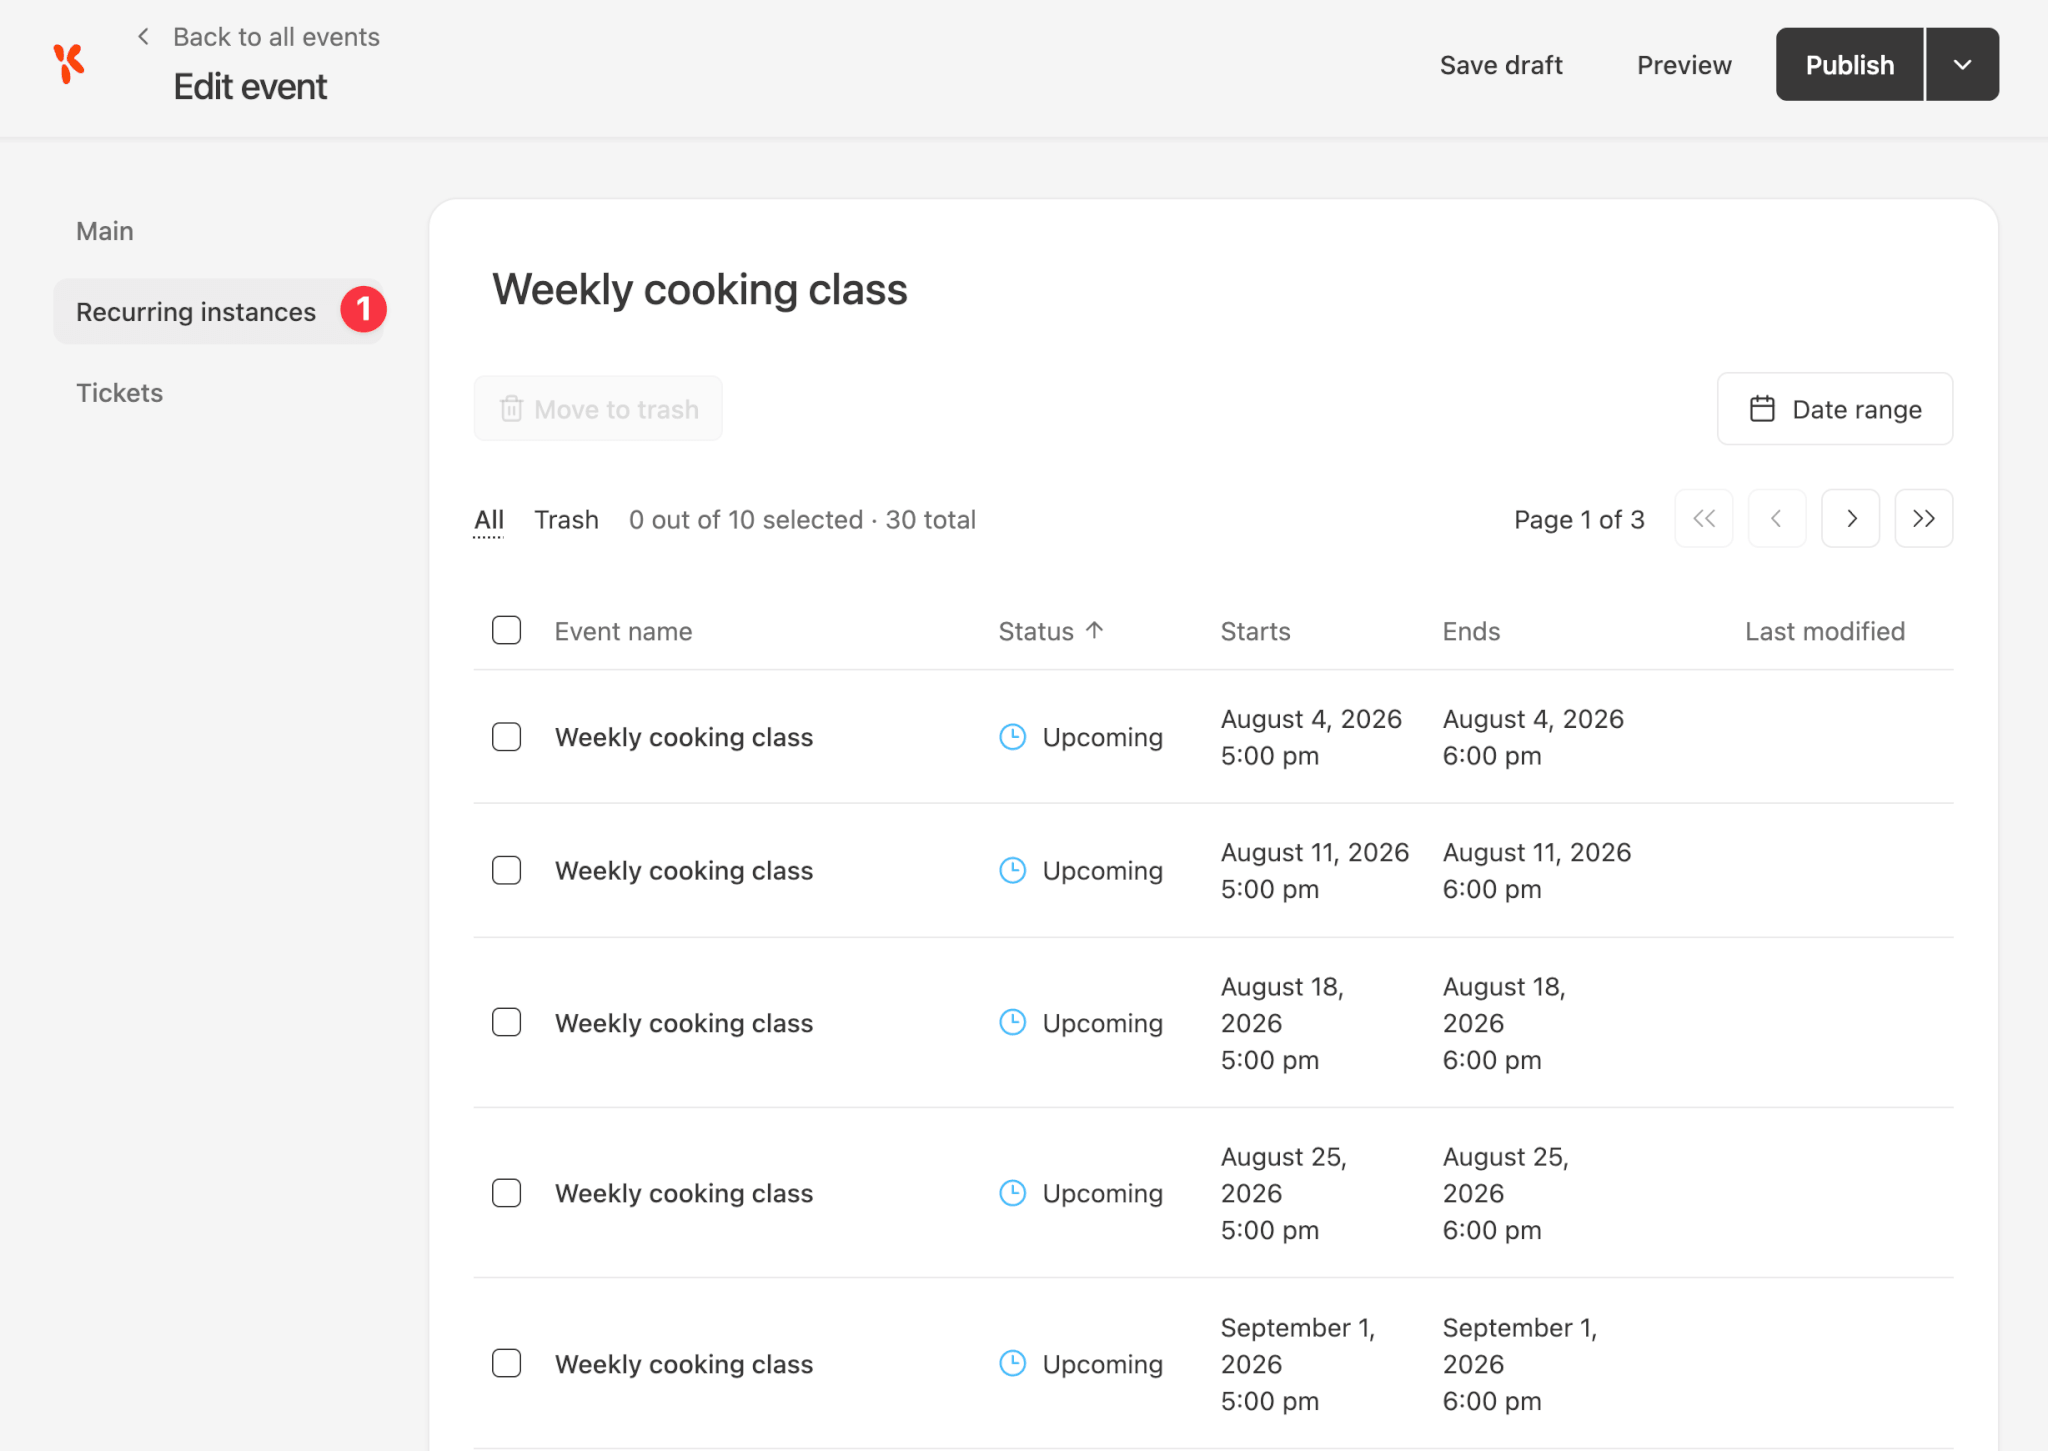
When you click on an instance, you can customise the following information:
Time and date: This is useful if a particular instance needs to be rescheduled. For example, if you have a 3 month-long recurring class, but you need to reschedule one of the classes because it falls on a public holiday.
Location details: This is useful if one of your classes needs to be relocated.
Event details: This is the one that we want to focus on in this post. For our weekly cooking class, because each class teaches a different recipe, we want to change the event details from the generic overarching details, to a specific one for the specific class.
Ticket price and quantity: For our cooking class example, it’s possible that some classes are more expensive than others because the recipe calls for more expensive ingredients.
Ticket sales open and close: For our cooking class example, we want the ticket sales to open 2 weeks before each class takes place.
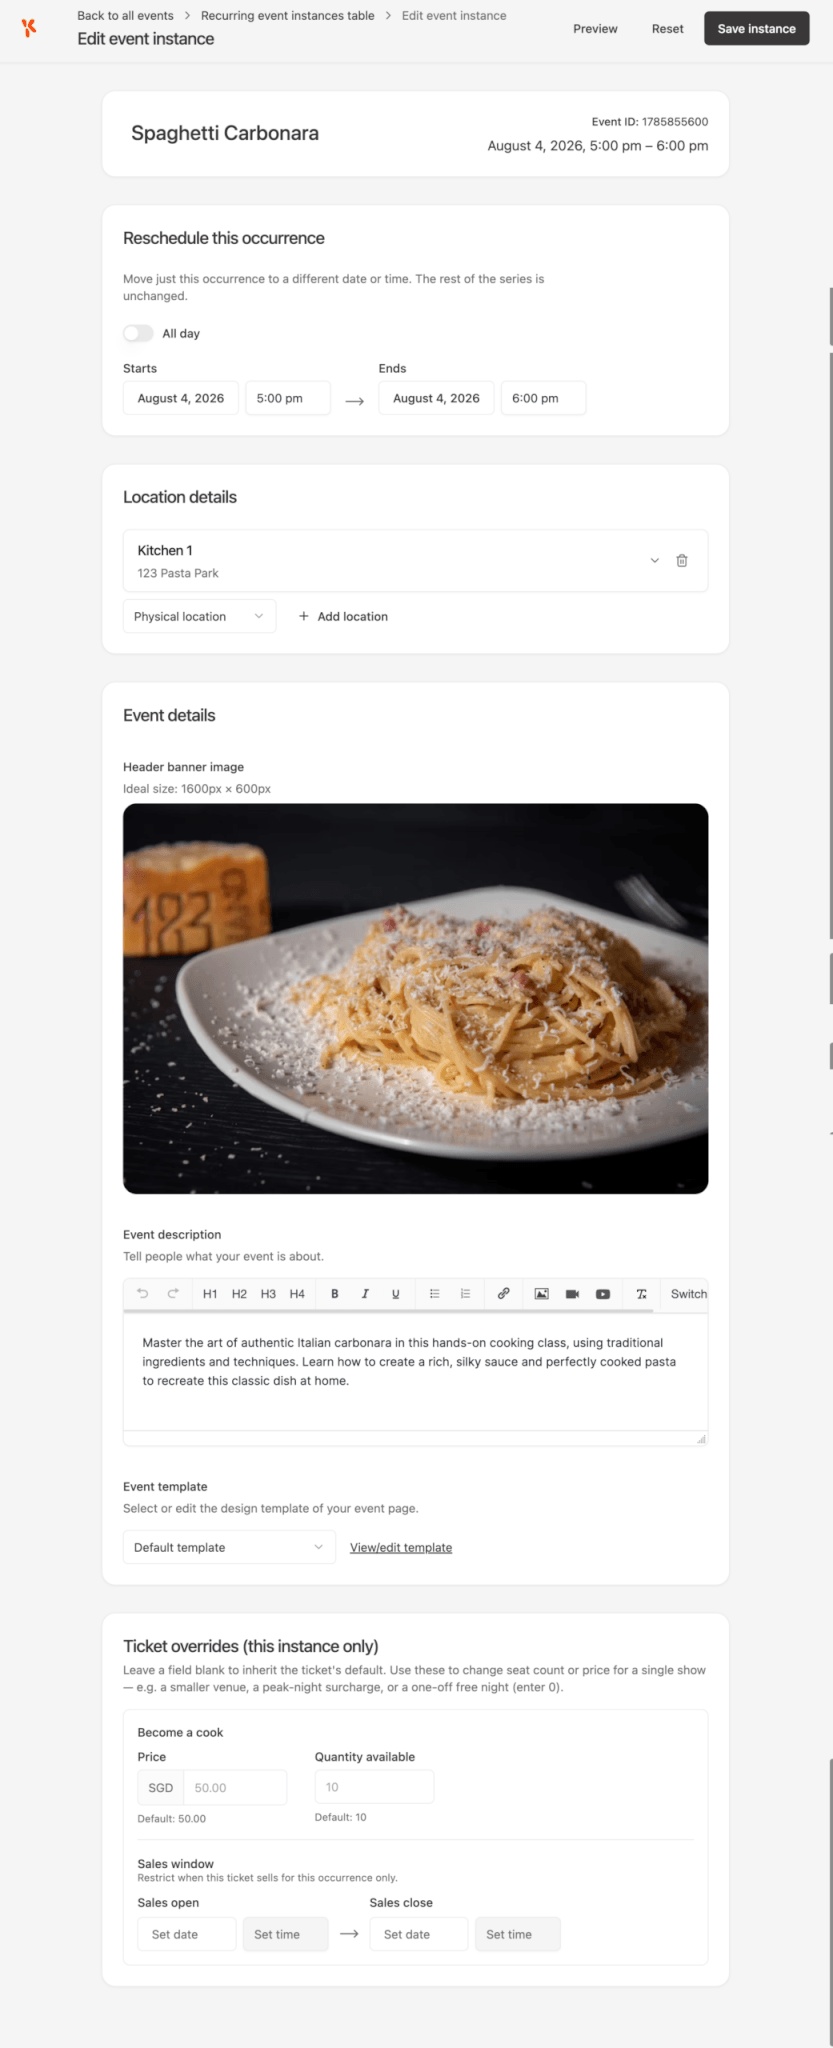
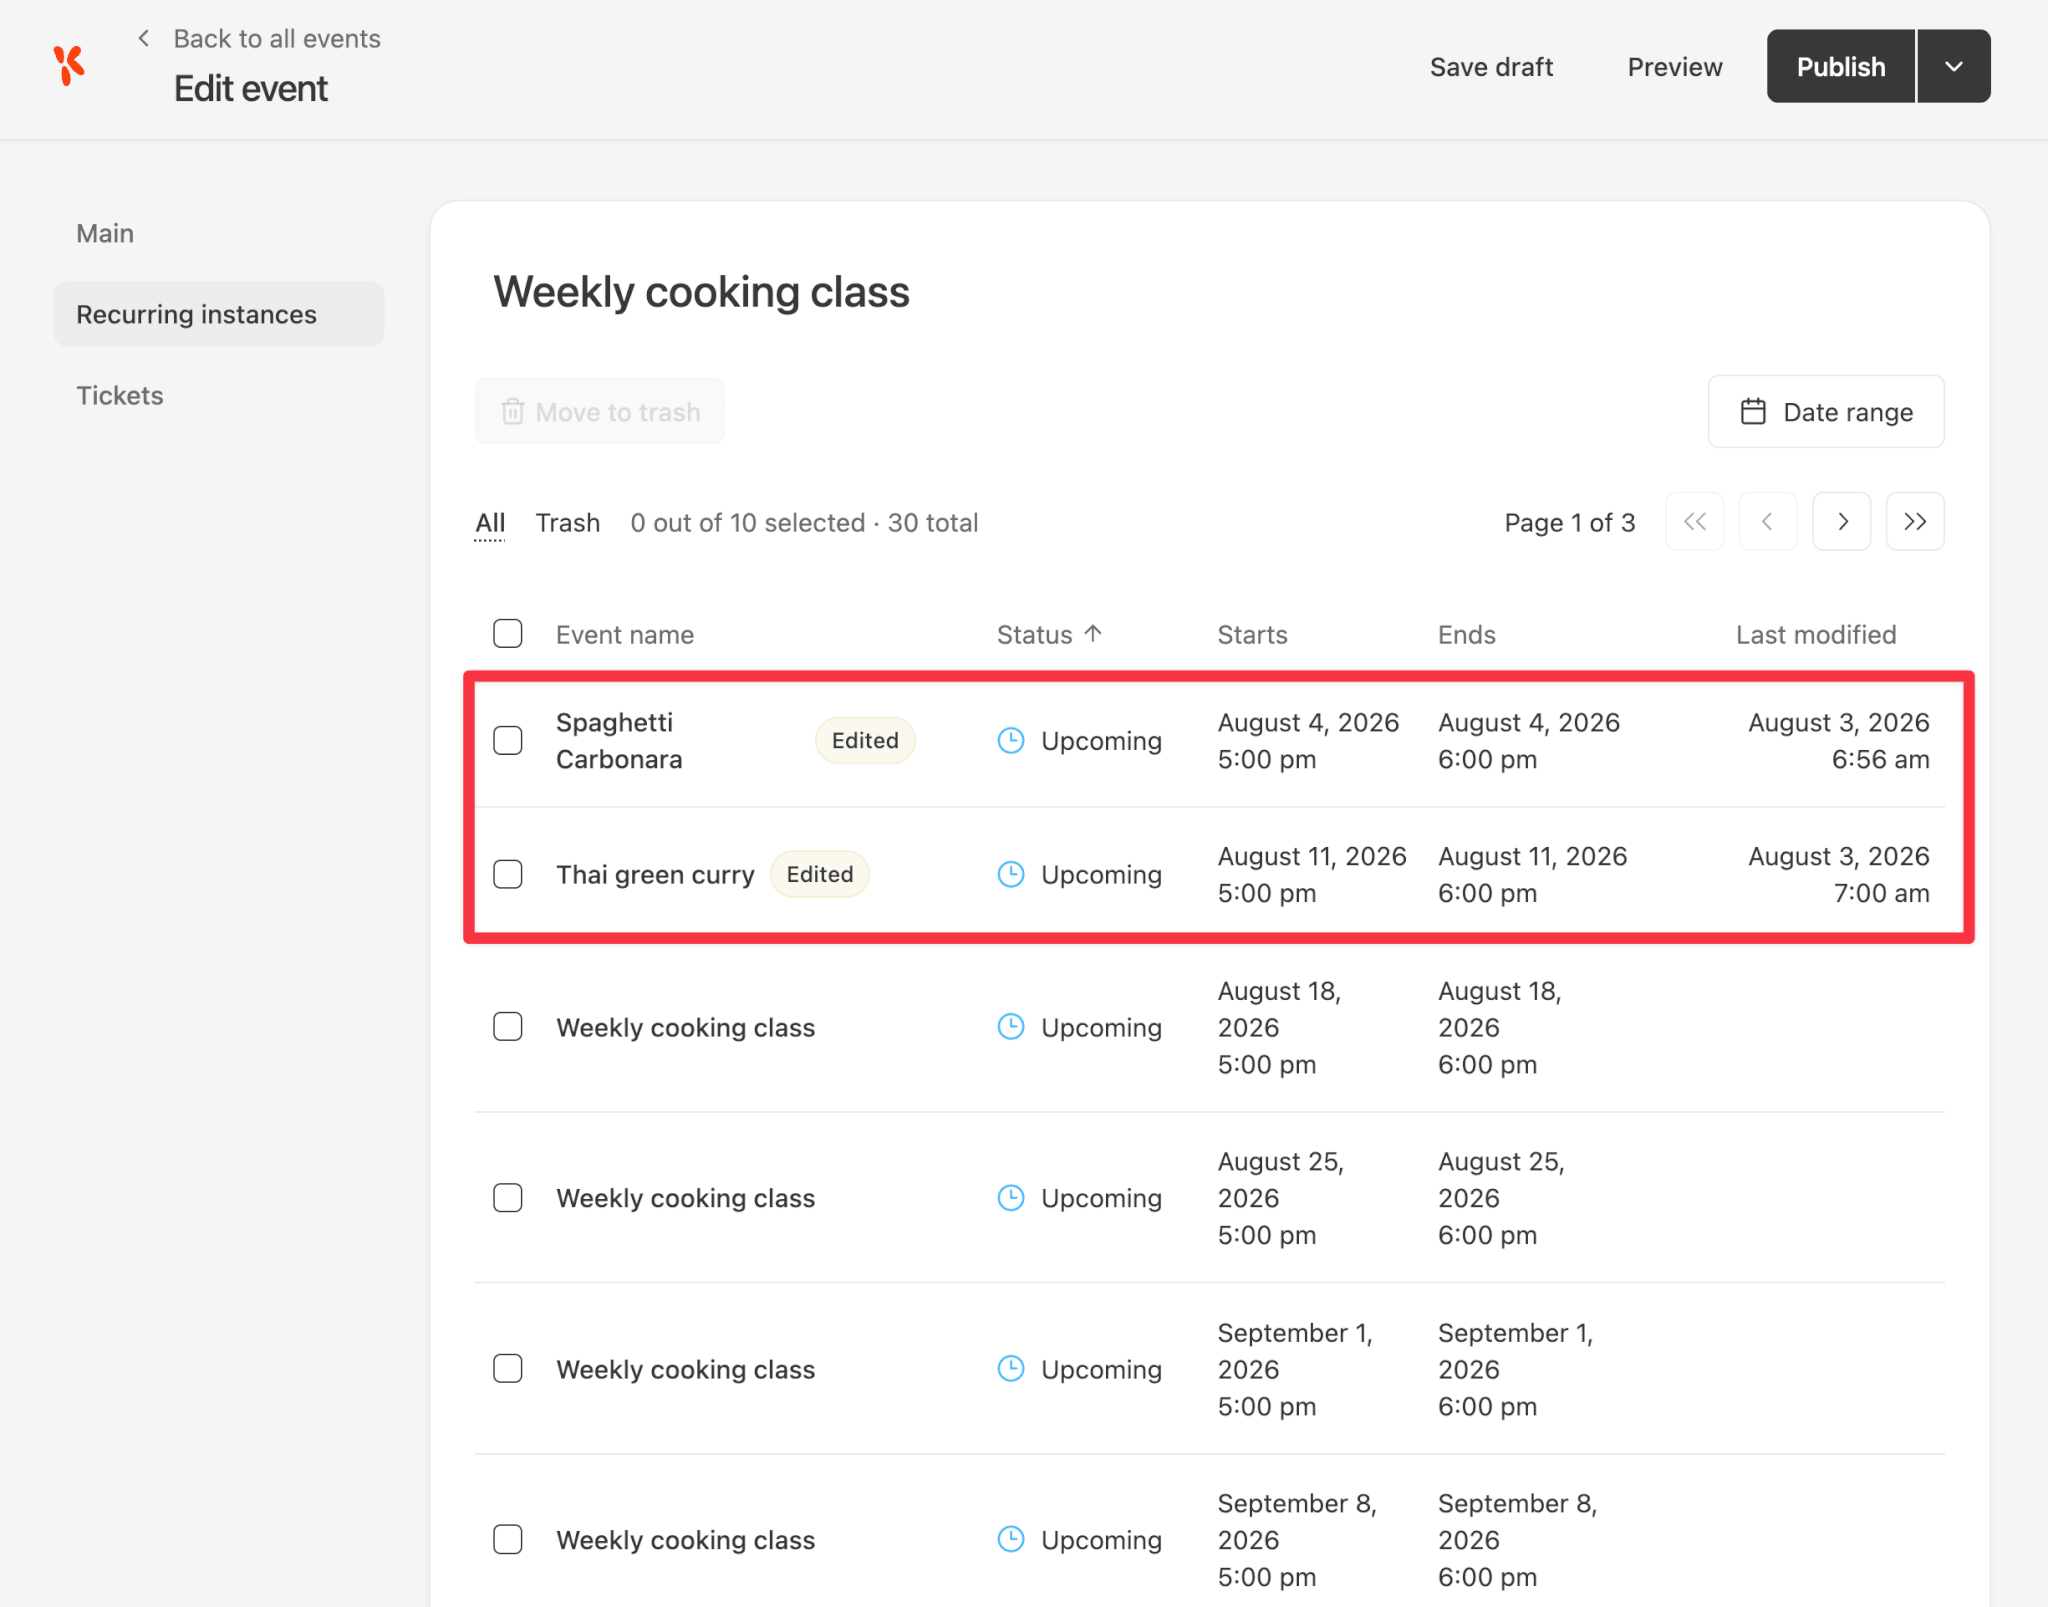
When you’ve edited an instance, you’ll see an Edited label next to the instance. In the sccreenshot below, you’ll see that we’ve edited the first two cooking classes:
Step 4. Publish and go live!
When you’re ready, you can publish your cooking class.
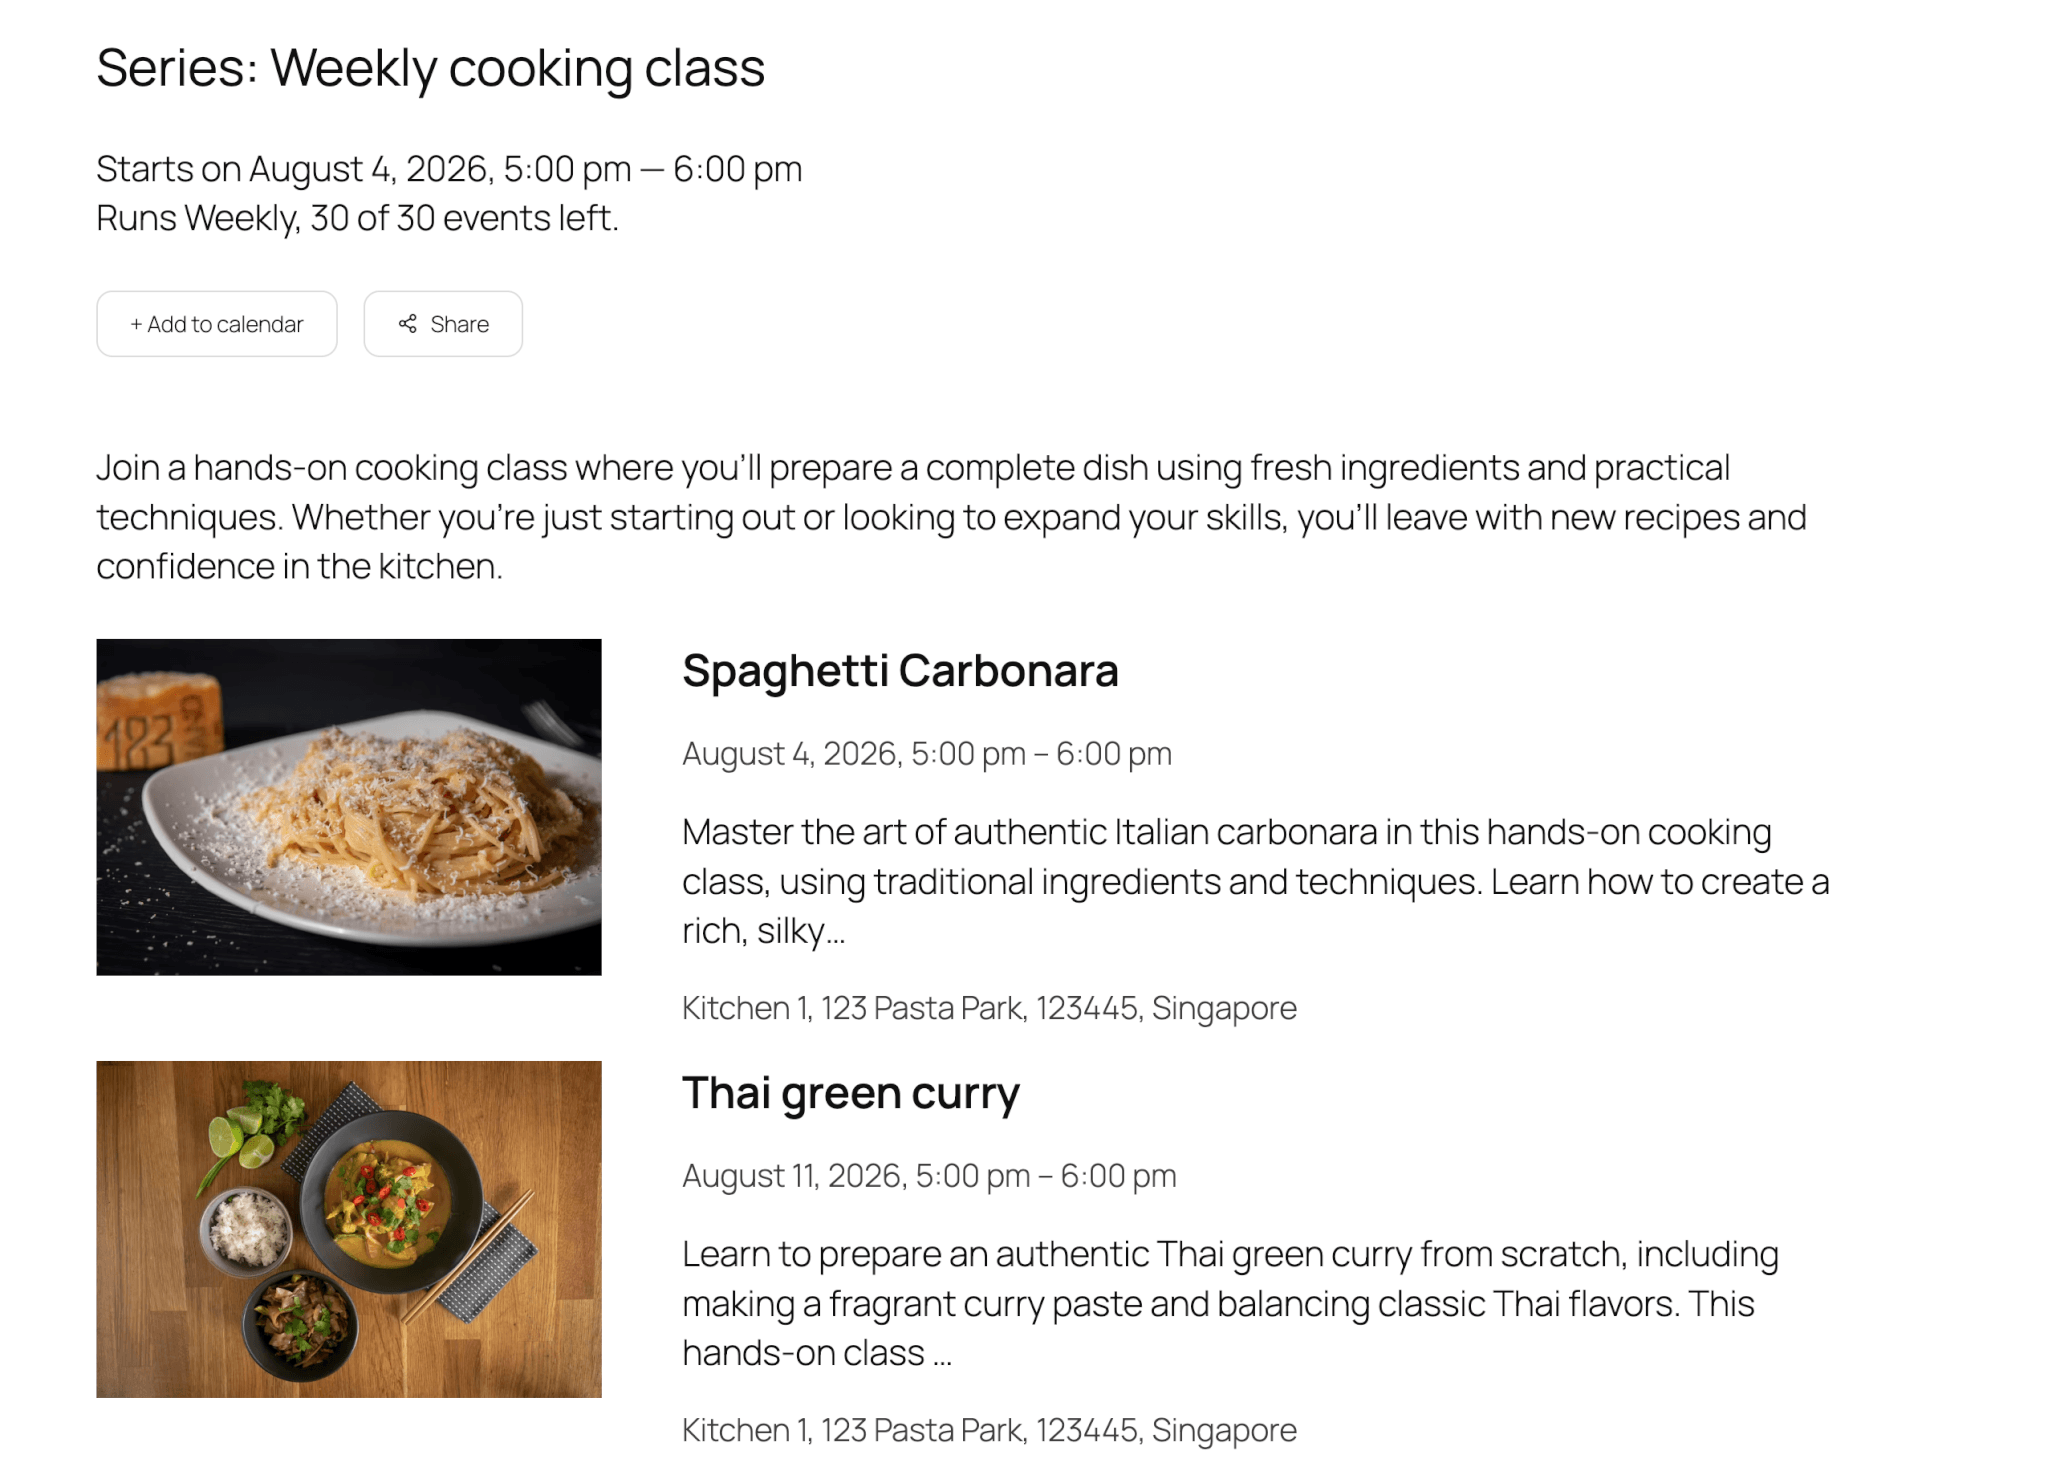
Because you created a recurring event, there are two levels of pages created. The first level page is the overarching page for your weekly cooking class. This displays a list of cooking classes so that potential attendees can see what’s available and pick the class they want to attend.
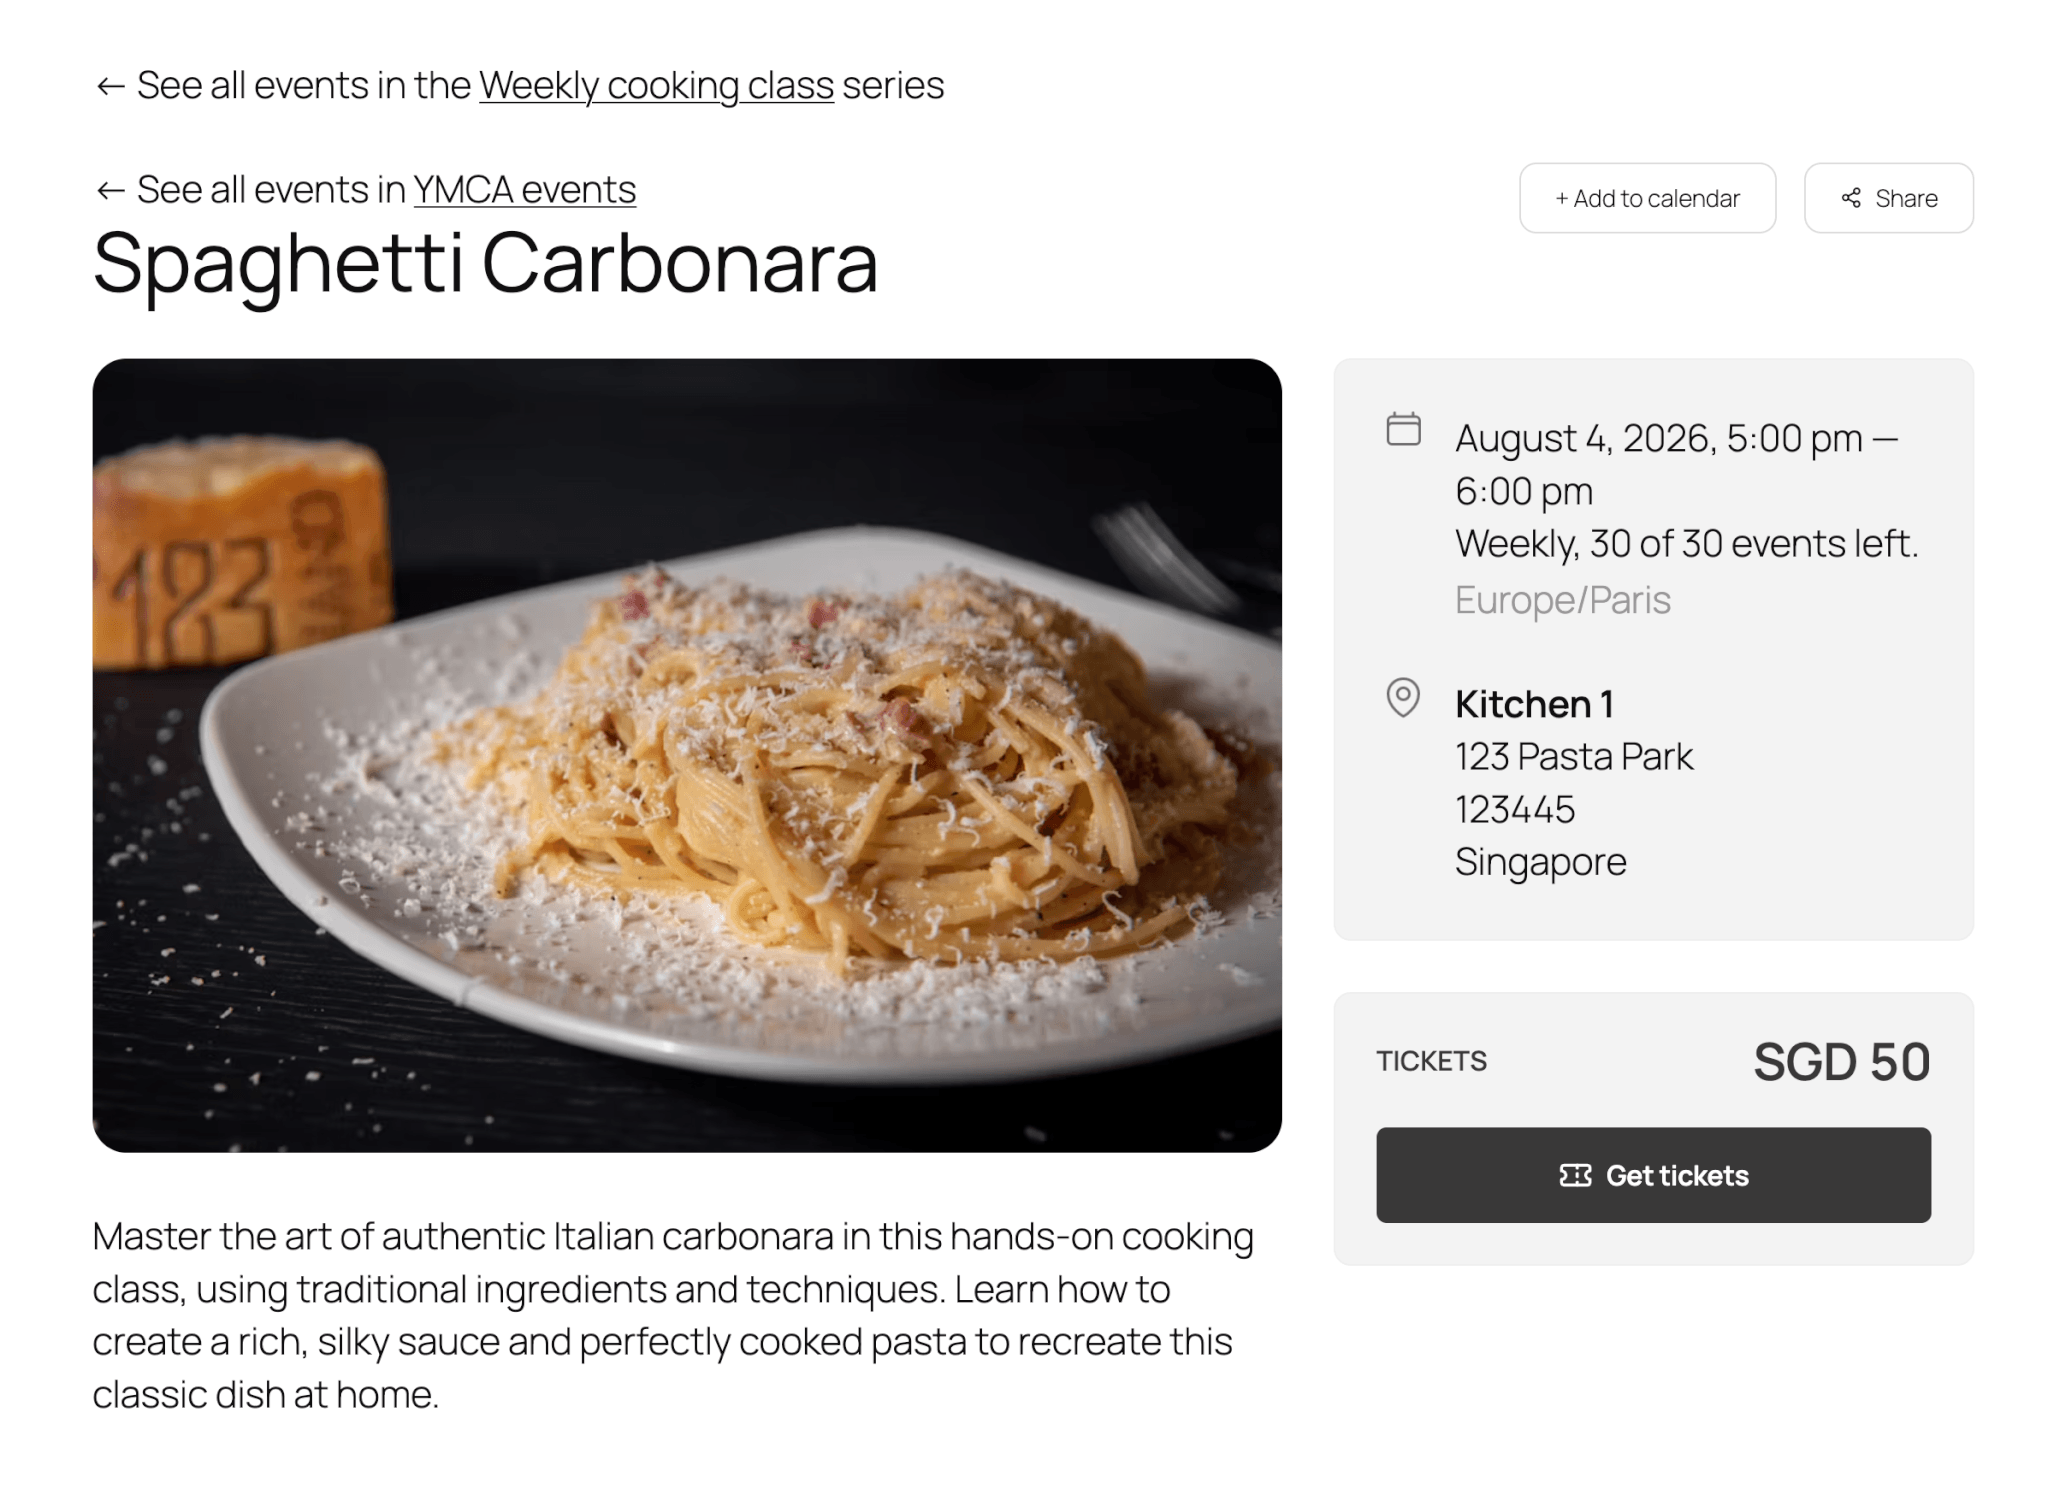
The second level is the class itself. If an attendee is interested in the Spaghetti Carbonara cooking class, they can click on it to learn more, and purchase tickets.
Step 5. Manage orders, attendees, and check-ins
Once someone buys a ticket, the attendee gets a confirmation email with a check-in code, and you get an admin sale notification recording what they agreed to.
How the ticket gets issued depends on your checkout method:
- On Stripe, the webhook reconciles the payment and syncs the order back, so a buyer who pays and immediately closes the tab still gets their ticket.
- On WooCommerce, the ticket is issued as soon as the order reaches processing. This is why bank transfer and cash on delivery work just like card payments, instead of leaving those buyers without a ticket.
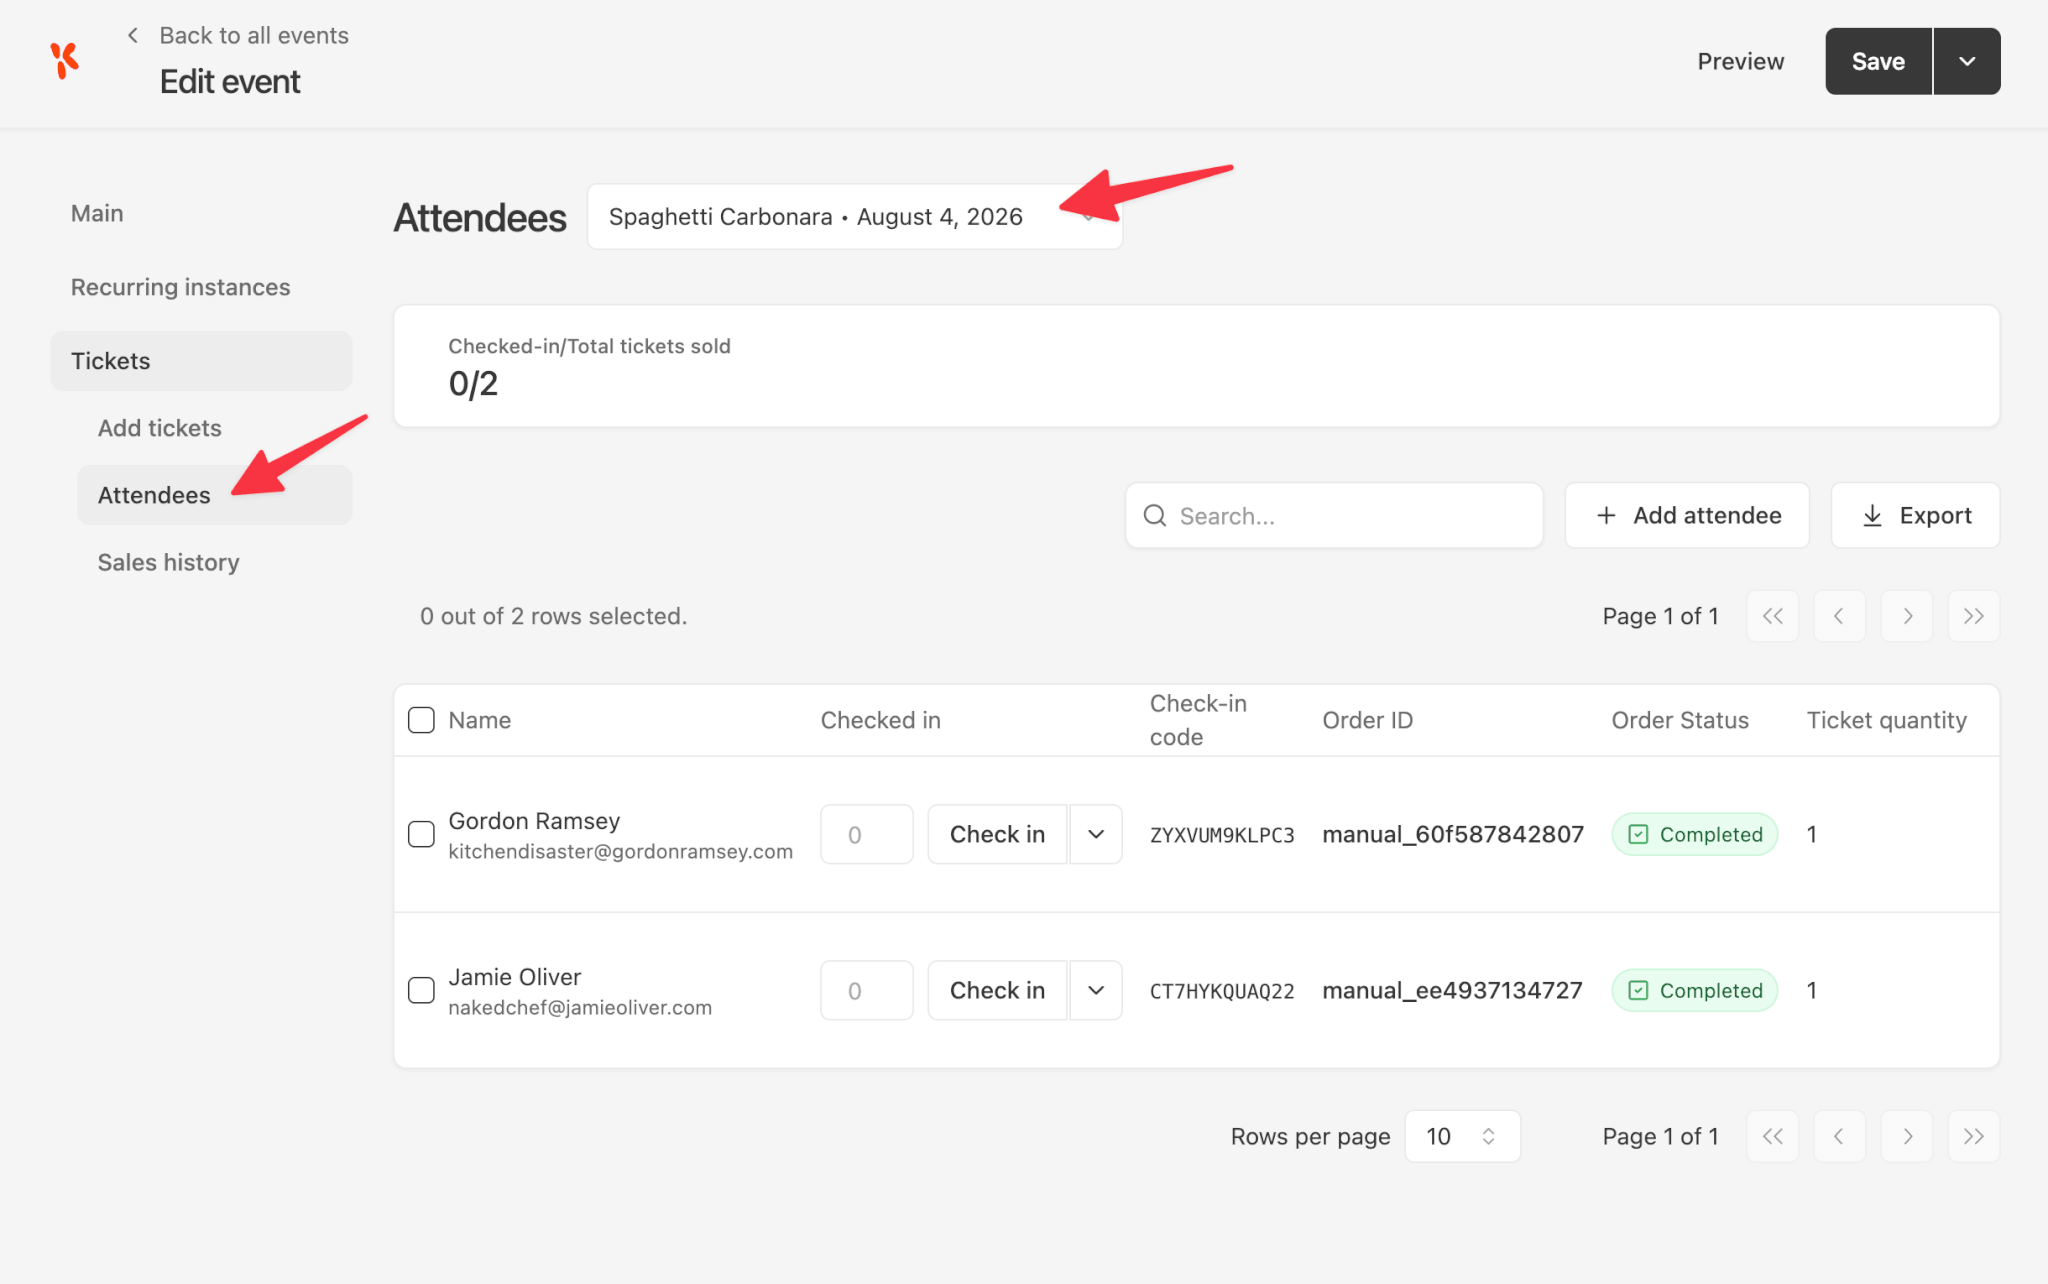
In the Tickets > Attendees tab, you can filter by status, export your attendee list to CSV, and check people in from the WordPress admin or by scanning their code at the door.
You can also select which event instance you want to view.
FAQs
Do I need WooCommerce to sell tickets on WordPress?
In this guide, we used EventKoi Pro for the recurring events feature. With the Pro version, you can use Stripe directly.
However, you can also use WooCommerce if you already run a store, or if you need payment methods Stripe does not cover, such as PayPal or bank transfer.
In EventKoi Lite, only WooCommerce is available as a payment gateway. However, recurring events is a Pro feature, so you would not be able to follow the steps in this guide using EventKoi Lite.
Can I sell tickets for a recurring event?
Yes. Set your recurrence rule and each date becomes separately bookable, with its own page URL and its own attendee list. Your buyers pick a date. You can also sell tickets to the entire recurring event series if you like.
Recurring events are an EventKoi Pro feature.
Does EventKoi take a commission on ticket sales?
No. Stripe or your chosen gateway charges its usual processing fee, and that is your whole cost. This is worth checking against any other plugin you are considering, because free plugins often take a percentage of your sales.
Can I have free and paid tickets on the same event?
Yes. Each ticket type has its own price, so set it to 0 for free or any amount for paid. Free ticket holders still get a confirmation email and a check-in code.
Can I switch from Stripe to WooCommerce later?
You can change your checkout method in settings, but this is a potentially system breaking change. Your existing orders were created by the method that sold them, so switching is a clean break rather than a migration. You will have to test extensively after the switch. It is much easier to pick correctly at the start.
Is EventKoi a full WordPress event ticketing system?
For most small businesses, yes. You get multiple ticket types, capacity limits, sale windows, custom fields, consent checkboxes, checkout through Stripe or any WooCommerce gateway, attendee management, check-ins, refunds, and reporting, with all your data on your own site.
Summary
Here is a quick recap of what we set up:
- Created a recurring event that repeats every Tuesday
- Added a ticket, then set up terms and conditions, including a separate checkbox for allergies
- Customised the confirmation email for this specific class
- Edited each individual class instance, giving every Tuesday its own recipe, price, and ticket sale dates
- Published the event, creating an overview page listing every class and a separate page per class
- Managed orders, attendees, and check-ins, filtered by individual instance
You can find more setup details in the EventKoi documentation, and EventKoi Pro starts from $99 a year.