
EventKoi’s taxonomy builder allows you to build custom taxonomies for your events, filter them in calendars (both in the WP admin and on the frontend for your site visitors), and display them across your site using shortcodes, metakeys, event data blocks, and more.
Why use the Taxonomy Builder
Let’s say you run a conference series with events happening at several different venues throughout the year. You want visitors to be able to see all events at “Prosser Hall” in one place, and you’d like each event page to show the venue’s address and a photo, without retyping that information into every single event.
Some plugins hardcode a “Location” field, but that only helps if location is the thing you need to group by. Maybe you actually need to group by speaker, or by industry, or by client, depending on your site. Rather than build one rigid feature, EventKoi lets you create your own taxonomy from the admin screen without code.
The Taxonomy Builder lets you:
- Classify events. Group and filter events by venue, speaker, industry, or anything else you define, with each term getting its own archive page if you want one.
- Reuse data. A term is created once and shared across every event assigned to it. Fill out “Prosser Hall” and assign it to twenty events, and all twenty display the same details. Edit the term later and every event assigned to it updates at once, rather than you having to hunt down and re-edit each event individually.
Here are some examples of when you might use the Taxonomy Builder:
- Group events by venue, and give each venue an address and photo you only ever fill out once.
- Group events by speaker, and display a page listing all the events where that speaker is presenting.
- Group events by industry, so visitors can filter to what’s relevant to them.
Overview of the Taxonomy Builder
The Taxonomy Builder has three components:
- Create a taxonomy. A taxonomy is the grouping itself, for example “Venues” or “Speakers.” You decide its name, whether it’s hierarchical, and what fields it should carry.
- Create and fill out terms. A term is one entry within that taxonomy, for example “Prosser Hall” within the “Venues” taxonomy. Each term can carry the fields you defined on the taxonomy, like an address or a photo, and that data is stored once on the term.
- Assign terms to events, and display them. Once a taxonomy has terms, you’ll start seeing it in your event settings. Select the terms that apply, then display them on your event pages using the Event Data block, a meta key, or a shortcode.
A taxonomy you create in EventKoi is a WordPress taxonomy. Its terms live in the same database tables WordPress uses for categories and tags, which means other plugins (SEO plugins, page builders, ACF) can read them too.
Create a taxonomy
Go to Settings > Taxonomies, then click Add taxonomy.
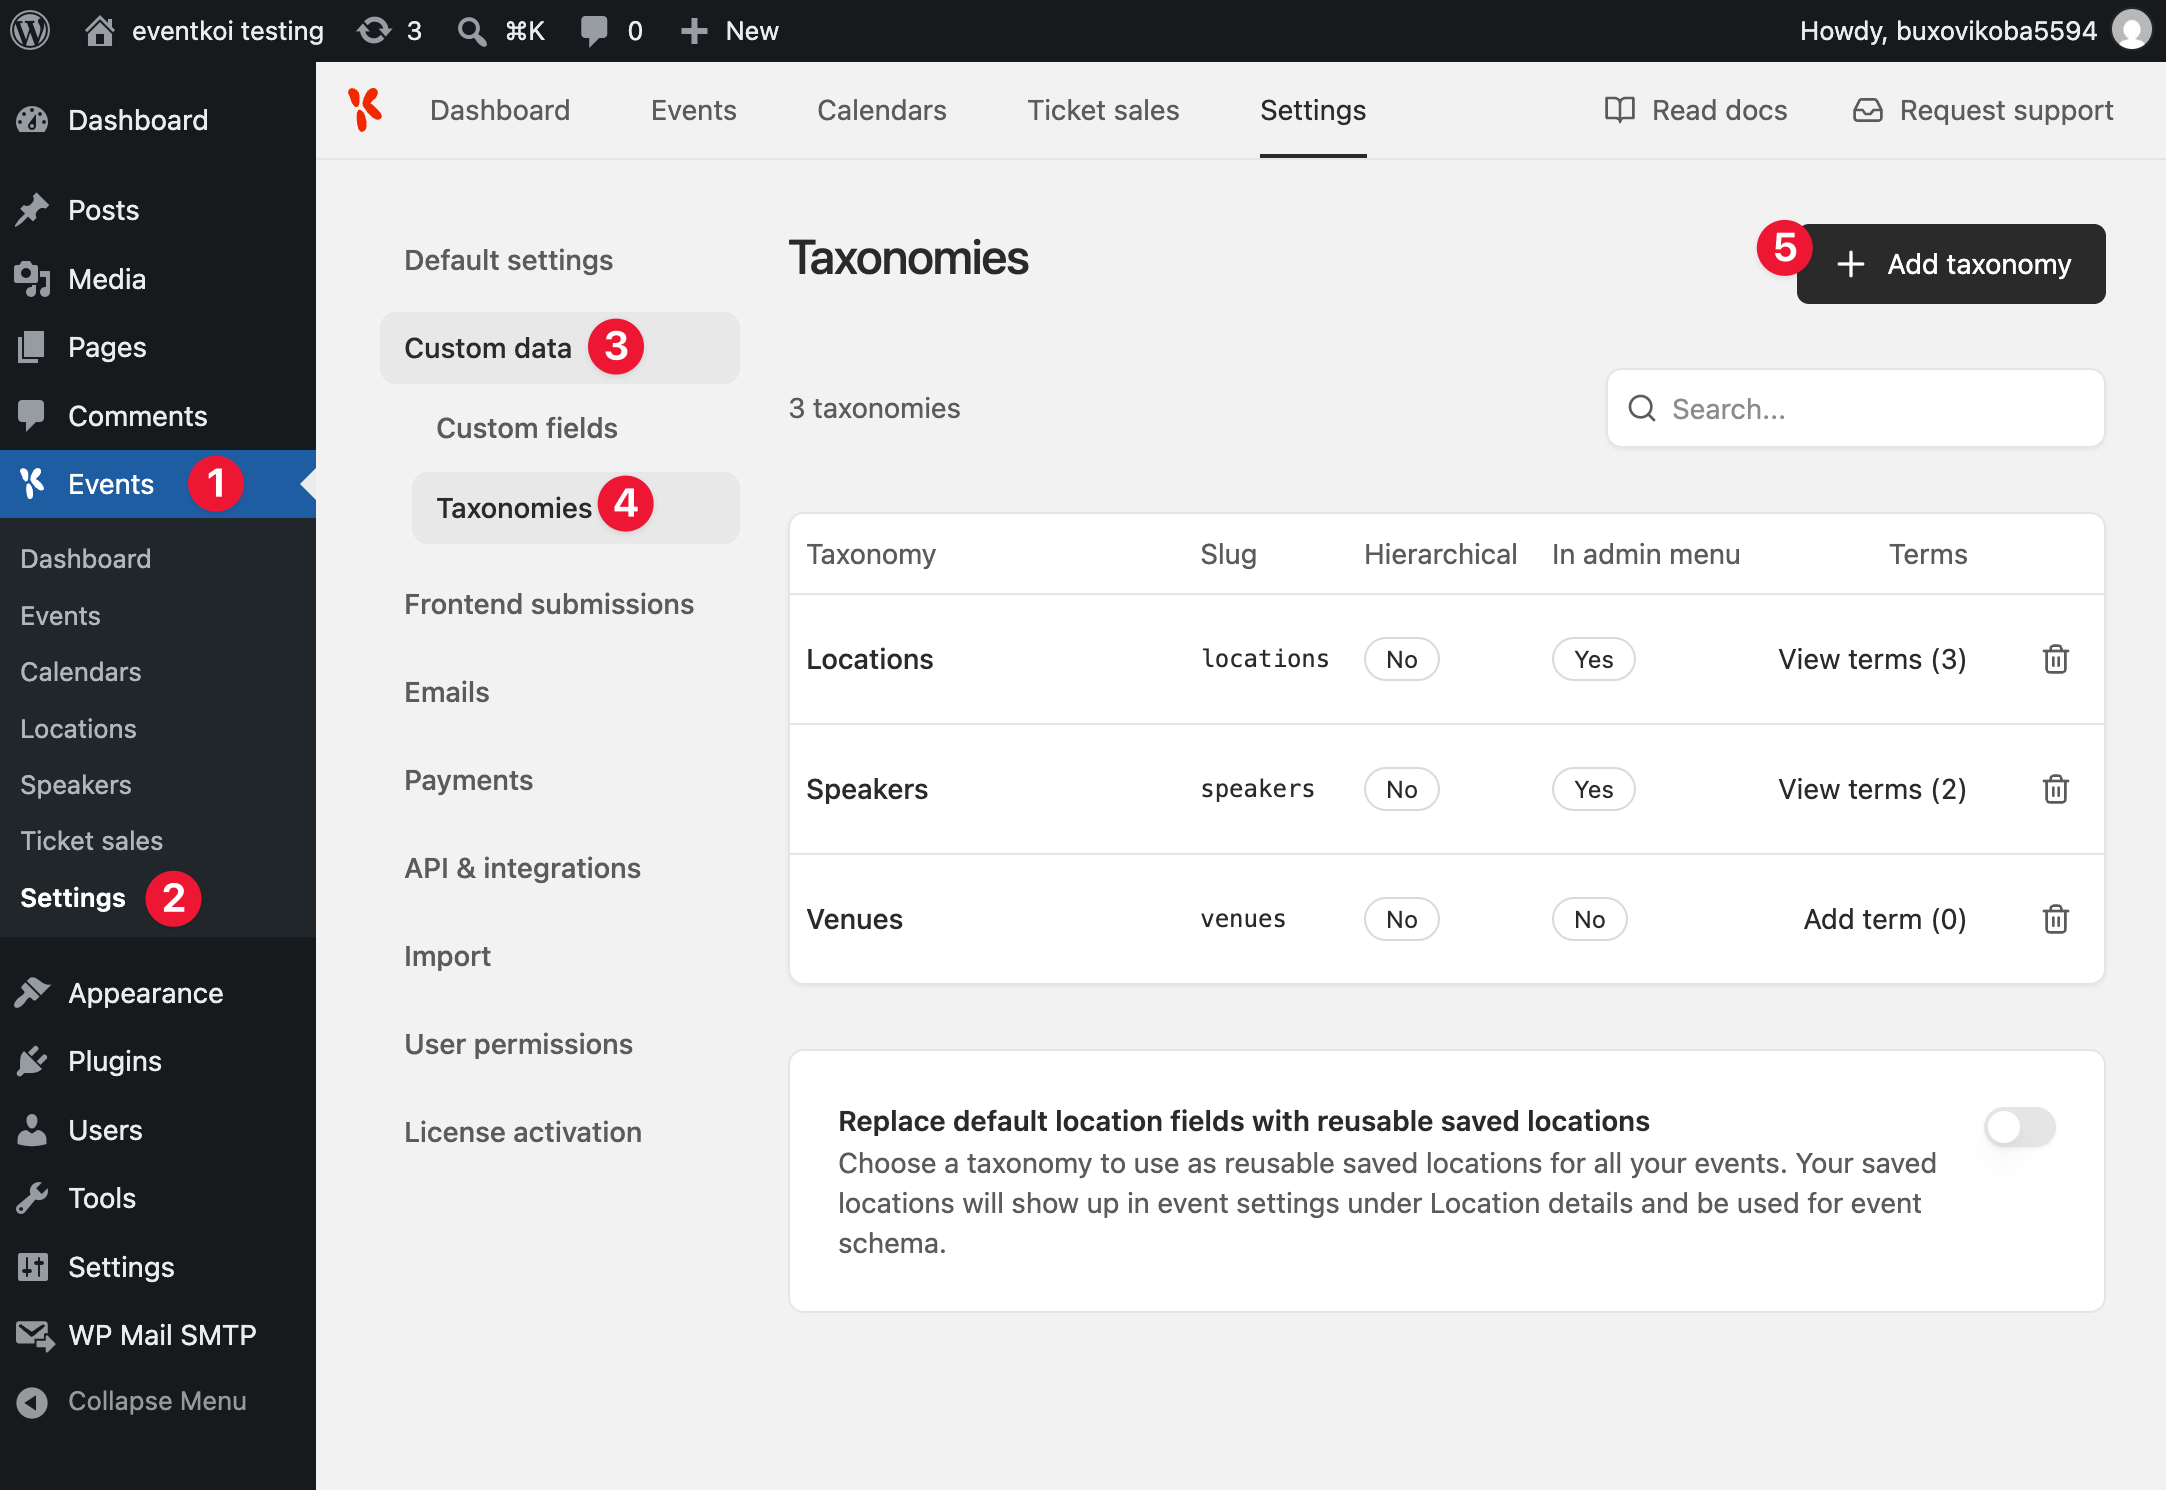
You’ll see the following options:
- Plural name – Used in menus and listing headings, e.g. “Venues.”
- Singular name – Used for one item at a time, e.g. “Add new Venue.”
- Slug – Used in URLs and the database. This is generated from the plural name automatically, but you can edit it before saving. Once the taxonomy is created, the slug is locked and cannot be changed.
- Hierarchical – Turn this on if terms should have parent/child relationships, similar to categories.
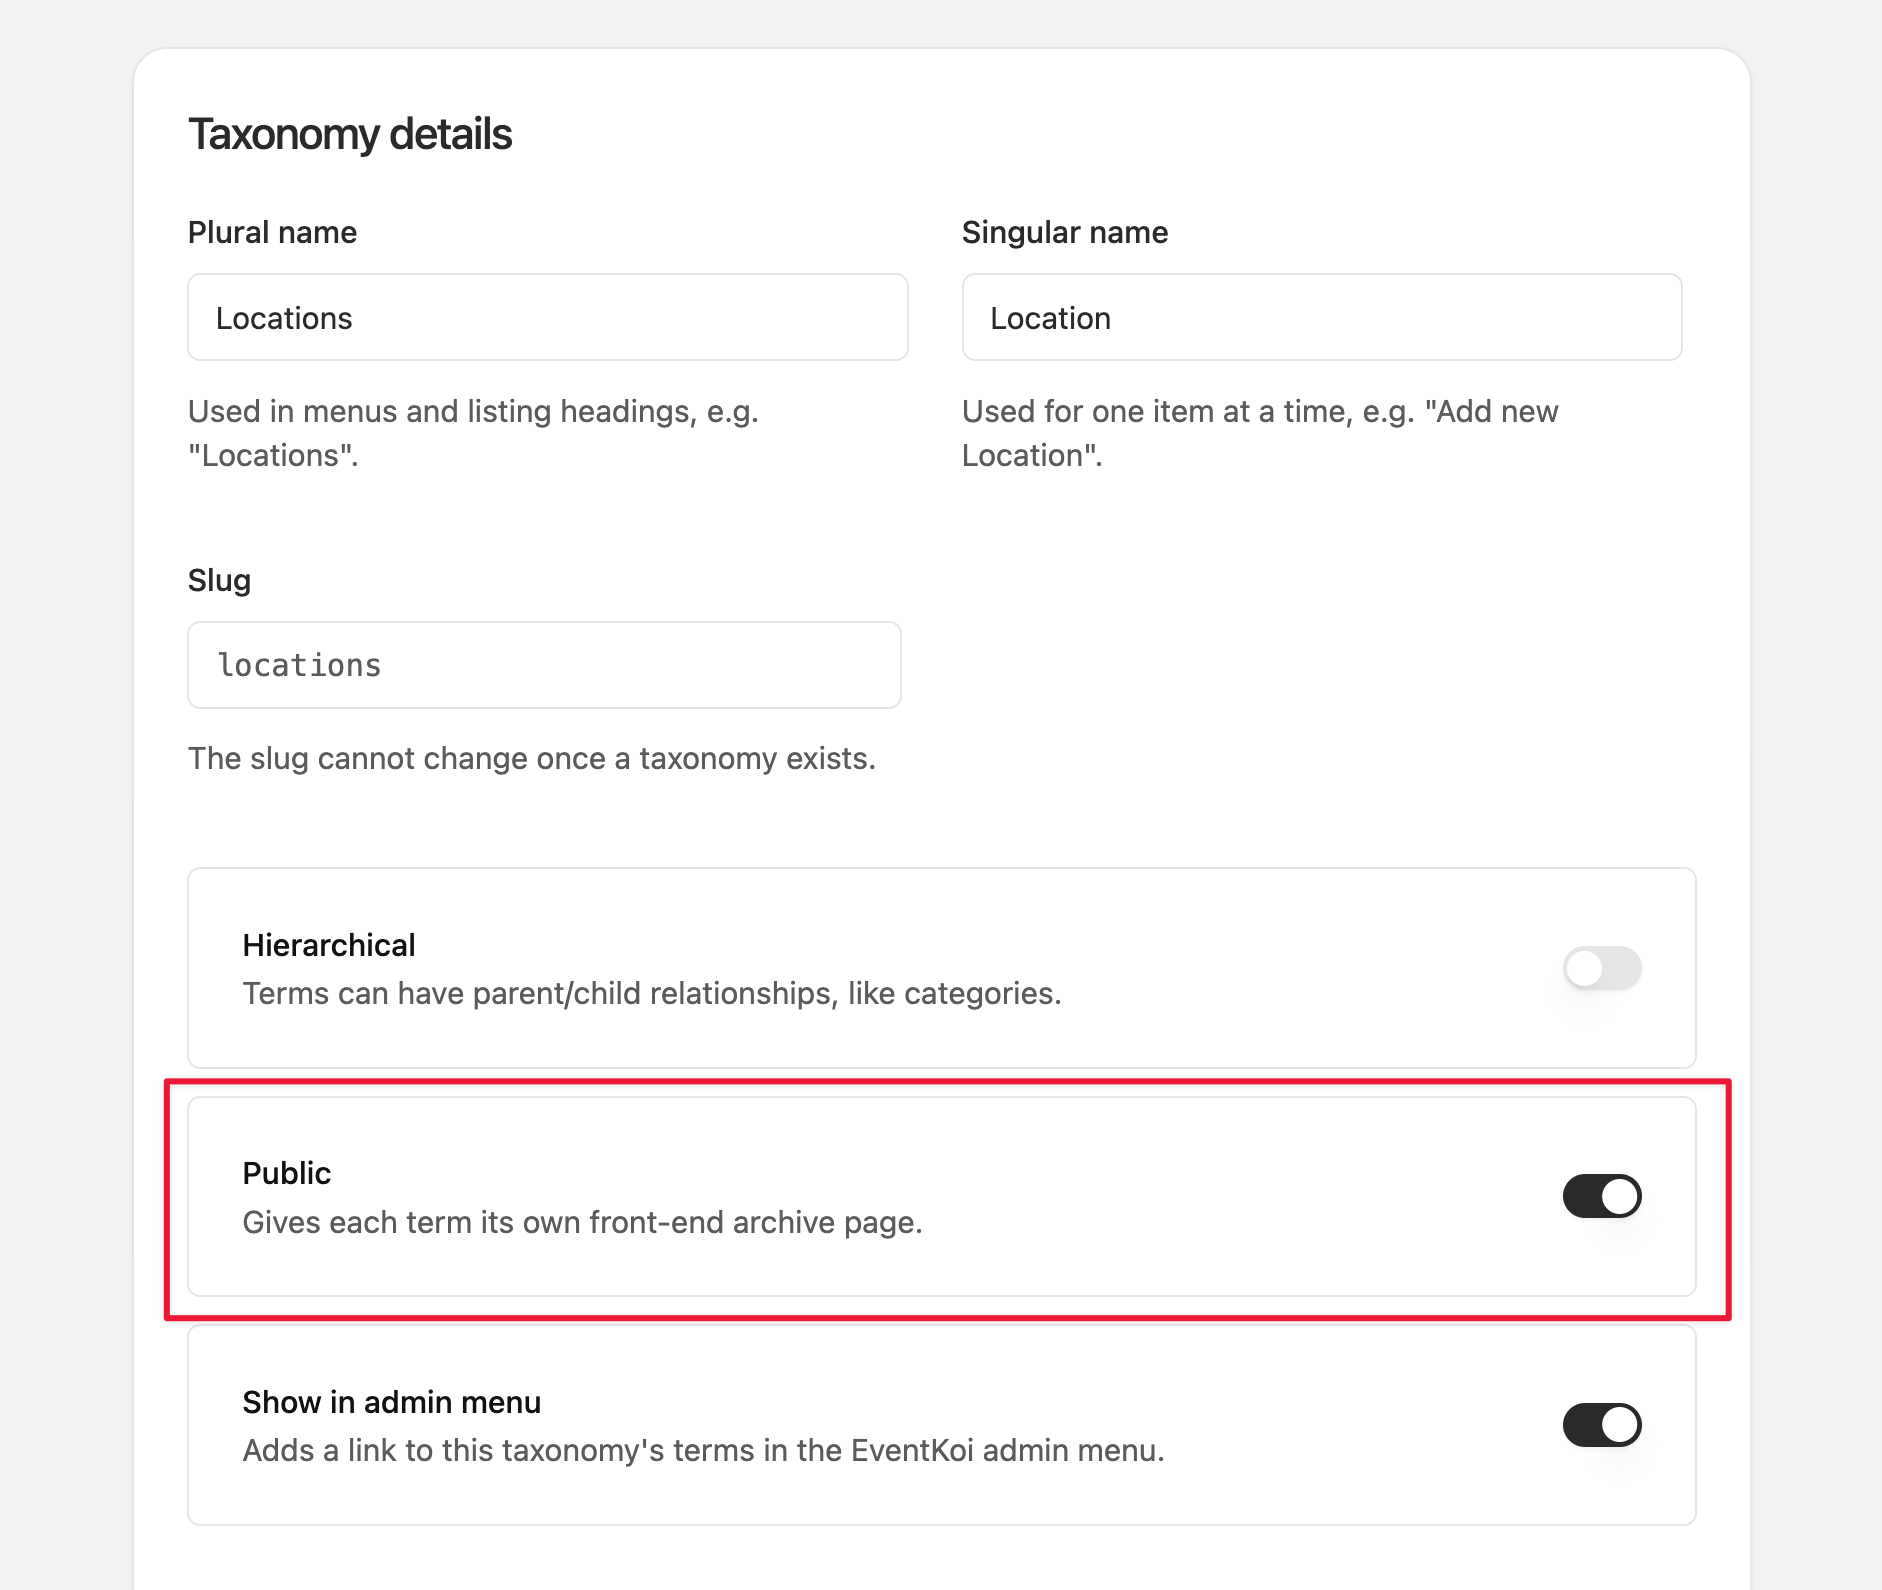
- Public – Turn this on to give each term its own front-end archive page. Turn it off if you only want to use the taxonomy internally, for example to filter events without giving each term a public page.
- Show in admin menu – Turn this on to add a link to this taxonomy’s terms in the EventKoi admin menu, so you don’t have to go through Settings each time.
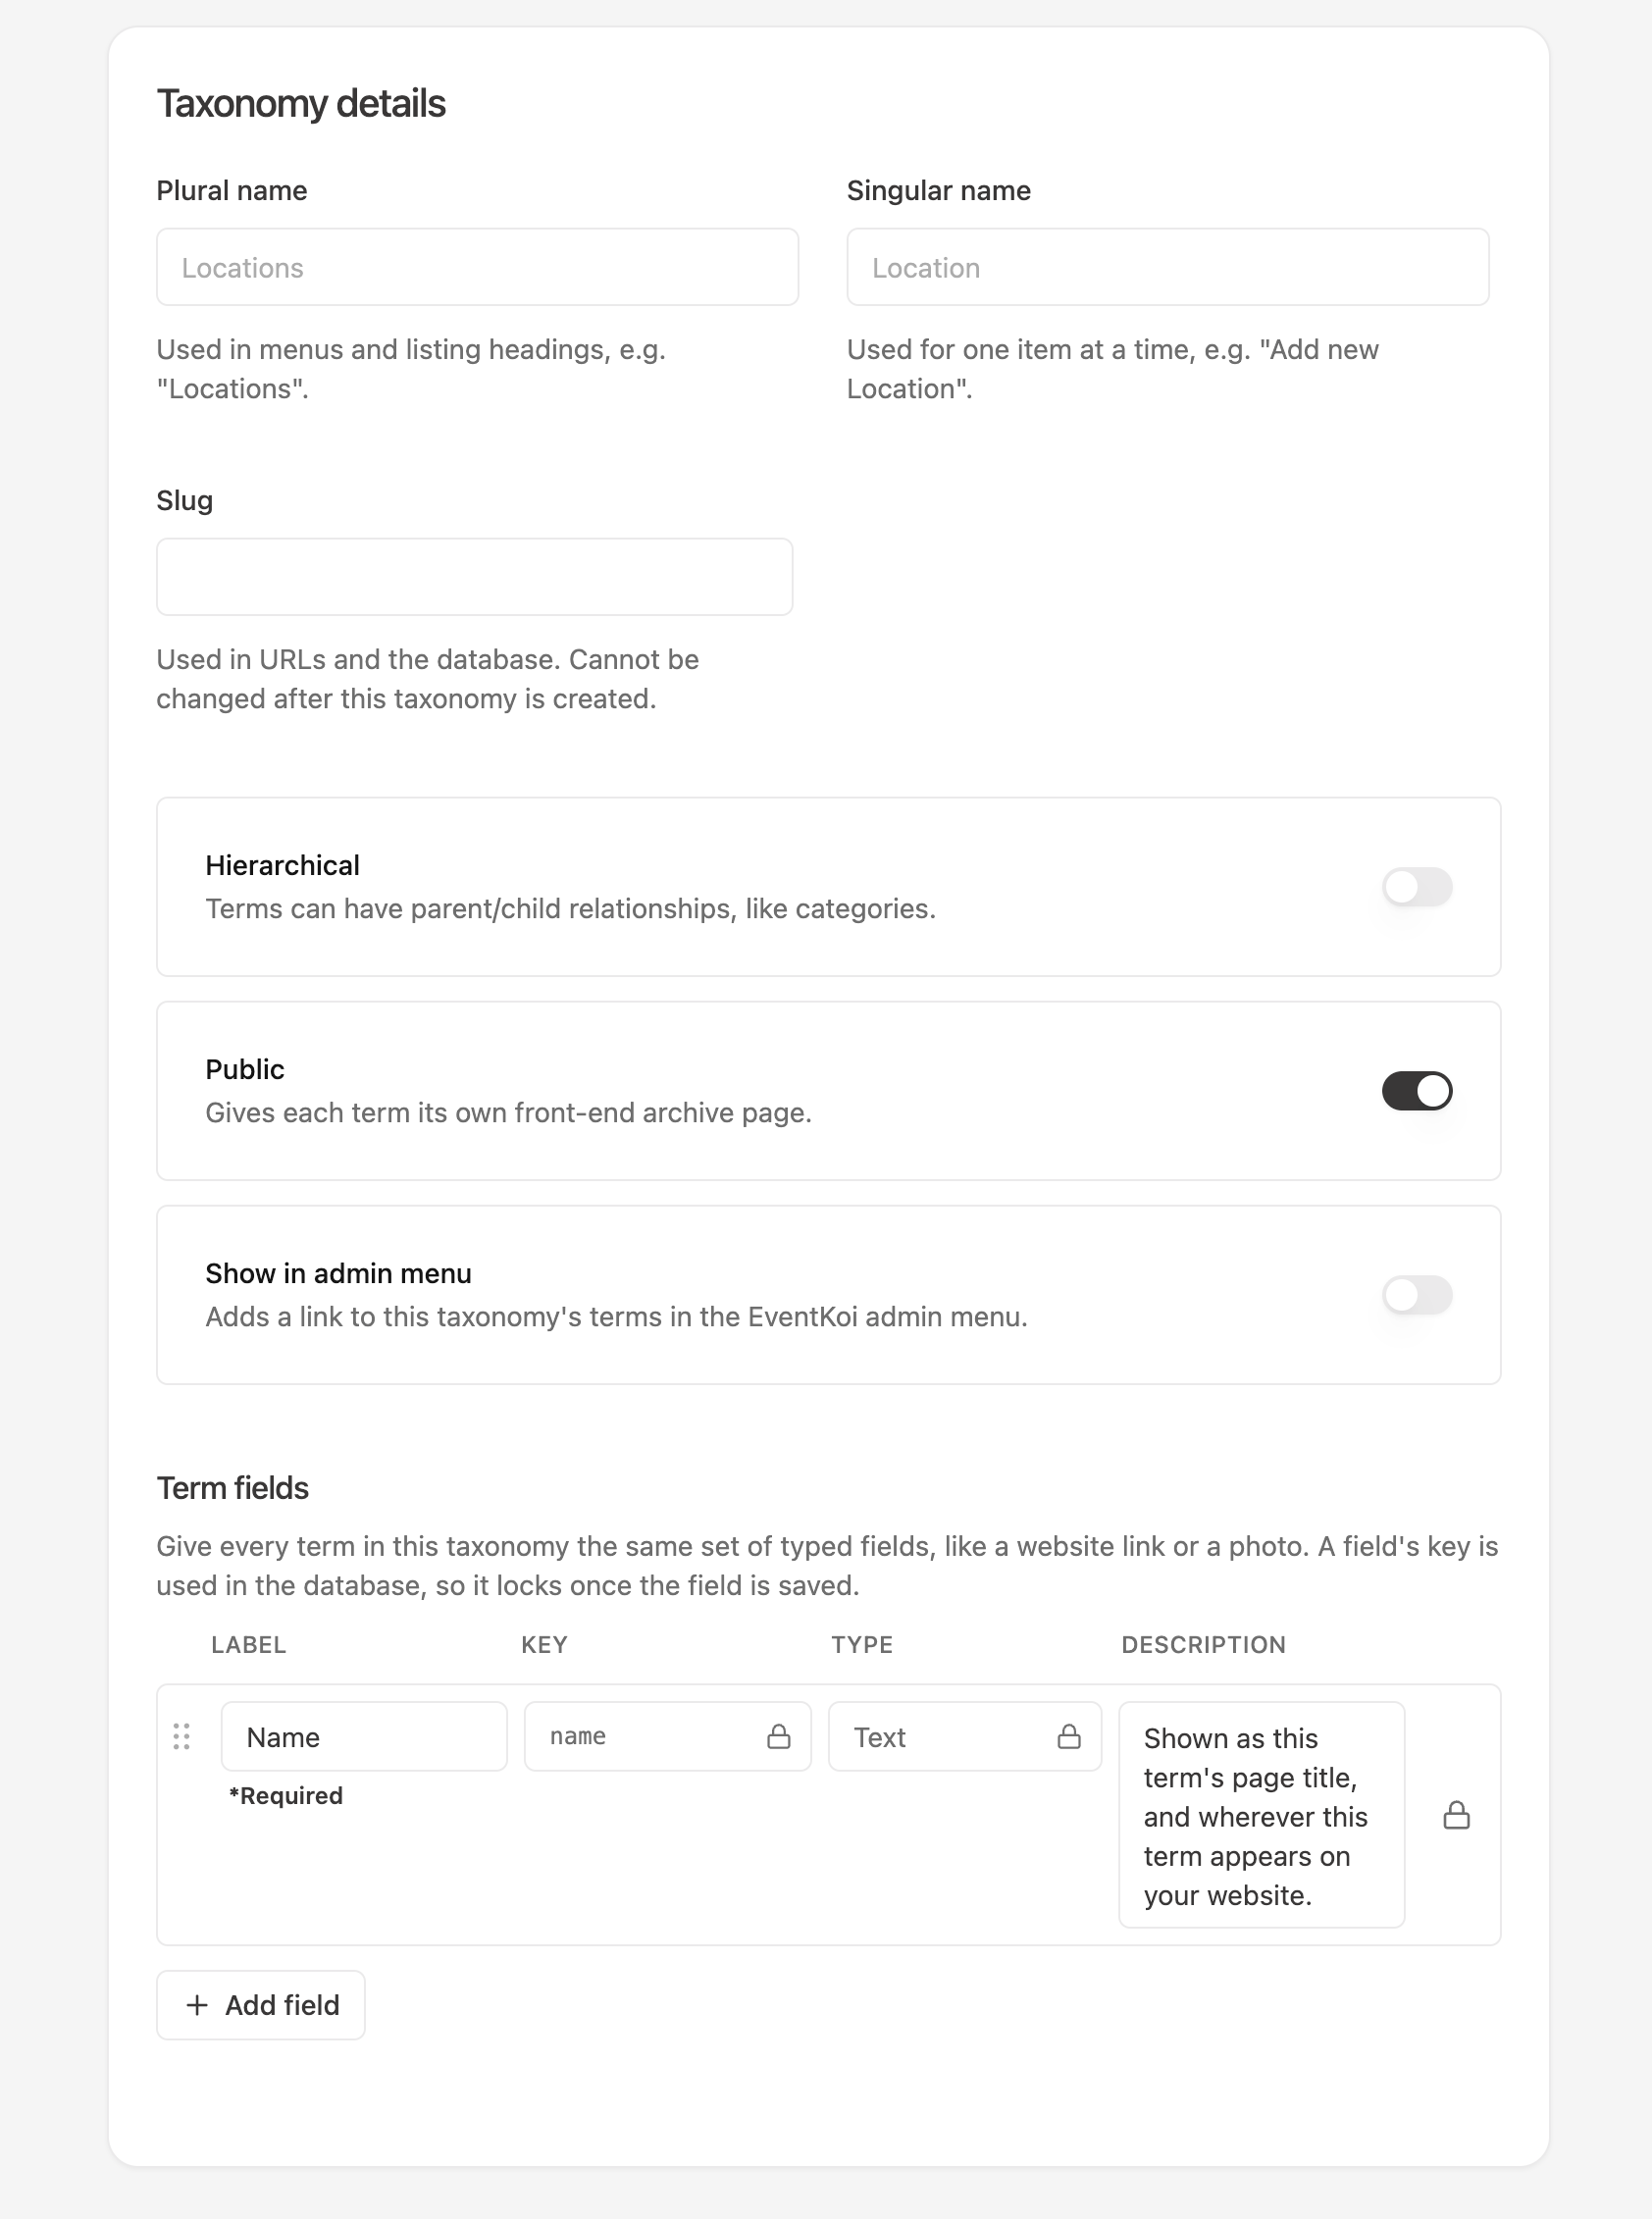
Underneath, you’ll find Term fields. This is where you decide what typed information every term in this taxonomy should carry, for example a Website field or a Photo field. For each field, you’ll set:
- Label – What the field is called, e.g. “Photo.”
- Key – Used to reference this field’s value when displaying it. This locks once the field is saved, so renaming the label afterwards won’t break anything already displaying it.
- Type – Text, Textarea, URL, or Image.
- Description (optional) – Helper text shown underneath the field on the term edit screen, to guide whoever’s filling it out.
The first field you’ll see is the Name field. Every term must have a name. This is why this field is locked and you cannot delete it. You can edit the label and description, but the key and type are locked as “name” and “text” respectively.
Create all the term fields you need:
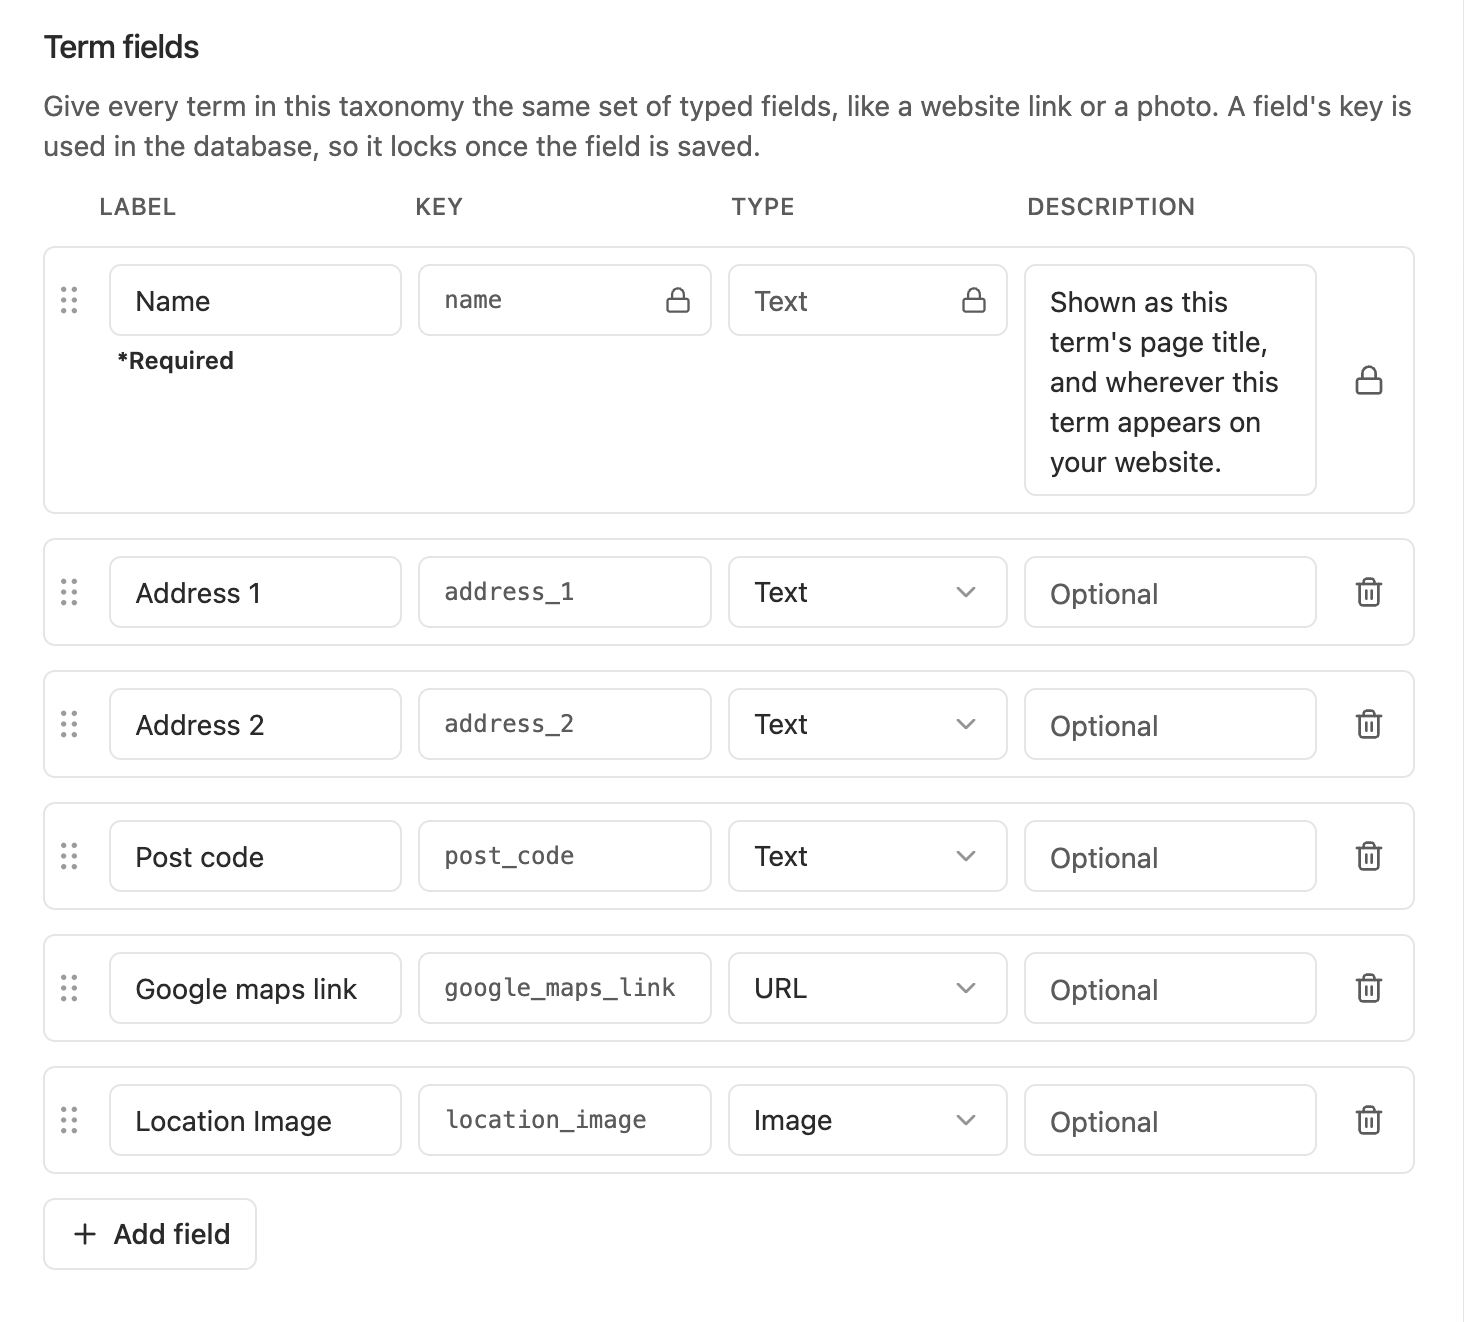
Once you’re happy, click Save. Your new taxonomy is now live.
Create terms
Head to your taxonomy’s terms screen, either from the EventKoi admin menu (if you toggled on “Show in admin menu” in the taxonomy settings) or by clicking through from Settings > Taxonomies.
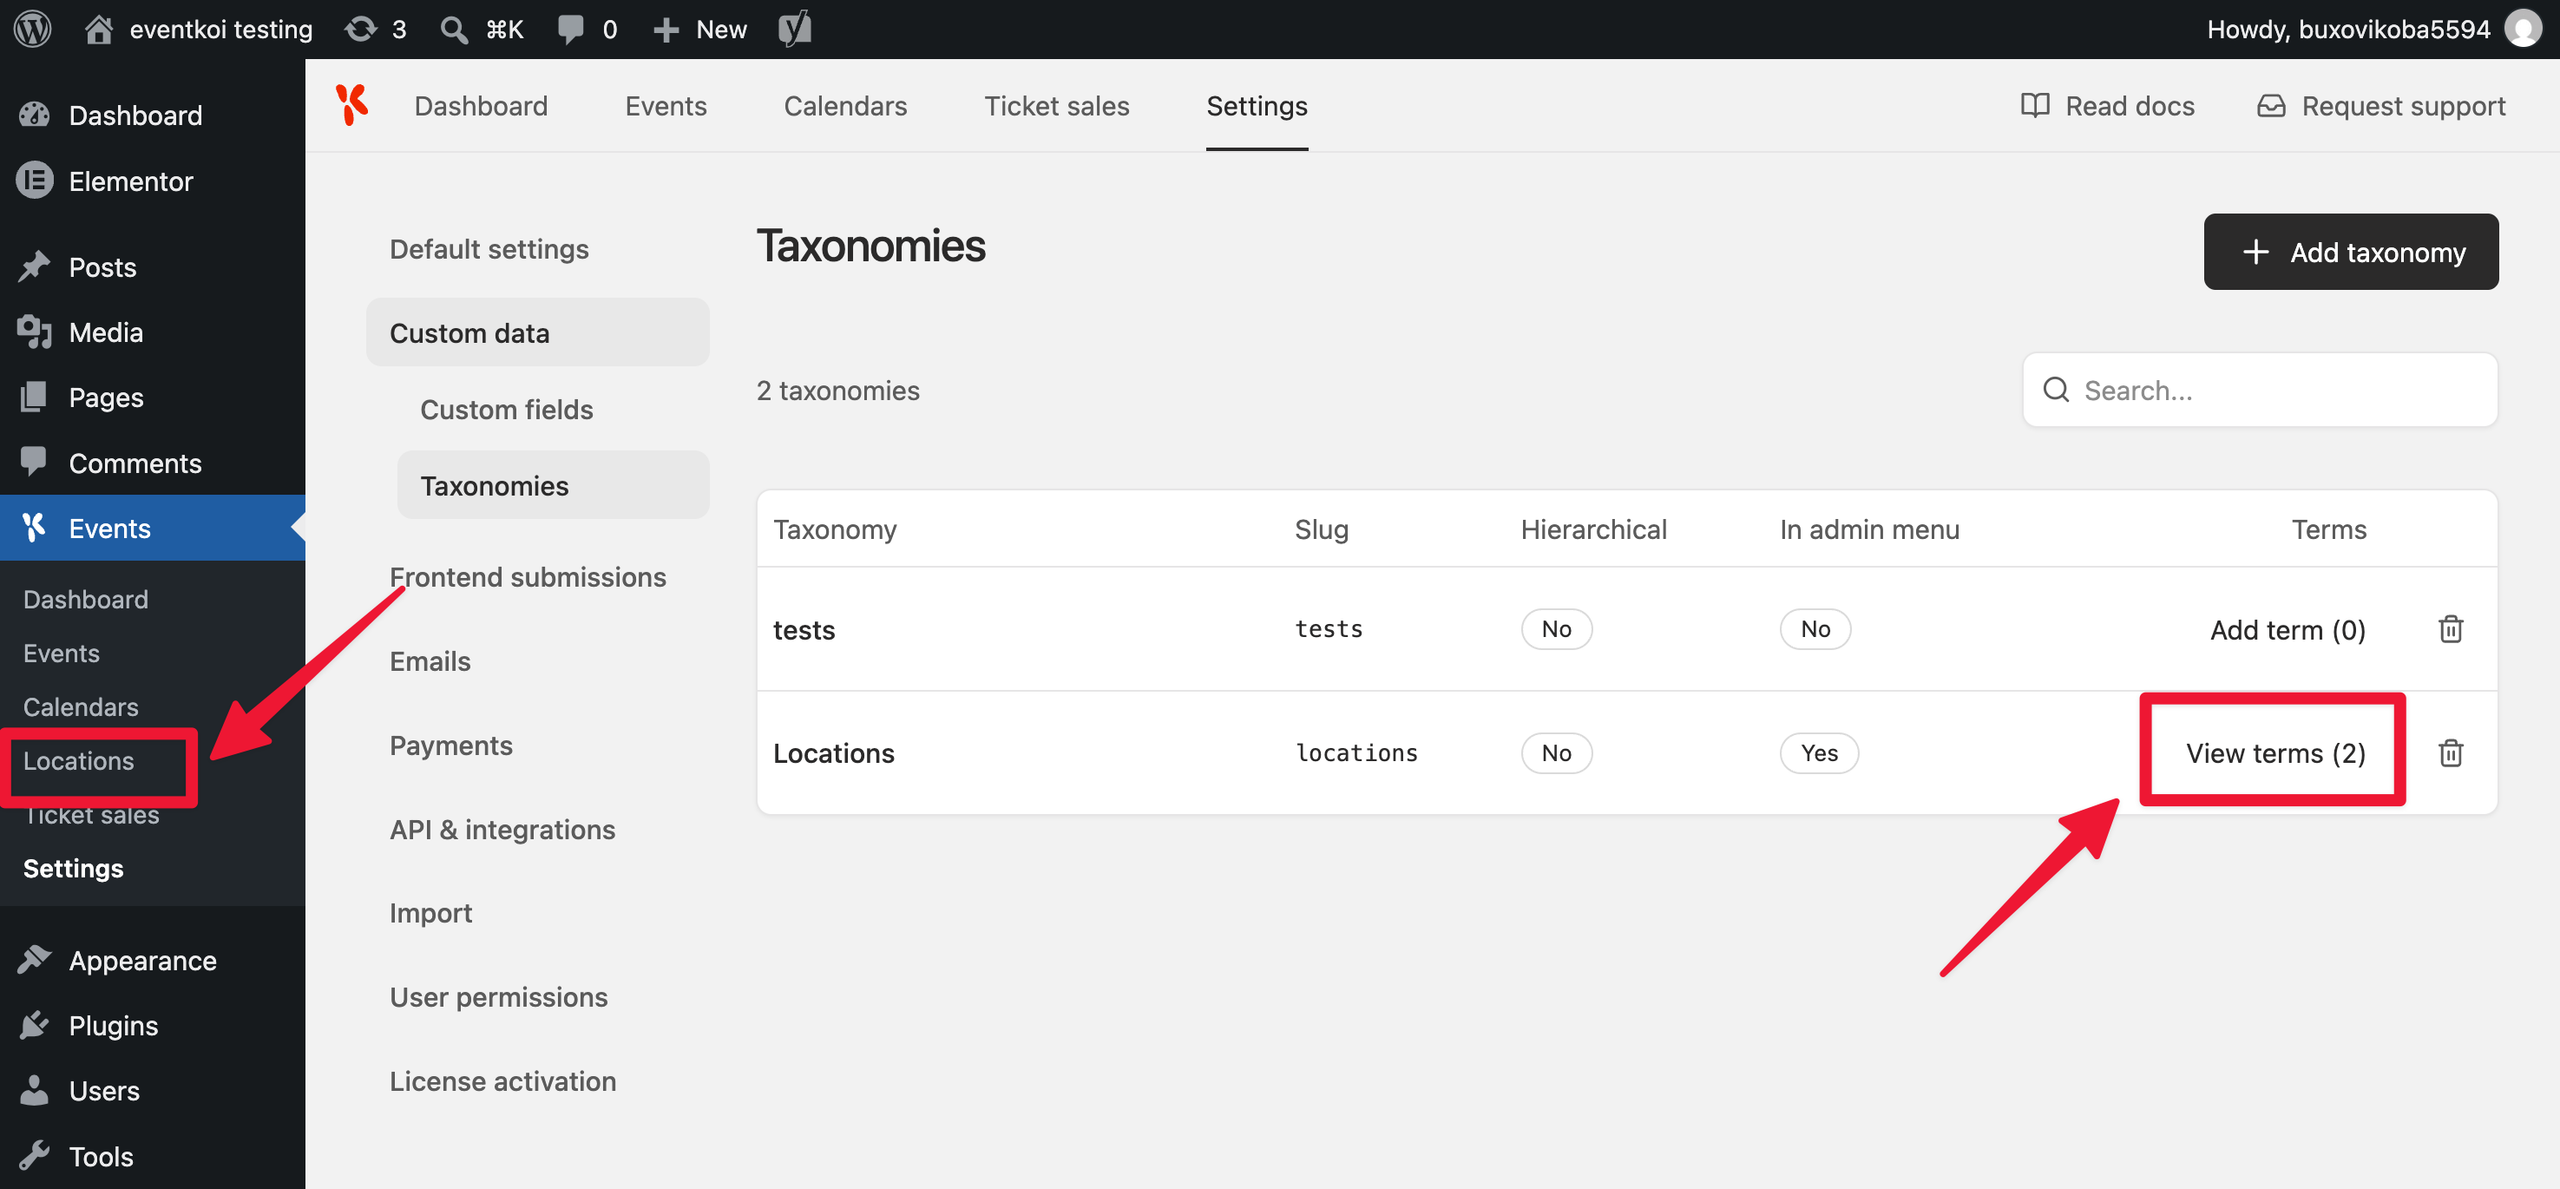
Click Add [singular name], for example Add Location.
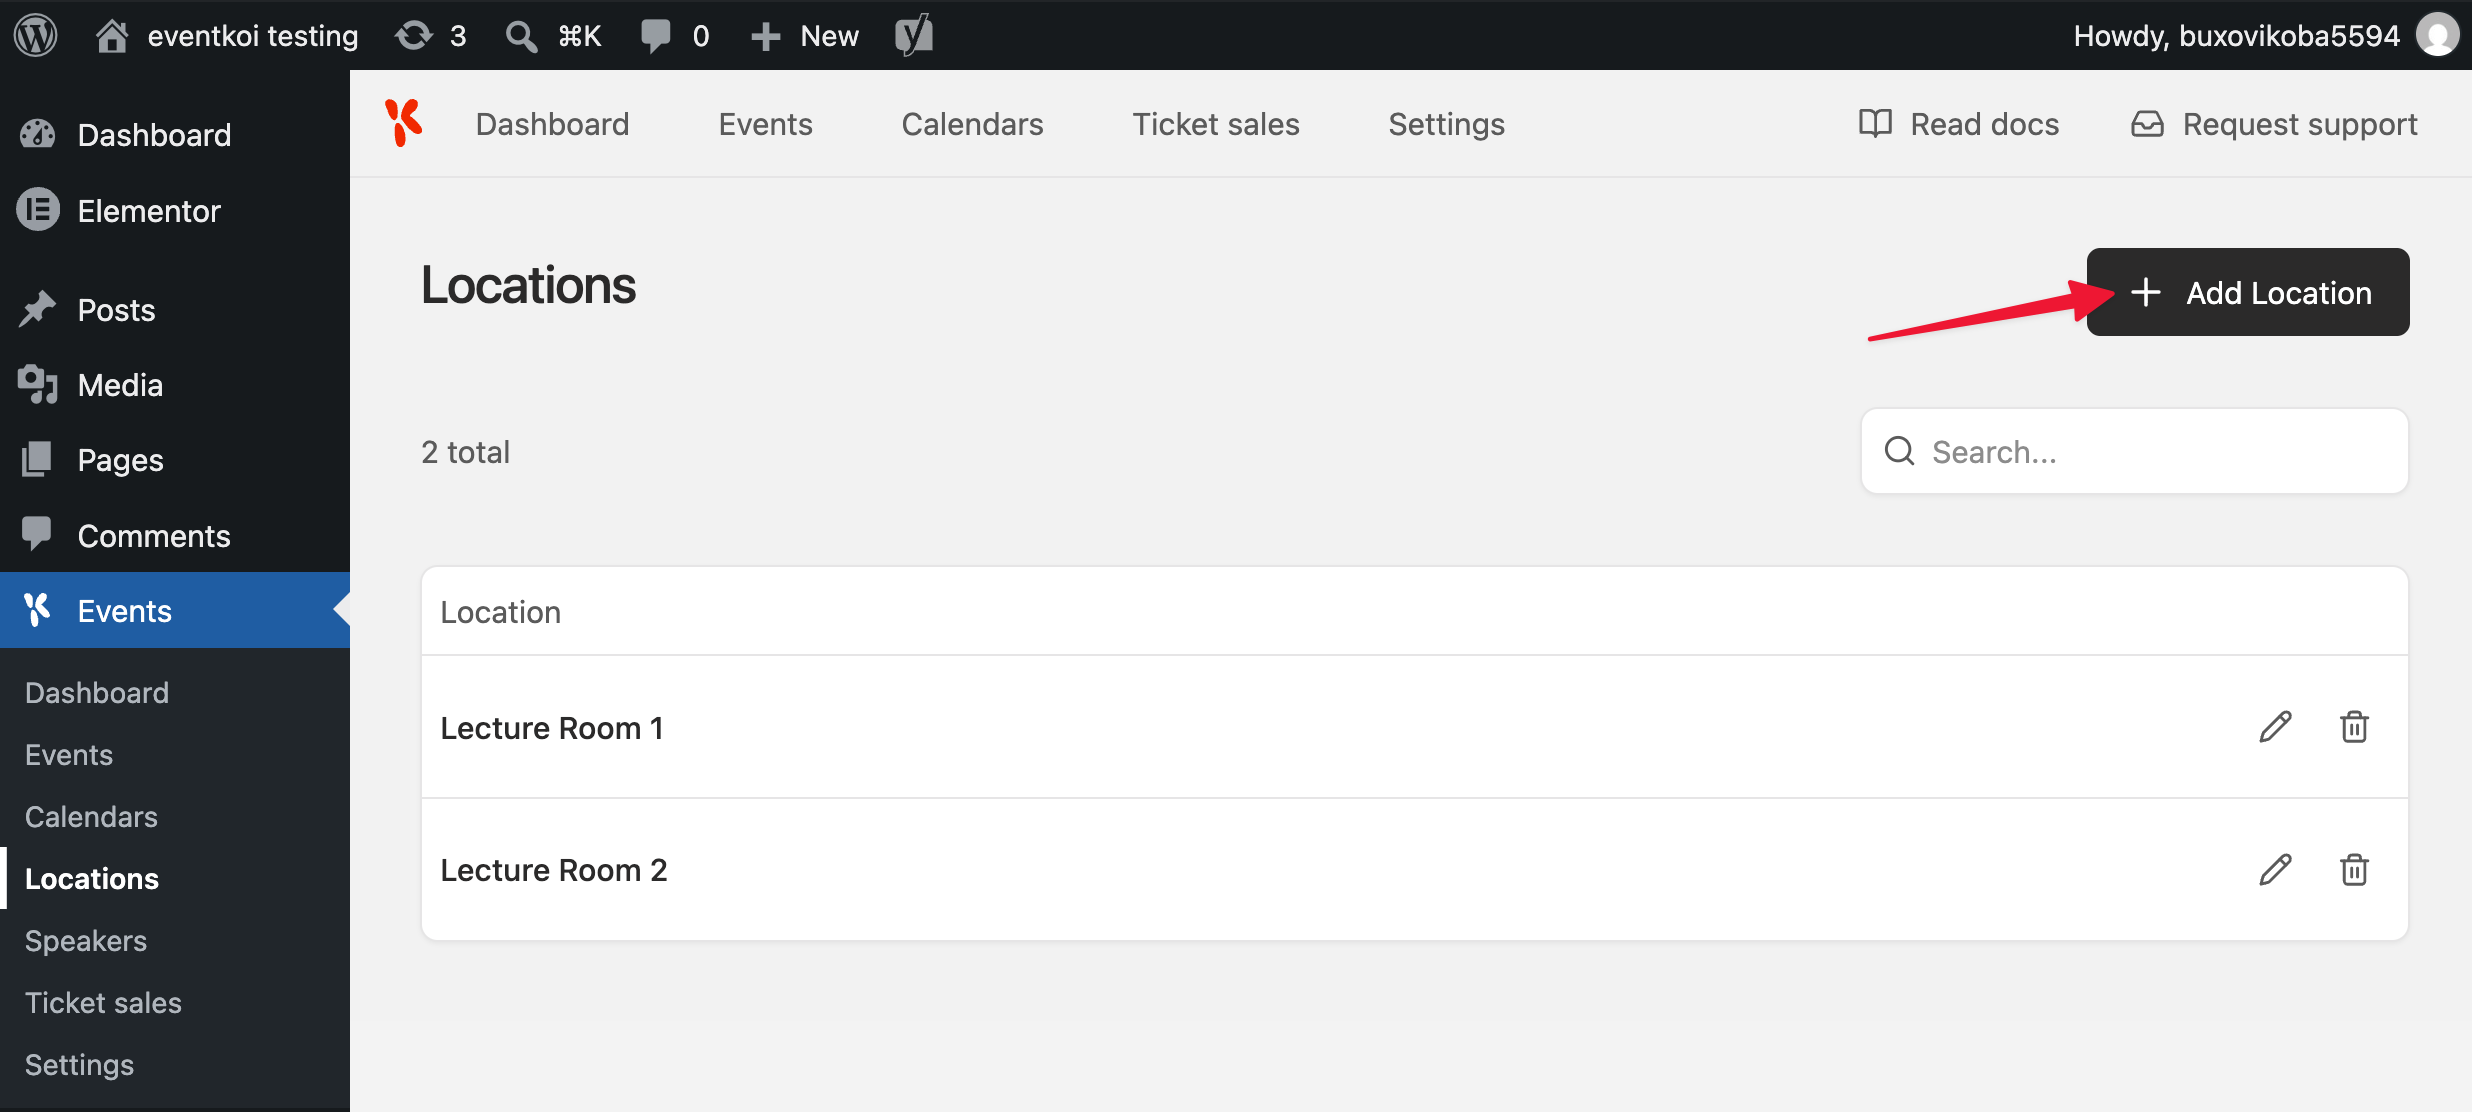
You’ll see:
- Name: The term’s name, e.g. “Lecture Room 1.”
- Parent: Only shown if the taxonomy is hierarchical. Lets you nest this term under another.
Fill out terms
Right below Name (and Parent, if applicable), you’ll see the term fields you set up when creating the taxonomy, each with its description underneath if you added one.
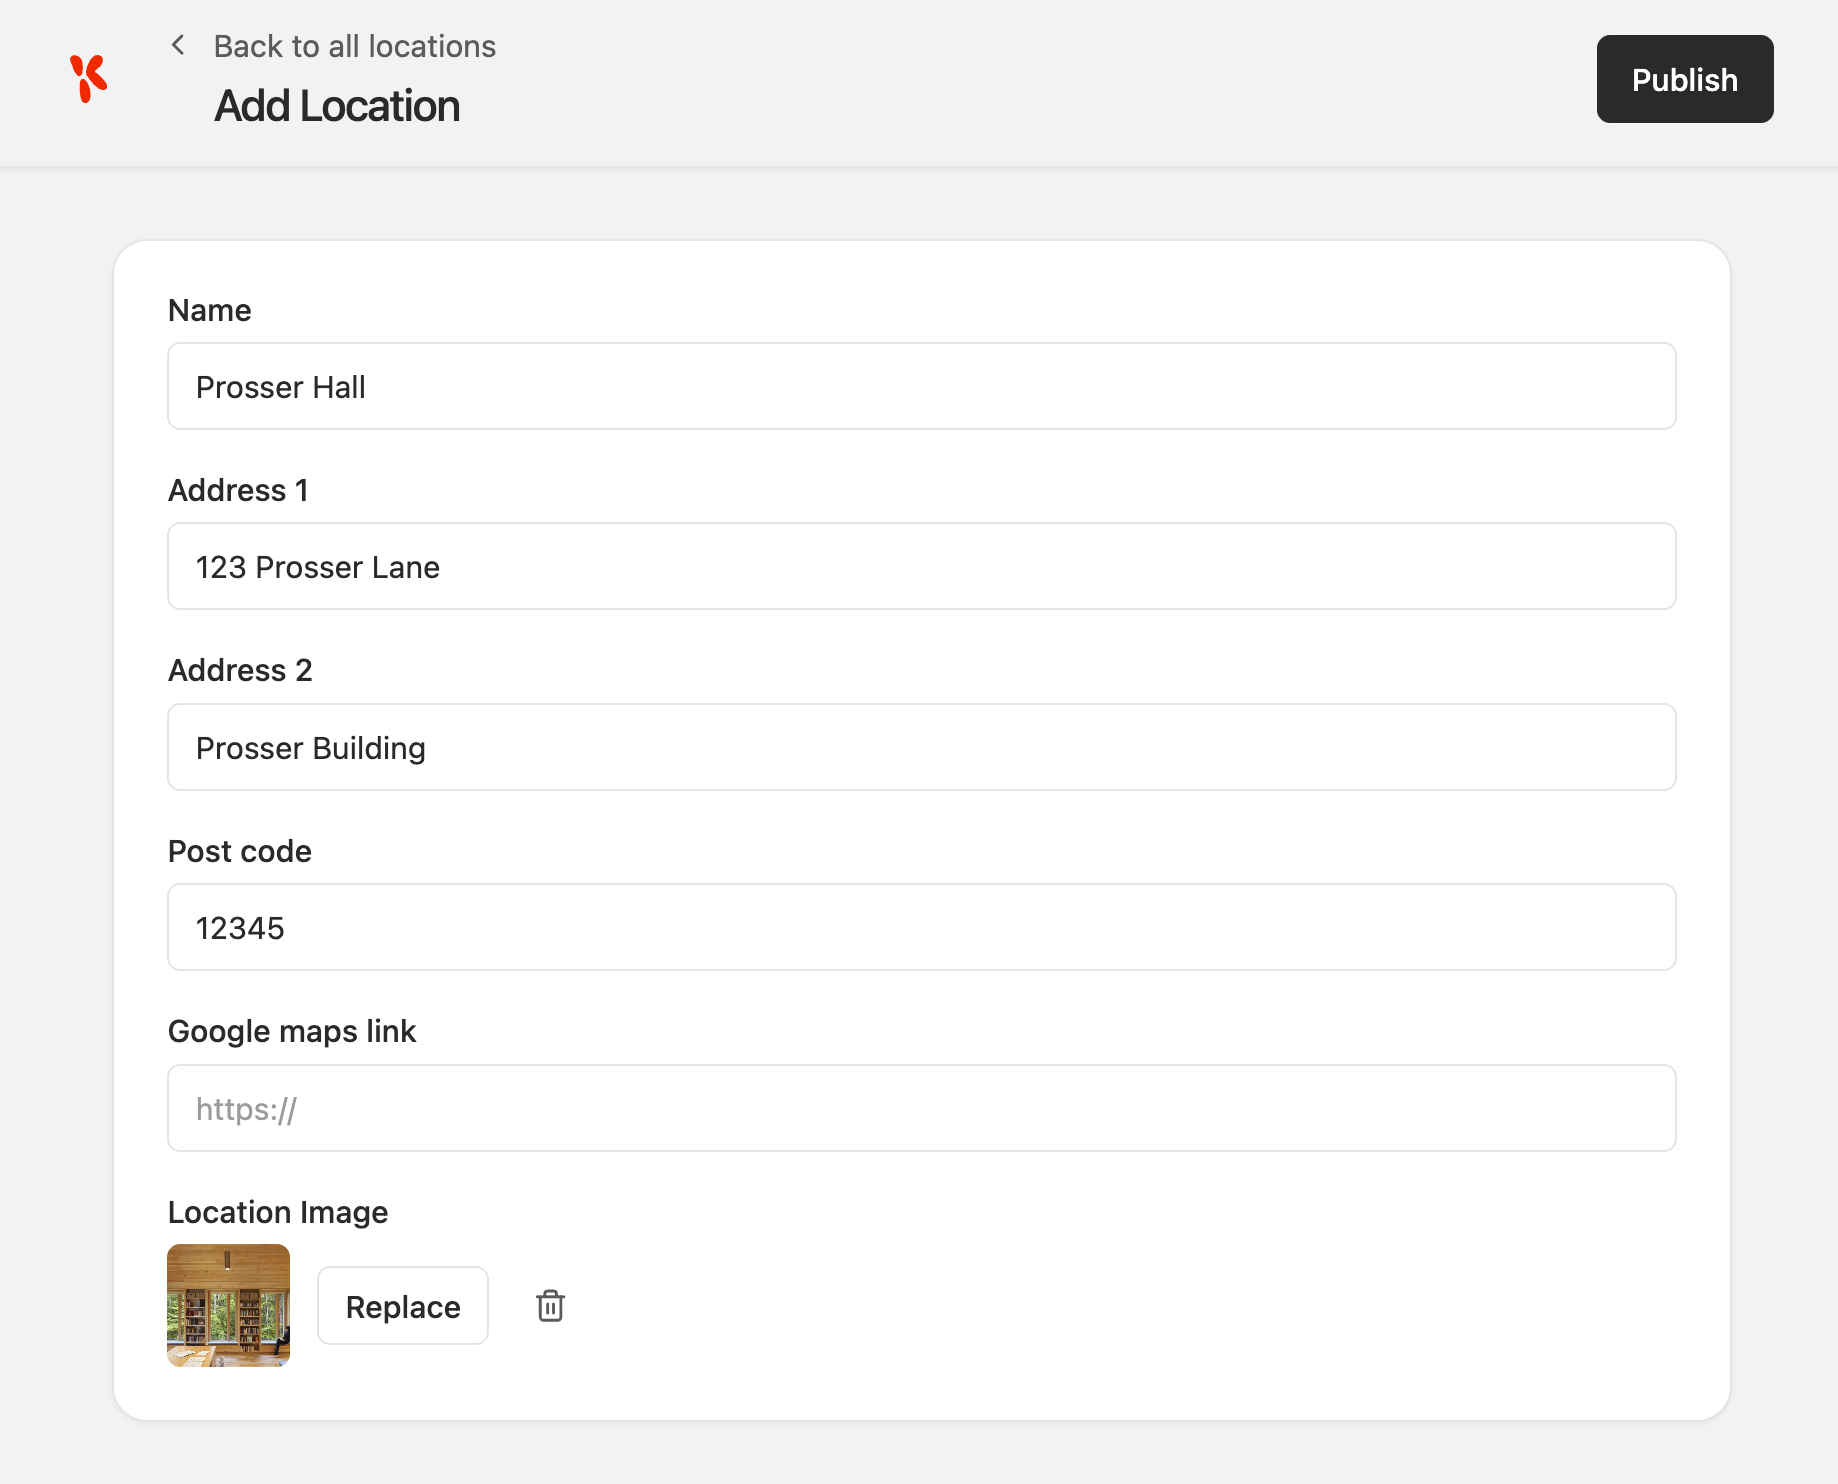
Click Publish once you’re done. Because these values are stored as standard WordPress term meta, they’re also available to other plugins and page builders that read term data, not just EventKoi.
Assign terms to your events
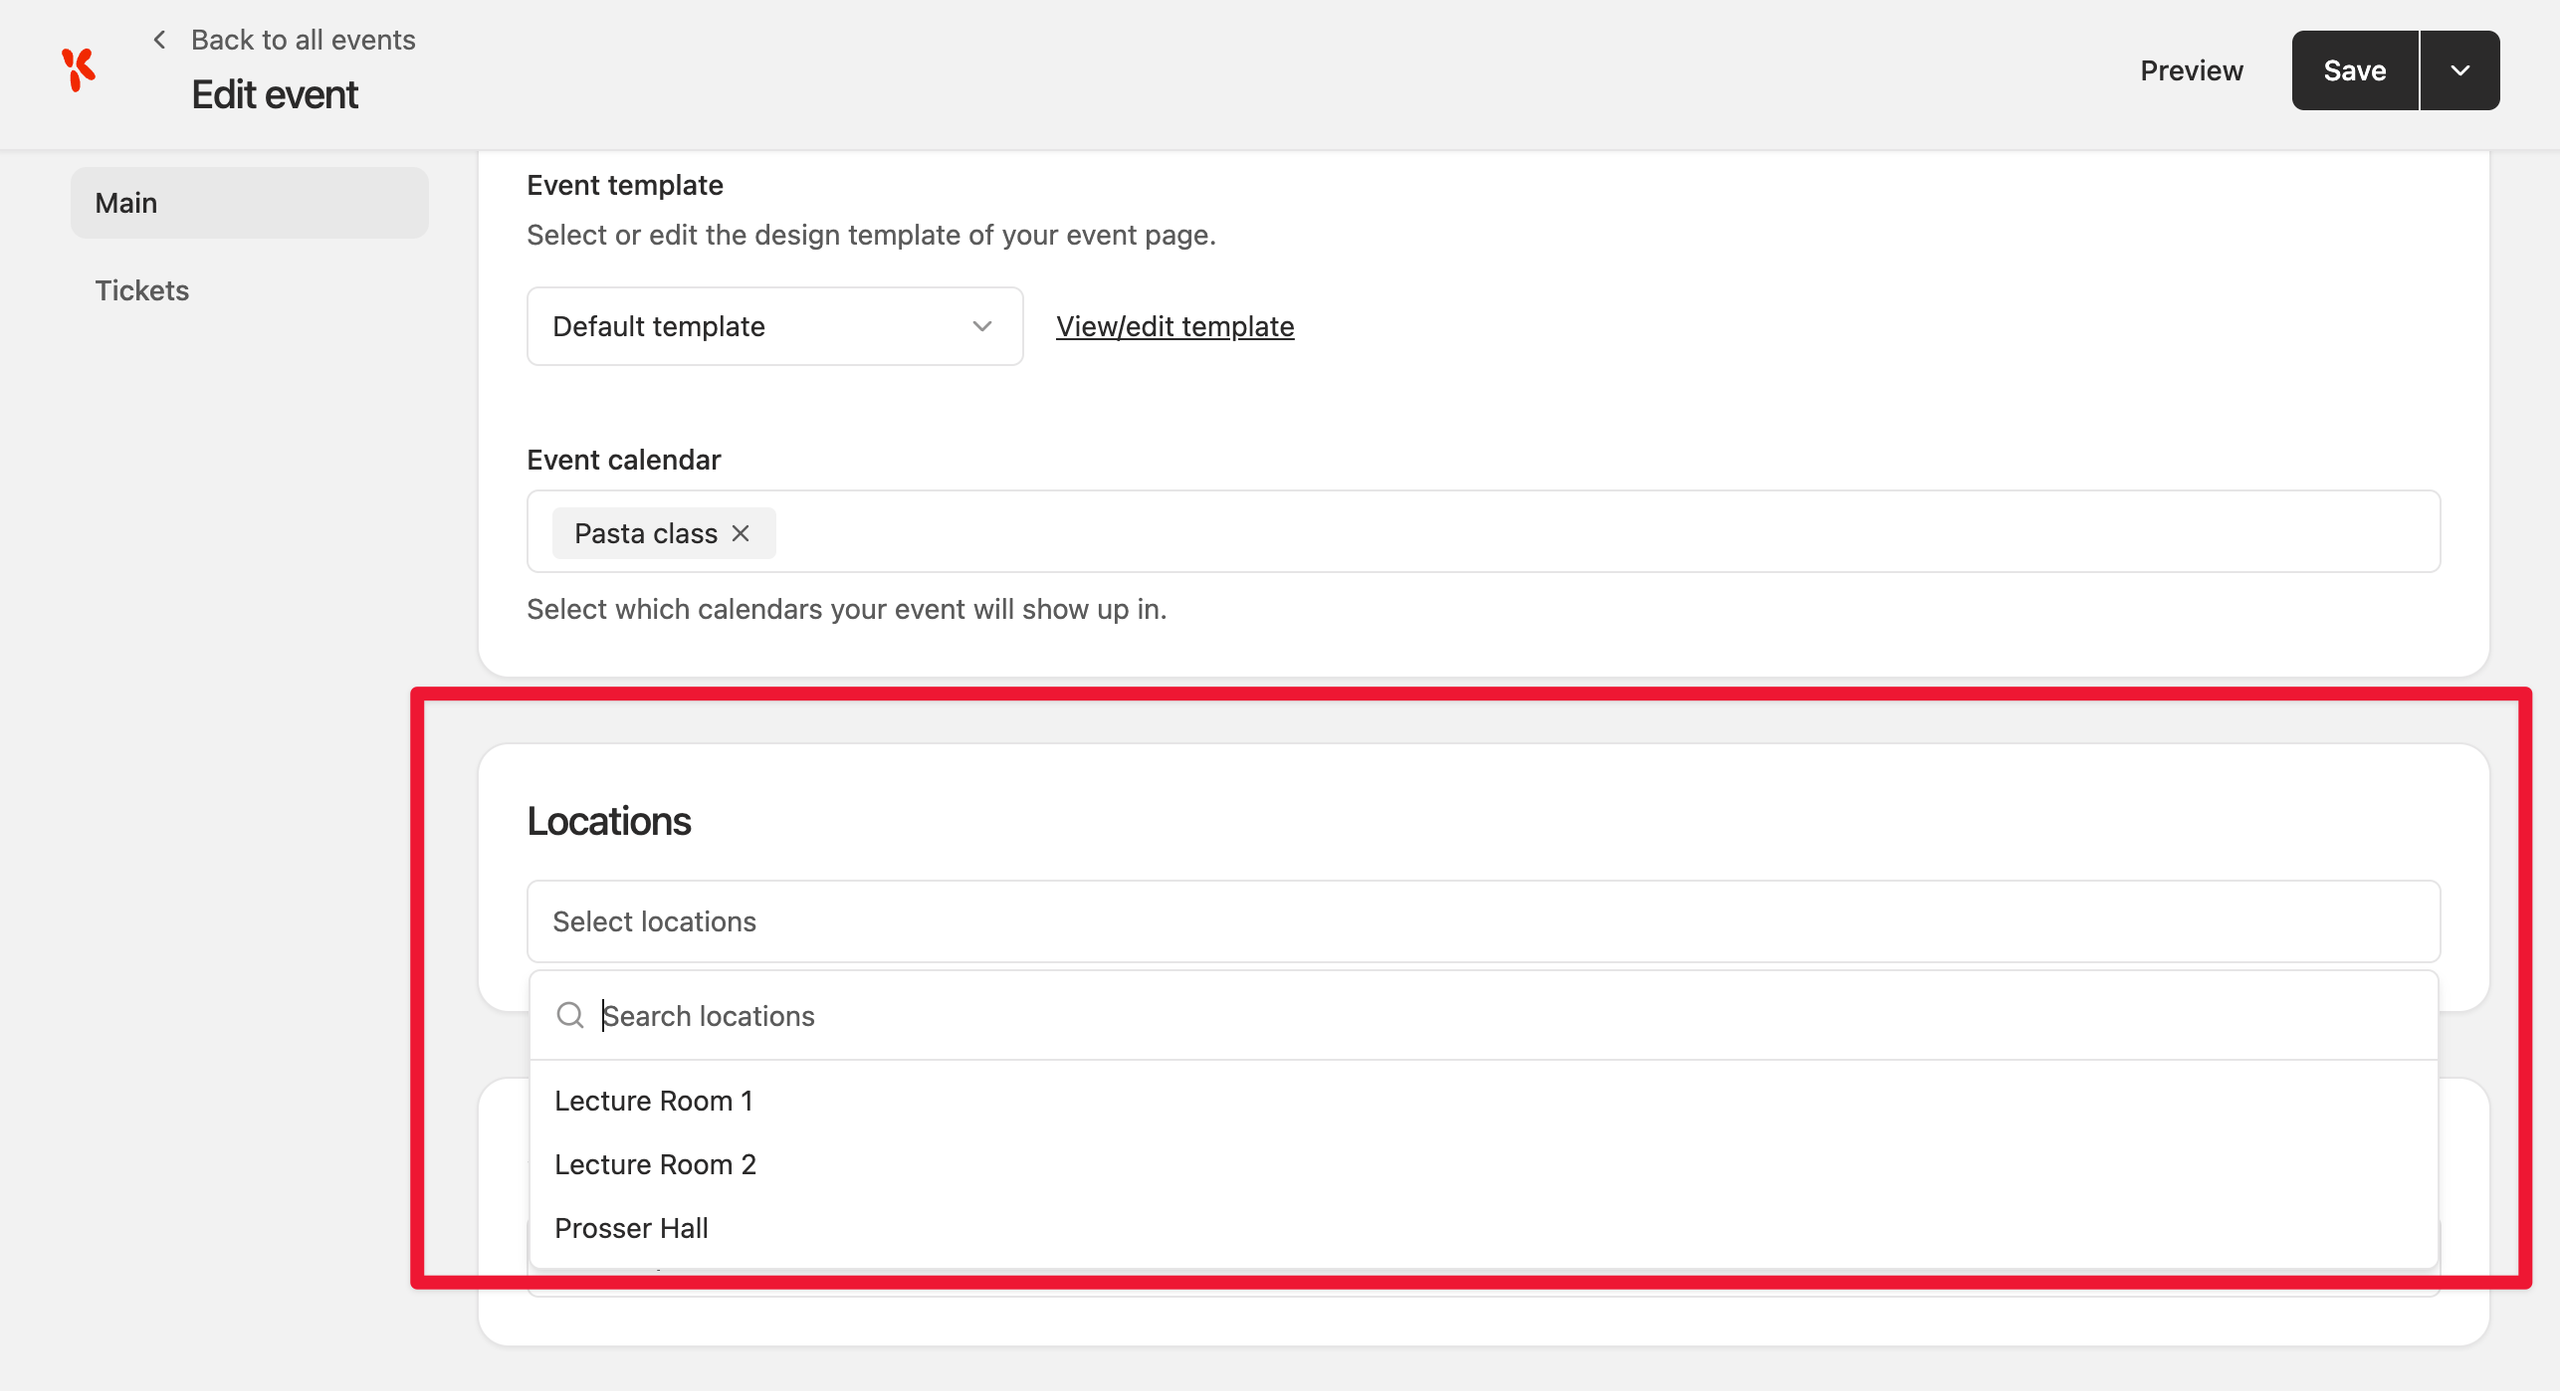
Before a term shows up on an event page, it needs to be assigned to that event. Head to Events, edit an event, and scroll down. Once your taxonomy has at least one term, you’ll see a box for it (titled with your taxonomy’s own name, e.g. “Locations”) with a dropdown list of terms. Select whichever apply to this event, then update the event.
Display taxonomy on the frontend
Once a term is assigned to an event, there are a few ways to bring that data onto the page.
Event Data block
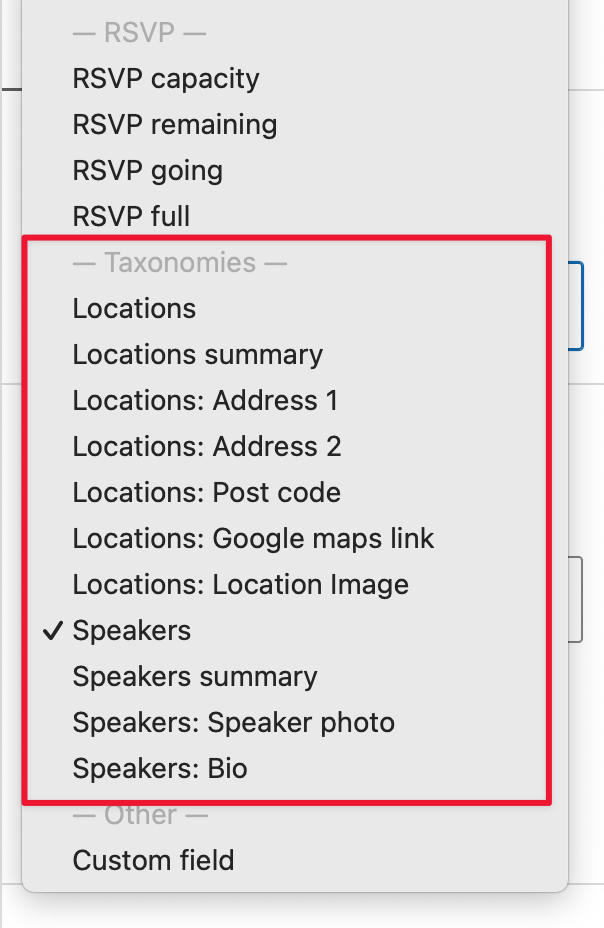
Add an EK Event Data block to your event template or Query Loop post template, and open its Field dropdown. Every taxonomy you’ve created is listed under a “Taxonomies” group, alongside the built-in fields like Title and Location, and gives you three kinds of options:
- The plain term list, e.g. “Locations”, a comma-separated list of the terms assigned to that event.
- A “[taxonomy] summary” option, e.g. “Locations summary”, every assigned term’s name, plus every one of its field values, laid out as labelled rows in one go. If Public is on for that taxonomy, the name links to its archive page.
- One option per individual field, e.g. “Locations: Post code”, just that one field’s value from the first assigned term.
Meta keys or shortcodes
Every taxonomy also gets a meta key in the shape event_tax_<slug>, the same value the Event Data block’s plain list option sets behind the scenes. For a taxonomy with the slug venue, that’s event_tax_venue. You can type this directly into a Heading, Paragraph, Button, or Image block on the Customise Events Template screen, the same way you’d use event_title or event_location. Or use it as a shortcode:
[eventkoi data=event_tax_venue]
Learn more about shortcodes for custom taxonomies here:
Term archive pages
If Public is turned on, each term automatically gets its own archive page at yoursite.com/venue/prosser-hall/, listing every event assigned to that term. This reuses the same listing style as your calendar archive pages.
Calendar filters
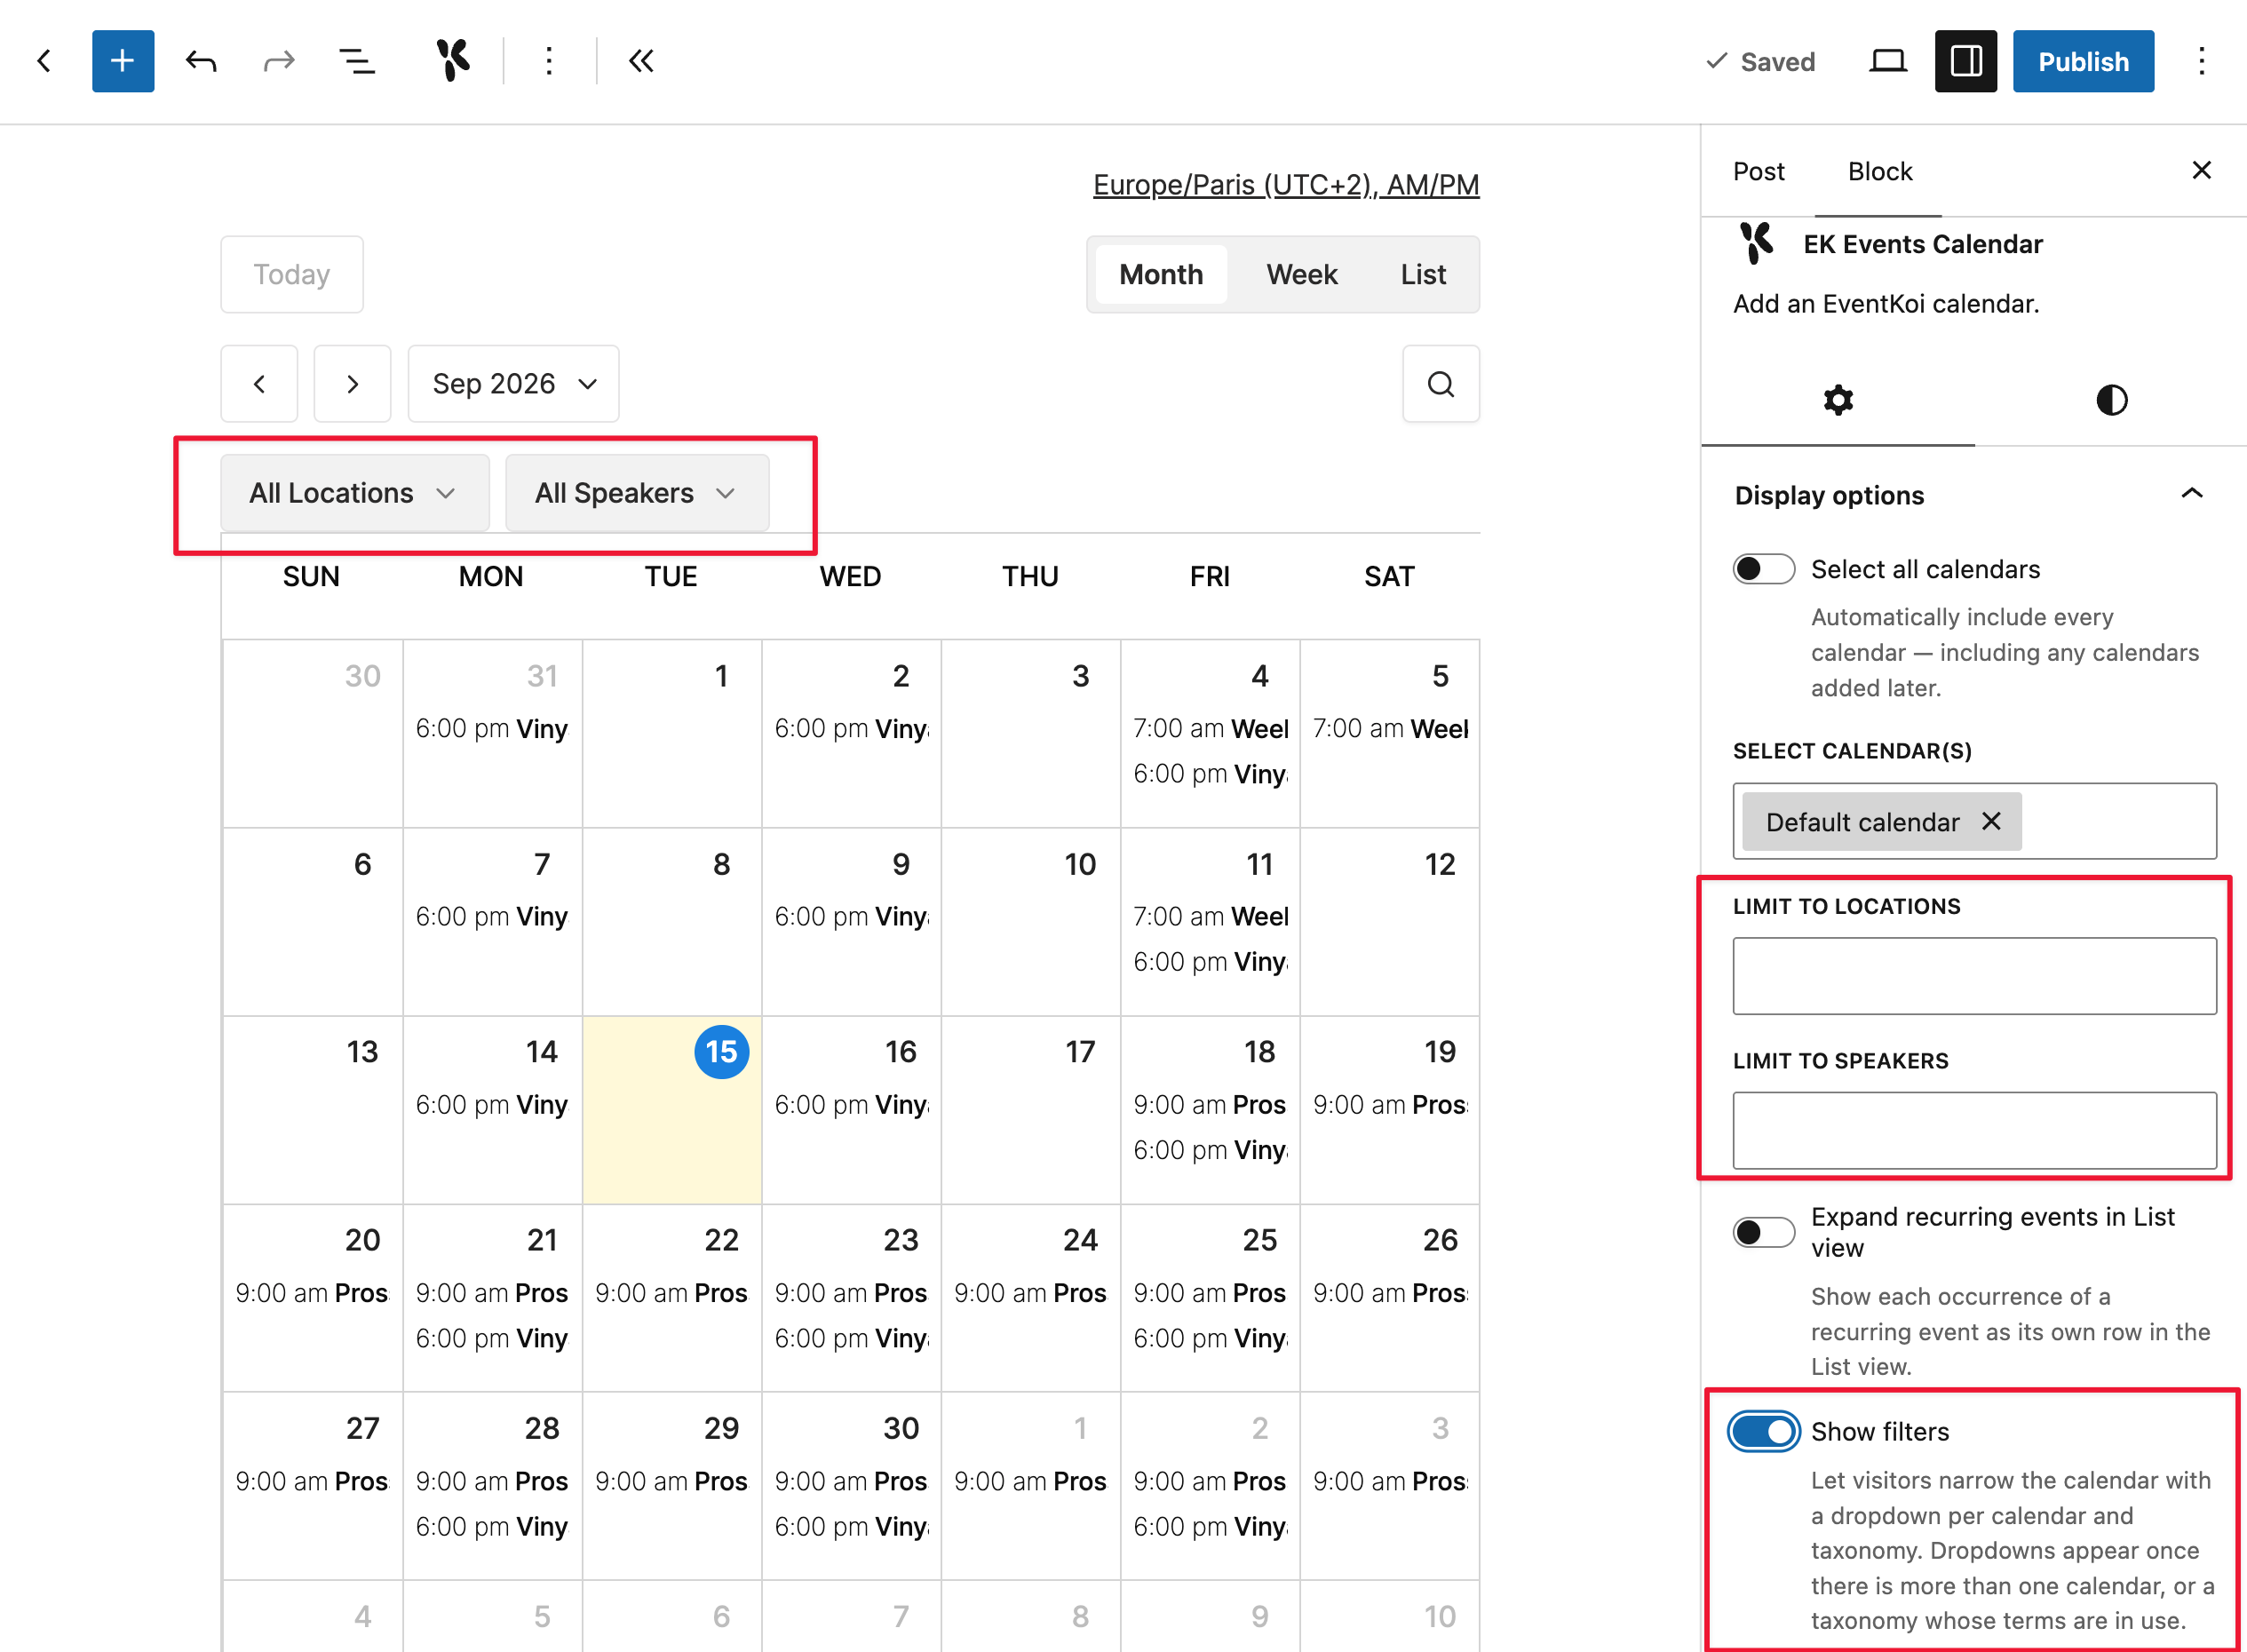
Show filters: To allow visitors to filter events by taxonomy, turn on Show filters in the calendar bloc, or add filter="1" to the calendar shortcode. This adds a dropdown for each calendar and for each taxonomy that has two or more terms currently in use.
Limit to [taxonomy]: You can also limit displayed events based on taxonomies so that visitors will only see events with the terms you’ve chosen. For example, if you have 2 available rooms, Room 1 and Room 2, you can limit the calendar to only display events from Room 1 by using the “Limit to locations” feature.
Page builders: We’re working on this. Custom taxonomy terms are not yet selectable in Elementor’s, Beaver Builder’s, or Bricks’ dynamic tag pickers, so if you’re building a template in one of those page builders, you won’t see your taxonomy’s fields listed alongside EventKoi’s built-in dynamic tags. The meta key and shortcode methods above still work everywhere, including inside page builder text modules; you’ll just need to type them in by hand rather than selecting them from a dropdown.
How to turn a custom taxonomy into reusable locations
Instead of hard coding a locations taxonomy, we wanted to provide a more flexible option by creating a simple way for you to map a custom taxonomy to location data.
Learn more here: